

T&D Lab
How to Automatically Enter Data into Multiple Sheets in a Spreadsheet
Published : September 07, 2026
1. Introduction
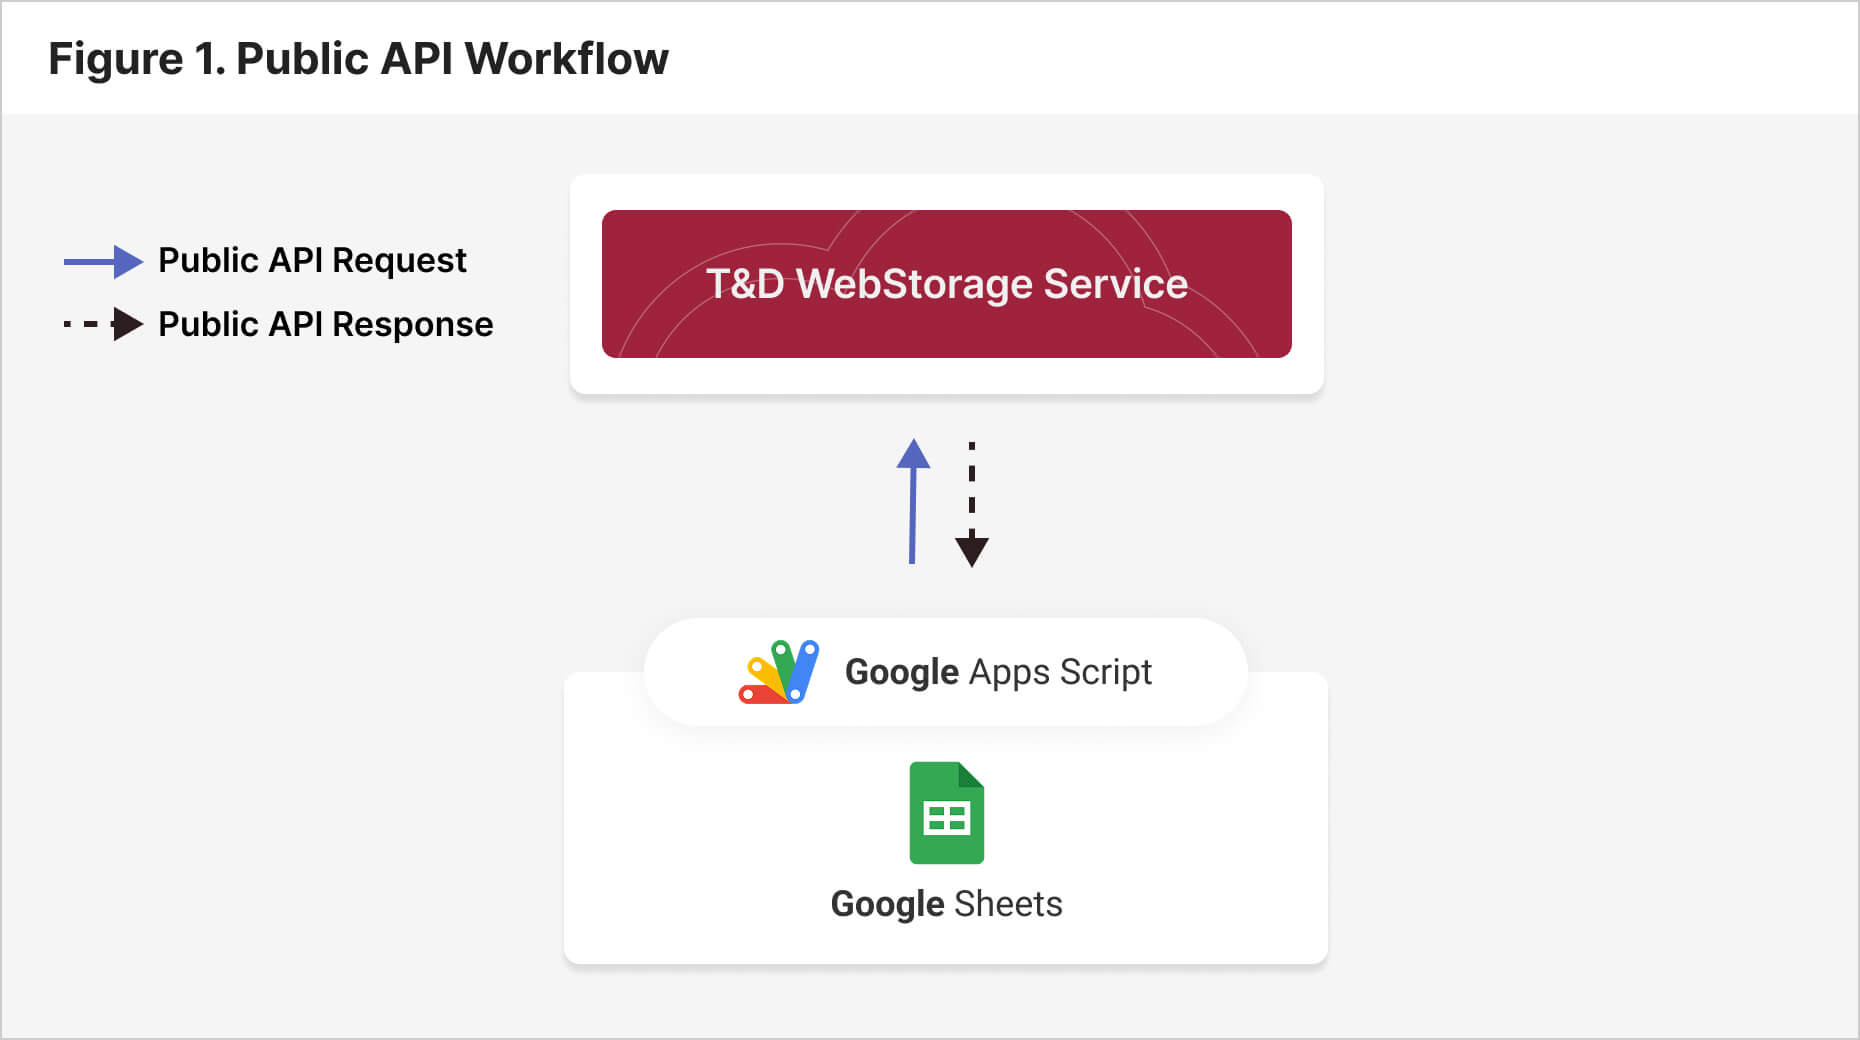
In this article, we will introduce how to specify devices registered in the T&D WebStorage Service using the T&D WebStorage Service API (hereinafter referred to as the Public API) and Google Apps Script (GAS), and automatically enter their data into separate sheets within a spreadsheet.
The sample image below shows an example in which data from an RTR501B is automatically entered into Sheet 1, data from an RTR503B into Sheet 2, and data from an RTR-576 into Sheet 3.
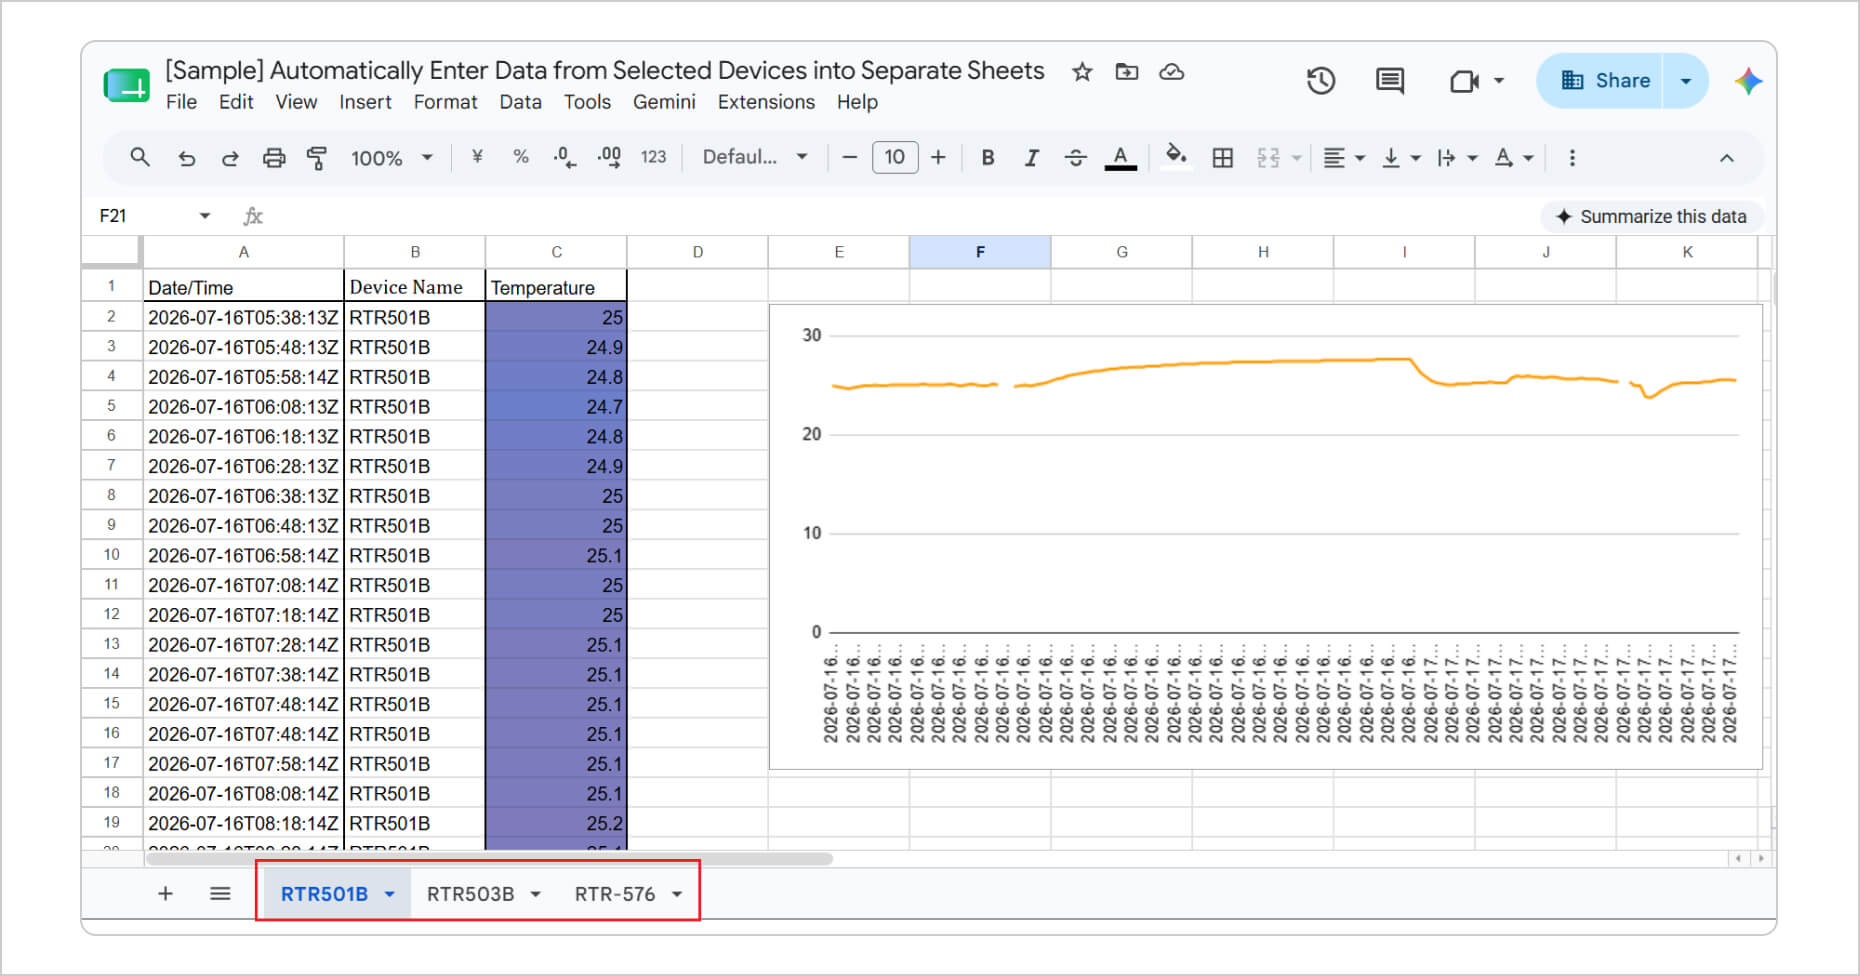
For details about the sample data, please refer to the sample spreadsheet here.
2. Overview
By integrating the Public API with GAS, you can specify the serial numbers of devices registered in the T&D WebStorage Service. Data from the specified devices can then be automatically entered into separate sheets.
3. Prerequisites
• A T&D WebStorage Service account
• A T&D product compatible with T&D WebStorage Service
• A Google Account
If you do not already have a T&D WebStorage Service account, create one here:
https://webstorage-service.com/
4. Issuing a Public API Key
Log in to T&D WebStorage Service and select [Account] > [API Key Management].
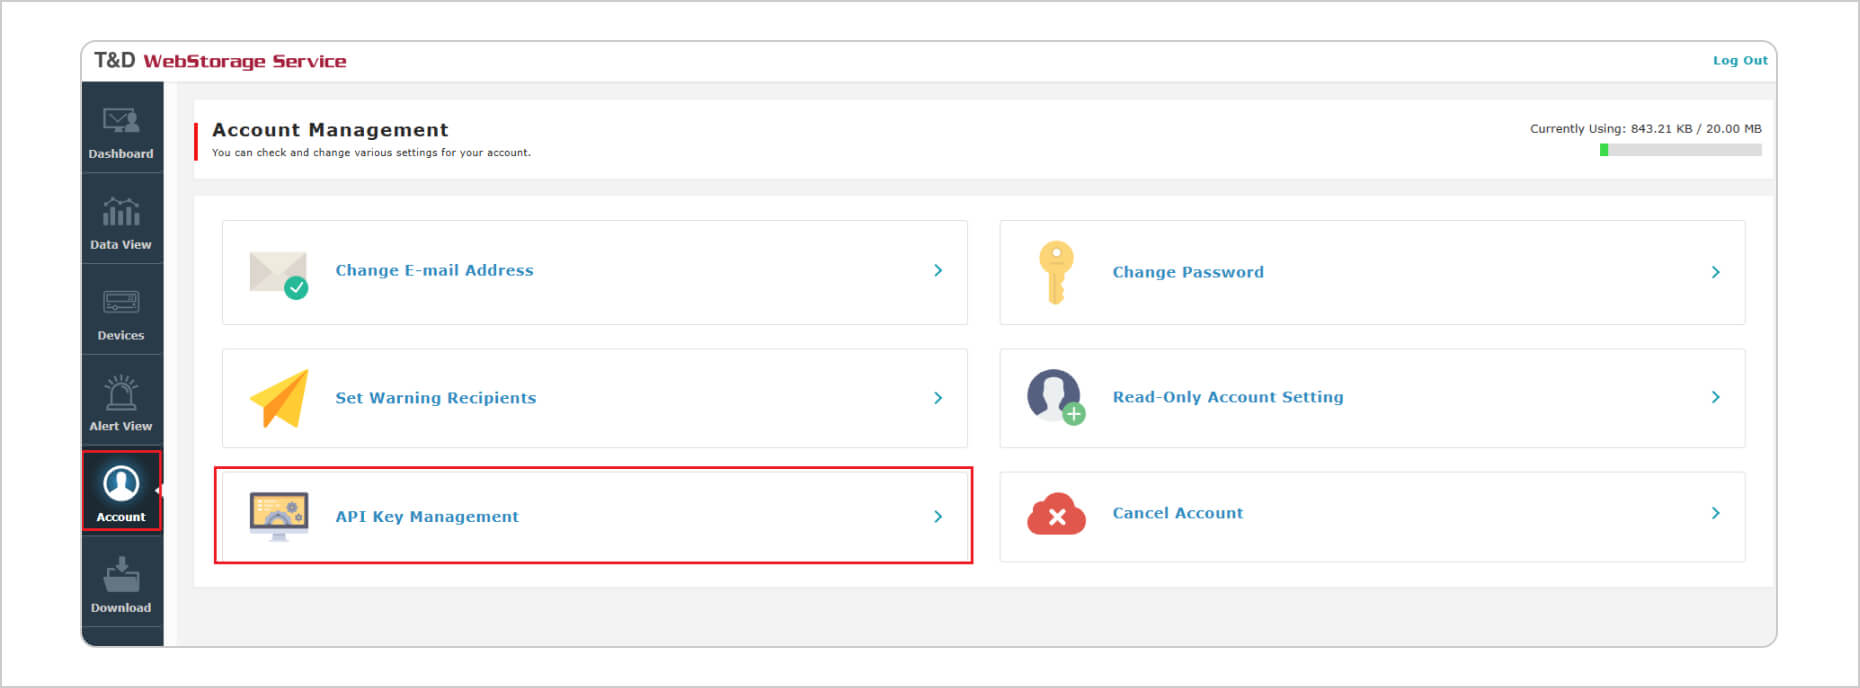
The following steps are only required the first time you issue an API Key. If an API Key has already been issued, you can view it from [Account] > [API Key Management].
1. Click [Get a Key].
2. Confirm that the message "An API key has been issued." is displayed.
3. Go back to Account Management.
4. Select [API Key Management] again.
5. Confirm that your API Key is displayed.
You will use this API Key later in the GAS script.
5. Preparing the Spreadsheet
Open Google Sheets using your Google Account.
In this example, data recorded by the RTR501B, RTR503B, and RTR-576 and uploaded to T&D WebStorage Service will be automatically entered into separate sheets.
First, click the “+” (Add Sheet) icon in the lower-left corner of the spreadsheet to create three sheets.
Use easy-to-identify names, such as device model numbers. In this article, the device model numbers are used as the sheet names.
The sheet names entered here will be used in the Section 6, “Entering the GAS Code.”
Sheet 1 (RTR501B)
• A1: Date/Time
• B1: Device Name
• C1: Temperature
Sheet 2 (RTR503B)
• A1: Date/Time
• B1: Device Name
• C1: Temperature
• D1: Humidity
Sheet 3 (RTR-576)
• A1: Date/Time
• B1: Device Name
• C1: CO₂
• D1: Temperature
• E1: Humidity
The headings above are examples only. You may use any headings that are meaningful for your application.
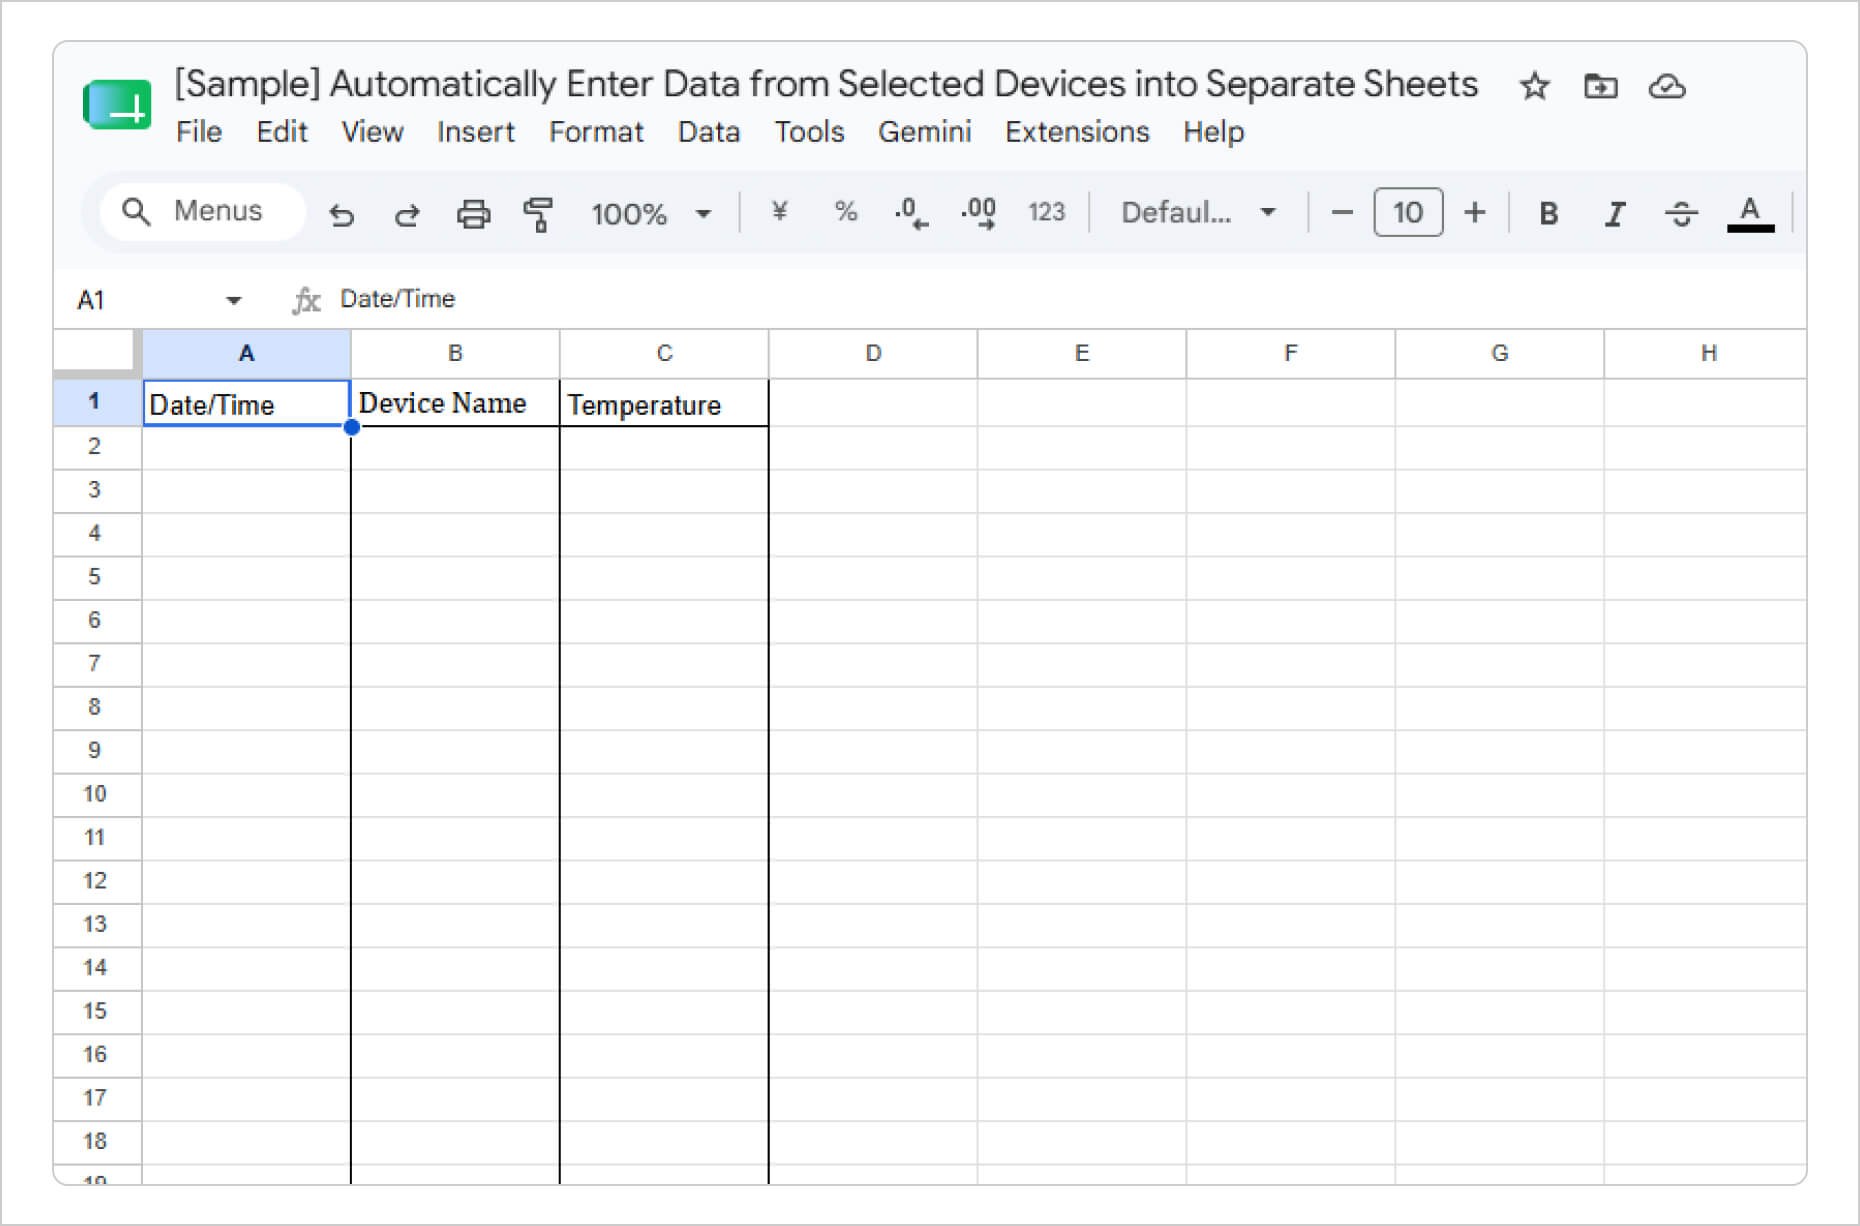
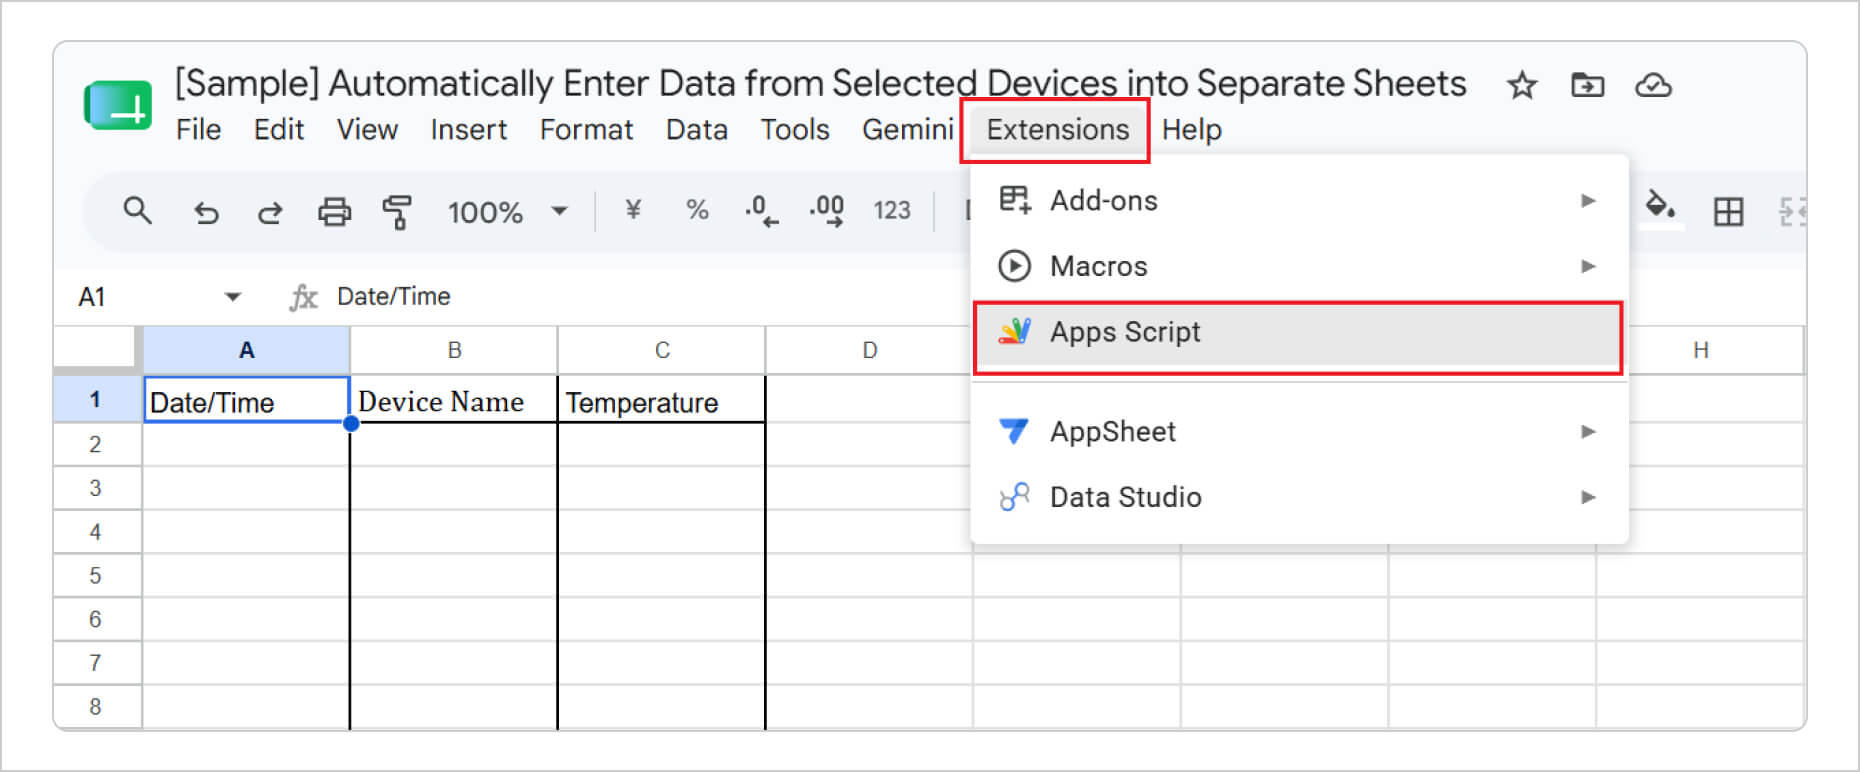
After entering the headings, select Extensions > Apps Script to open the script editor. Then enter the GAS script shown in the next section.
6. Entering the GAS Script
Enter the GAS script using the sample code provided below.
Replace the following items with your own information:
• API Key
• T&D WebStorage Service account ID
• Password
• Device serial numbers
Listing 1
ーーーーーーーーーーーーーーーーーーーーーーーーーーーーーーーーーーーーー
function myFunction() {
//===== Prepare the destination spreadsheet (runs on the spreadsheet containing this GAS script) =====
 var ss = SpreadsheetApp.getActiveSpreadsheet();
 var sheet_501 = ss.getSheetByName('RTR501B');    // Entered sheet name
 var sheet_503 = ss.getSheetByName('RTR503B');    // Entered sheet name
 var sheet_576 = ss.getSheetByName('RTR-576');    // Entered sheet name

 //===== T&D WebStorage Service API endpoint =====
 var api_url    = "https://api.webstorage-service.com/v1/devices/current"; // API for retrieving current readings.

 //===== T&D WebStorage Service account information (replace the Xs with your own account and device information) =====

 var api_key    = "XXXXXXXXXXXXXXXXXXXXXXXXXXXXXXXXXXXXXX";  // API Key issued by T&D WebStorage Service
 var login_id   = "xxxxxxxx";        // T&D WebStorage Service account ID
 var login_pass = "xxxxxxxx";        // T&D WebStorage Service password

 //===== HTTP request headers =====
 var headers = {
   "X-HTTP-Method-Override": "GET",
   "Content-Type": "application/json"
 };

 //===== Create the data payload for the POST request =====
 var payload = {
   "api-key": api_key,
   "login-id": login_id,
   "login-pass": login_pass,
 };

 //===== Configure the POST request options =====
 var options = {
   "method": "post",
   "headers": headers,
   "payload": JSON.stringify(payload) // Convert the payload object to a JSON string.
 };

 var response = UrlFetchApp.fetch(api_url, options);
 var data = JSON.parse(response.getContentText());
 if(response.getResponseCode() == 200){    // Process the data only if the request was successful.
   var devices = data.devices; // Extract device information from the response.
   var sheet = "";
   for (var i = 0; i < devices.length; i++) {   // Loop through each device in the response.
     var device = devices[i]; // Extract one device.
     if(device.serial == "xxxxxxxx"){    // Enter the serial number of your RTR501B.
       sheet = sheet_501;
       var lastRow = sheet.getRange(sheet.getMaxRows(), 1).getNextDataCell(SpreadsheetApp.Direction.UP).getRow()+1;
       sheet.getRange(lastRow, 1).setValue(Utilities.formatDate(new Date( unixtime * 1000 ), "JST", "yyyy/MM/dd HH:mm:ss")); // Convert Unix time to the specified time zone (JST in this example).
       var unixtime = device.unixtime; // Timestamp (Unix time) of the latest measurement from the remote unit.

       // Write the data to the spreadsheet.
       sheet.getRange(lastRow, 1).setValue(Utilities.formatDate(new Date( unixtime * 1000 ), "JST", "yyyy/MM/dd HH:mm:ss")); // Convert Unix time to the specified time zone (JST in this example).
       sheet.getRange(lastRow, 2).setValue(device.name);
       for (var i2 = 0; i2 < device.channel.length; i2++) {
         if(device.channel[i2].num == 1){
           // If the channel number is 1
           sheet.getRange(lastRow, 3).setValue(device.channel[i2].value);
         }
       }

     } else if(device.serial == "xxxxxxxx"){    // Enter the serial number of your RTR503B.
       sheet = sheet_503;
       var lastRow = sheet.getRange(sheet.getMaxRows(), 1).getNextDataCell(SpreadsheetApp.Direction.UP).getRow()+1;
       var unixtime = device.unixtime; // Timestamp (Unix time) of the latest measurement from the remote unit.

       // Write the data to the spreadsheet.
       sheet.getRange(lastRow, 1).setValue(Utilities.formatDate(new Date( unixtime * 1000 ), "JST", "yyyy/MM/dd HH:mm:ss")); // Convert Unix time to the specified time zone (JST in this example).
       sheet.getRange(lastRow, 2).setValue(device.name);
       for (var i2 = 0; i2 < device.channel.length; i2++) {
         if(device.channel[i2].num == 1){
           // If the channel number is 1
           sheet.getRange(lastRow, 3).setValue(device.channel[i2].value);
         } else if(device.channel[i2].num == 2){
           // If the channel number is 2
           sheet.getRange(lastRow, 4).setValue(device.channel[i2].value);
         }
       }

     } else if(device.serial == "xxxxxxxx"){    // Enter the serial number of your RTR-576.
       sheet = sheet_576;
       var lastRow = sheet.getRange(sheet.getMaxRows(), 1).getNextDataCell(SpreadsheetApp.Direction.UP).getRow()+1;
       var unixtime = device.unixtime; // Timestamp (Unix time) of the latest measurement from the remote unit.

       // Write the data to the spreadsheet.
       sheet.getRange(lastRow, 1).setValue(Utilities.formatDate(new Date( unixtime * 1000 ), "JST", "yyyy/MM/dd HH:mm:ss")); // Convert Unix time to the specified time zone (JST in this example).
       sheet.getRange(lastRow, 2).setValue(device.name);
       for (var i2 = 0; i2 < device.channel.length; i2++) {
         if(device.channel[i2].num == 1){
           // If the channel number is 1
           sheet.getRange(lastRow, 3).setValue(device.channel[i2].value);
         } else if(device.channel[i2].num == 2){
           // If the channel number is 2
           sheet.getRange(lastRow, 4).setValue(device.channel[i2].value);
         } else if(device.channel[i2].num == 3){
           // If the channel number is 3
           sheet.getRange(lastRow, 5).setValue(device.channel[i2].value);
         }
       }
     }
   }
 }
}
ーーーーーーーーーーーーーーーーーーーーーーーーーーーーーーーーーーーーー
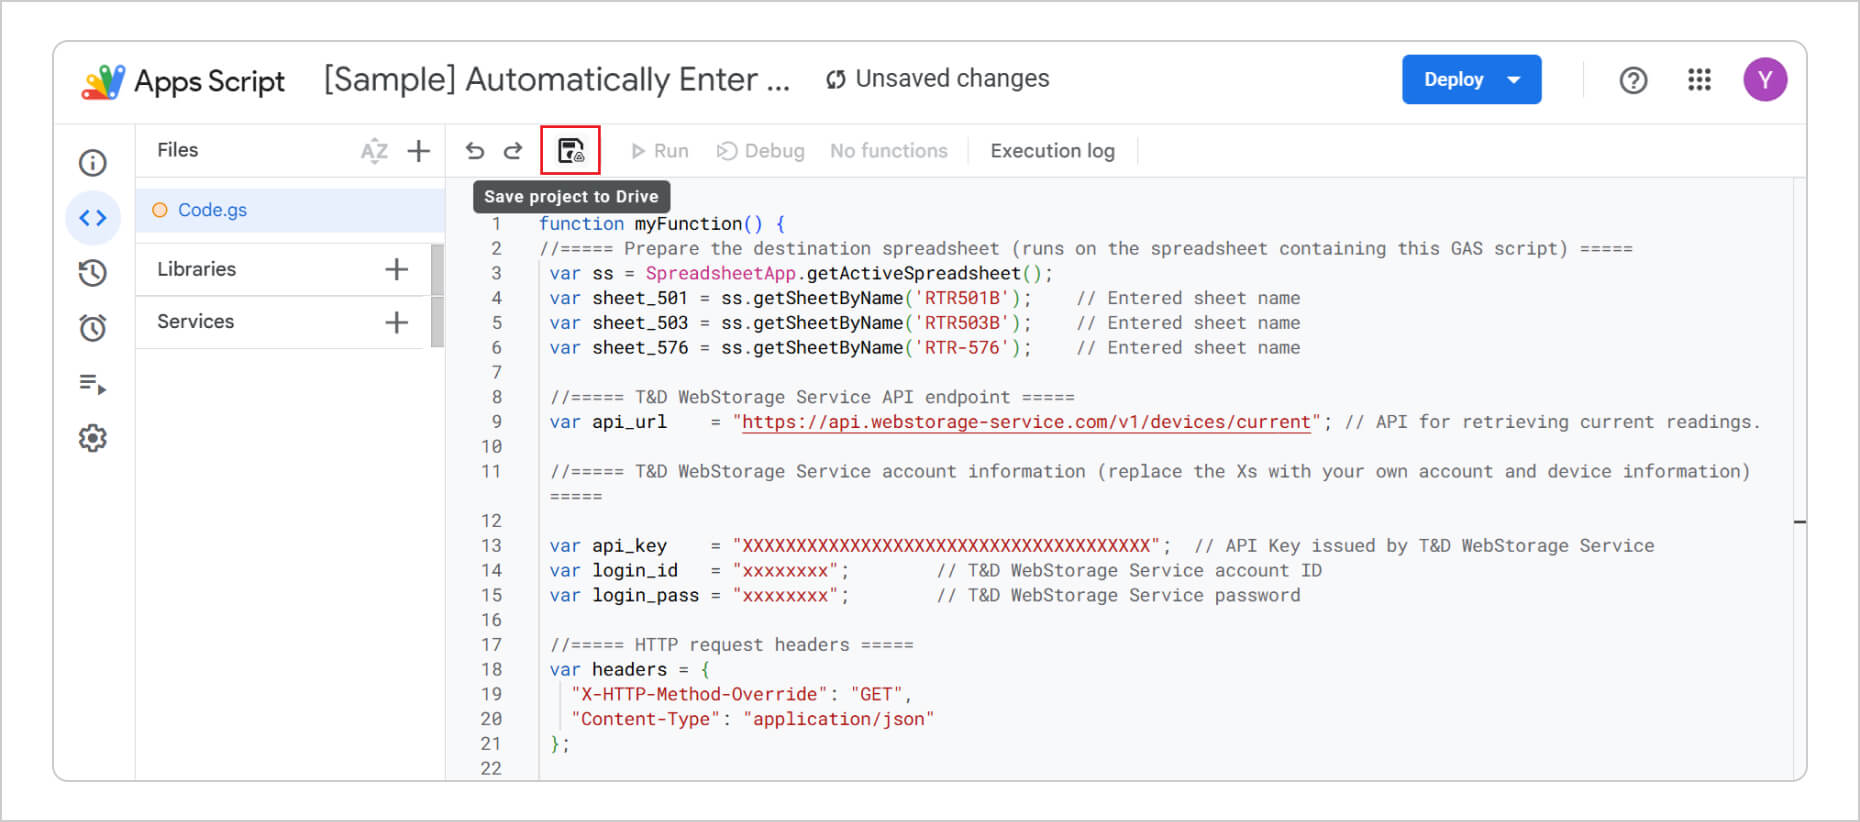
After entering the script, select Save project to Drive.
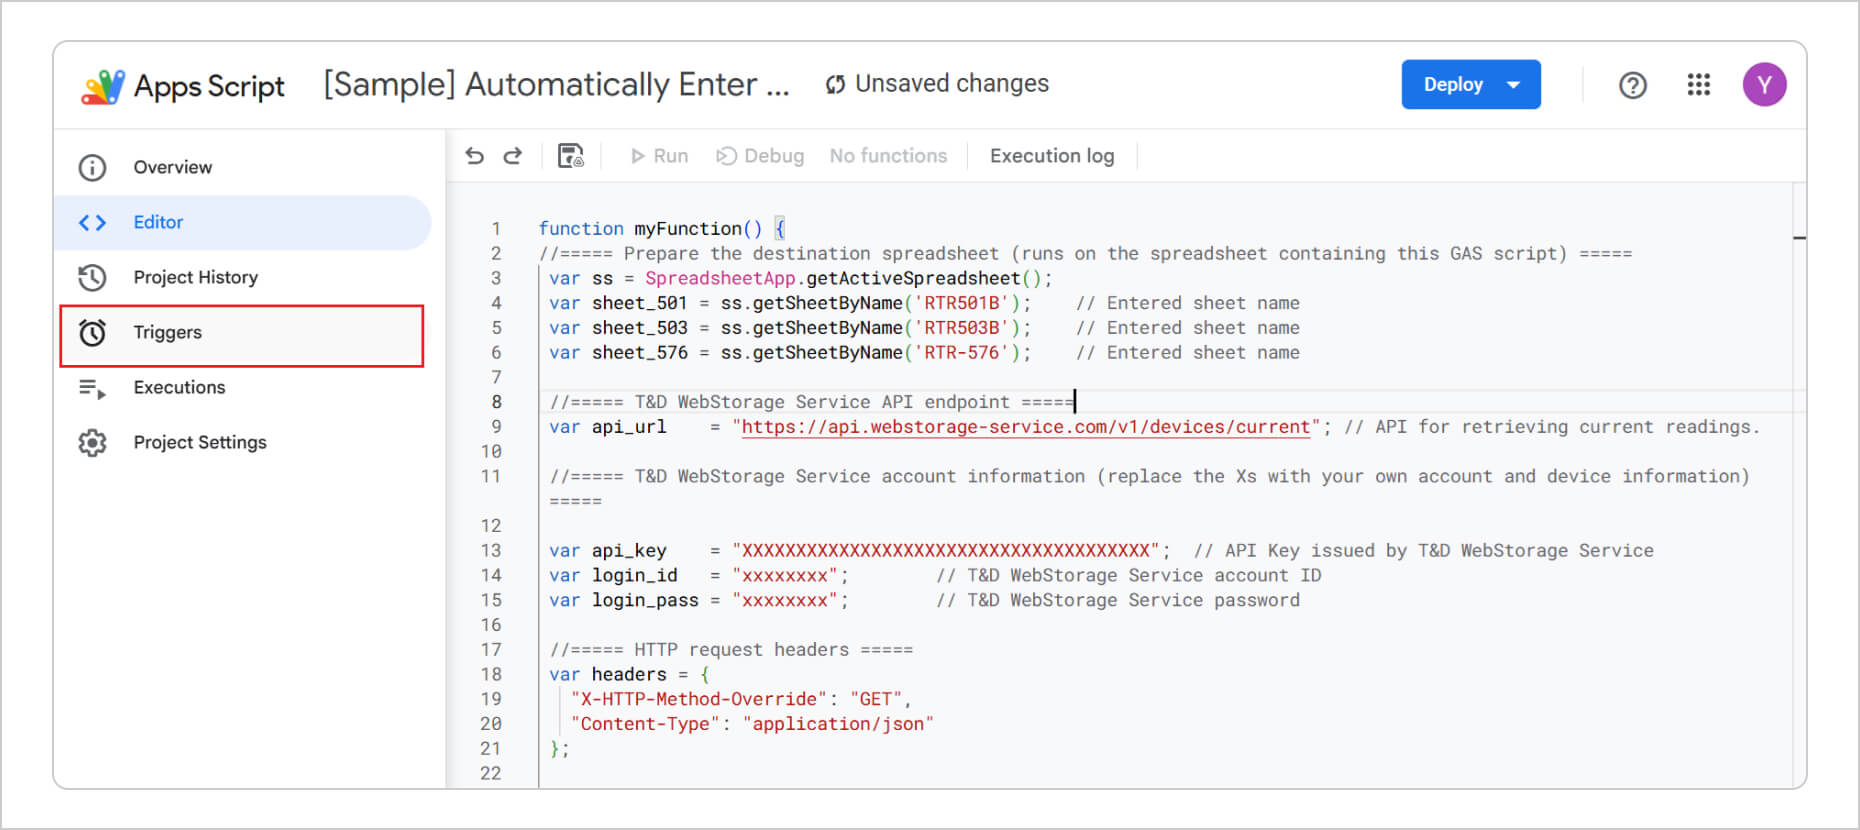
Next, select Triggers from the left-hand panel to open the trigger settings screen.
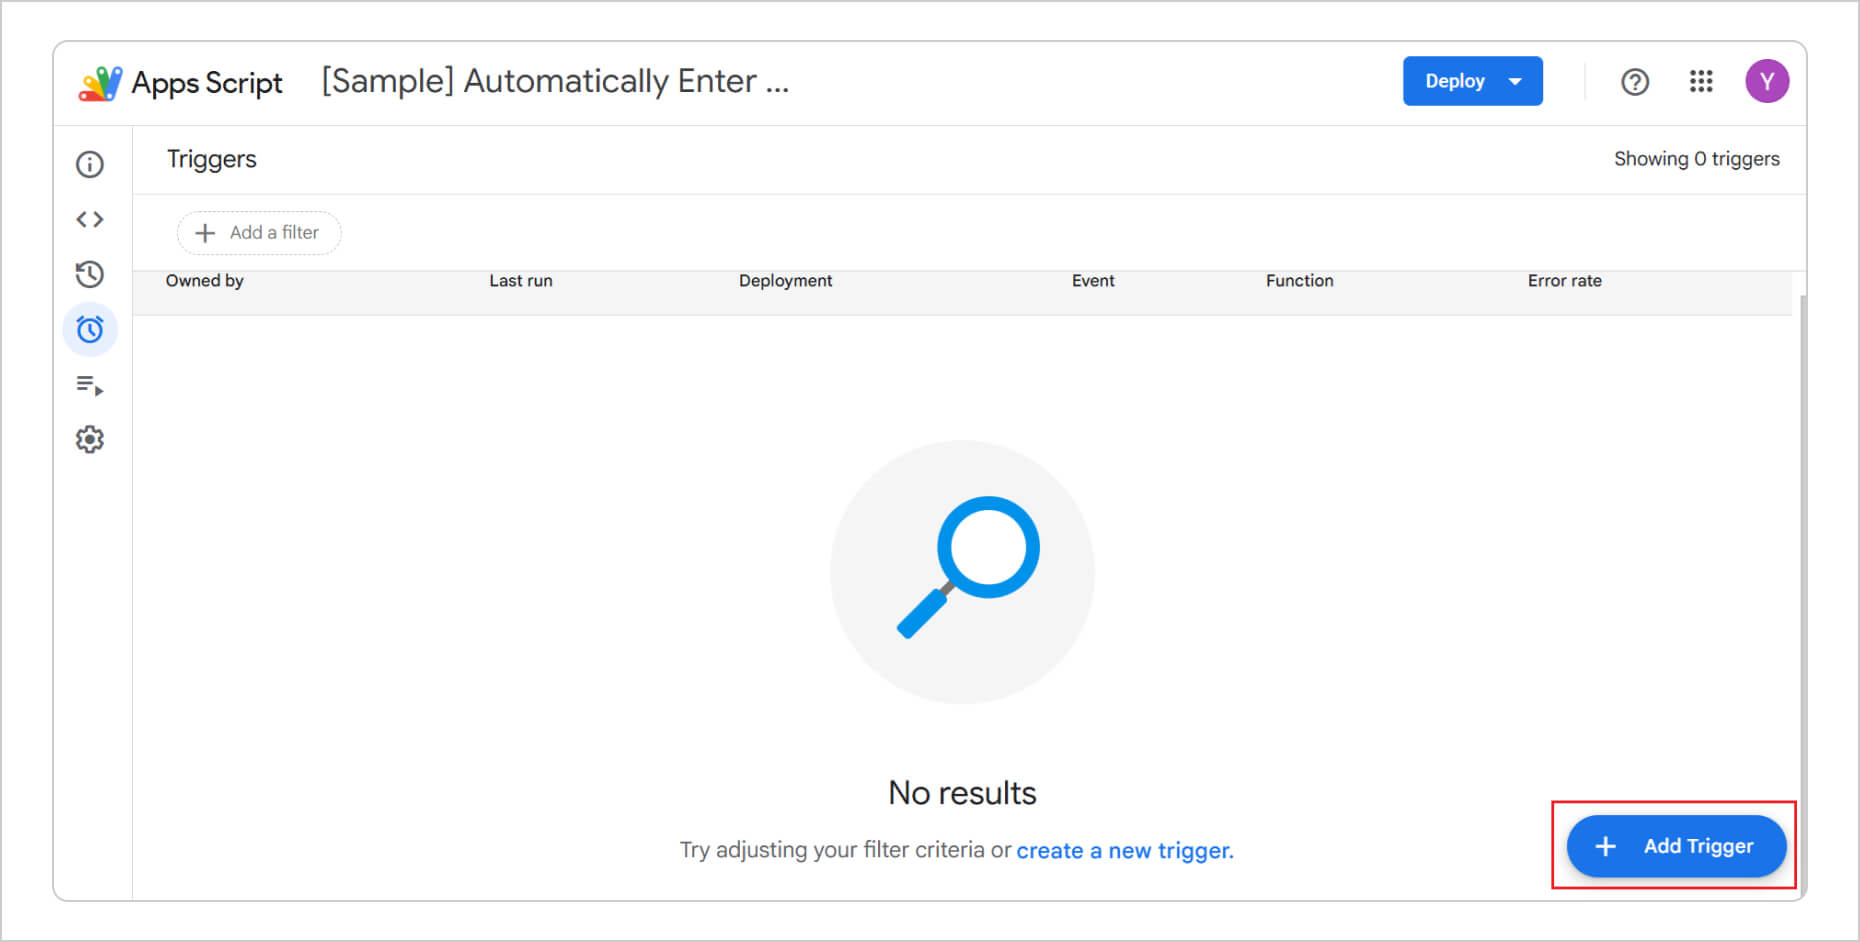
Select Add Trigger in the lower-right corner of the screen.
Configure the trigger settings, then select Save. In this example, the current reading transmission interval of the RTR500BW Base Unit is set to 10 minutes, so the trigger is configured to run every 10 minutes. (*1)
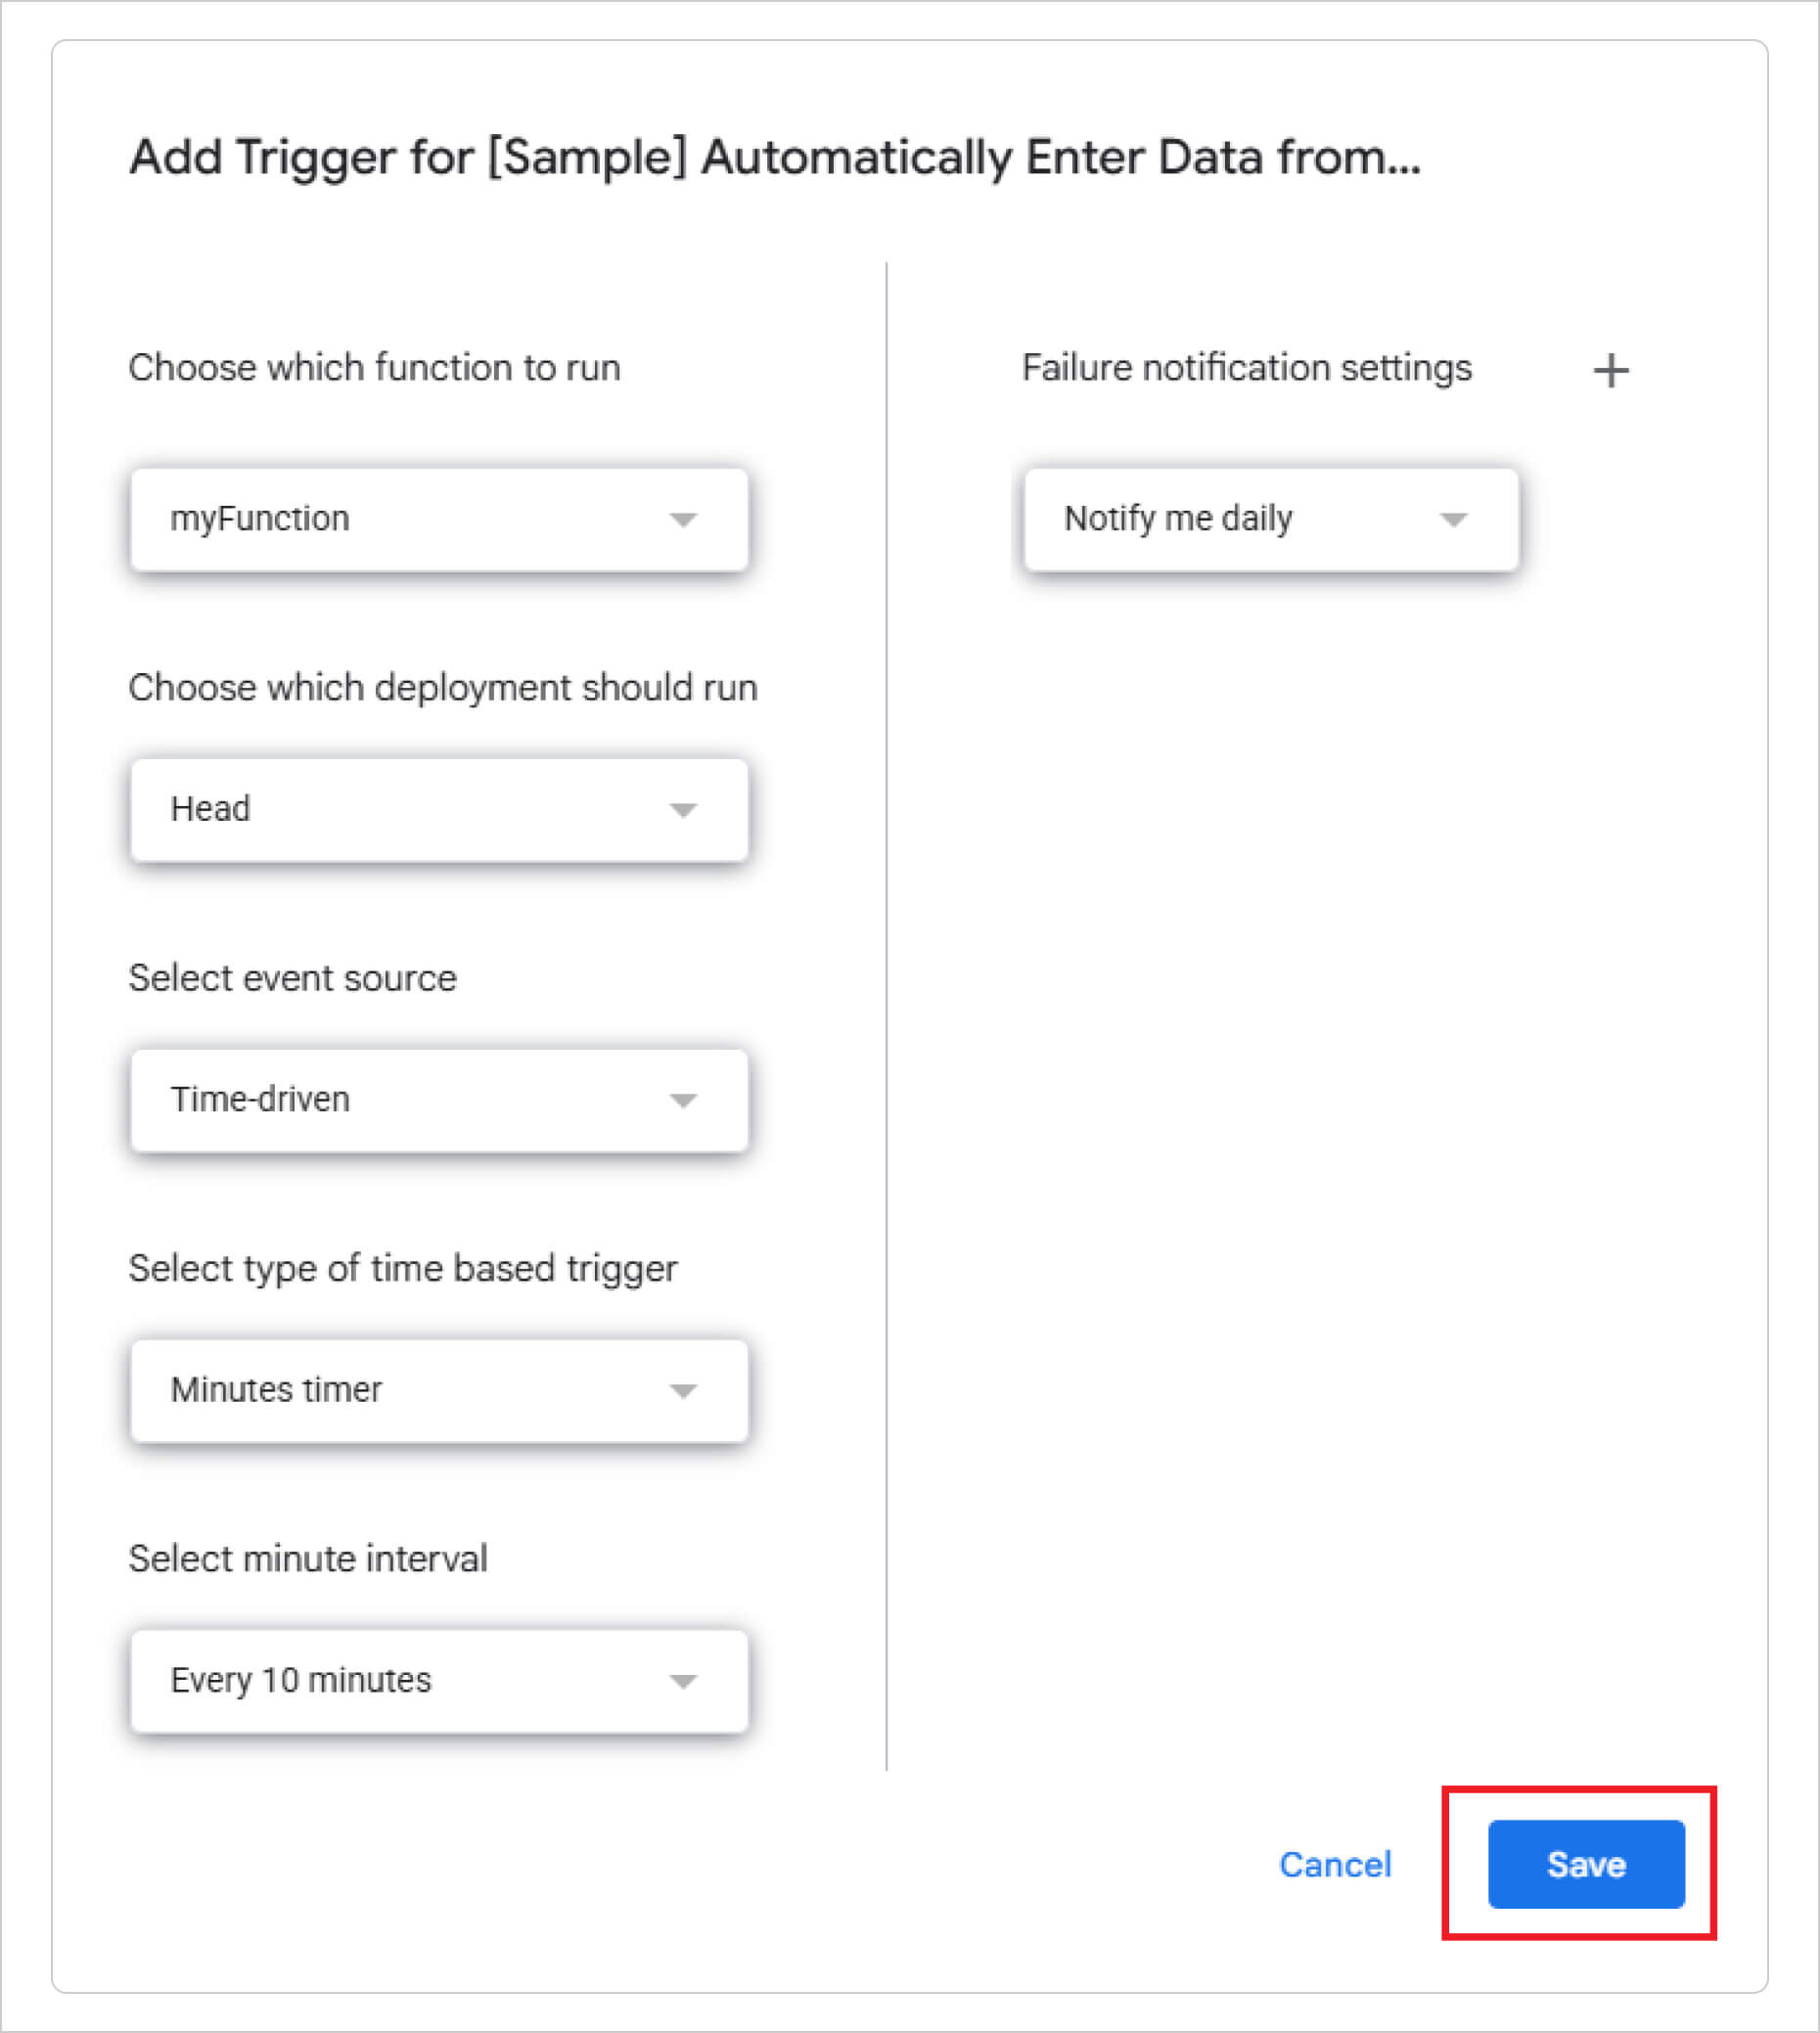
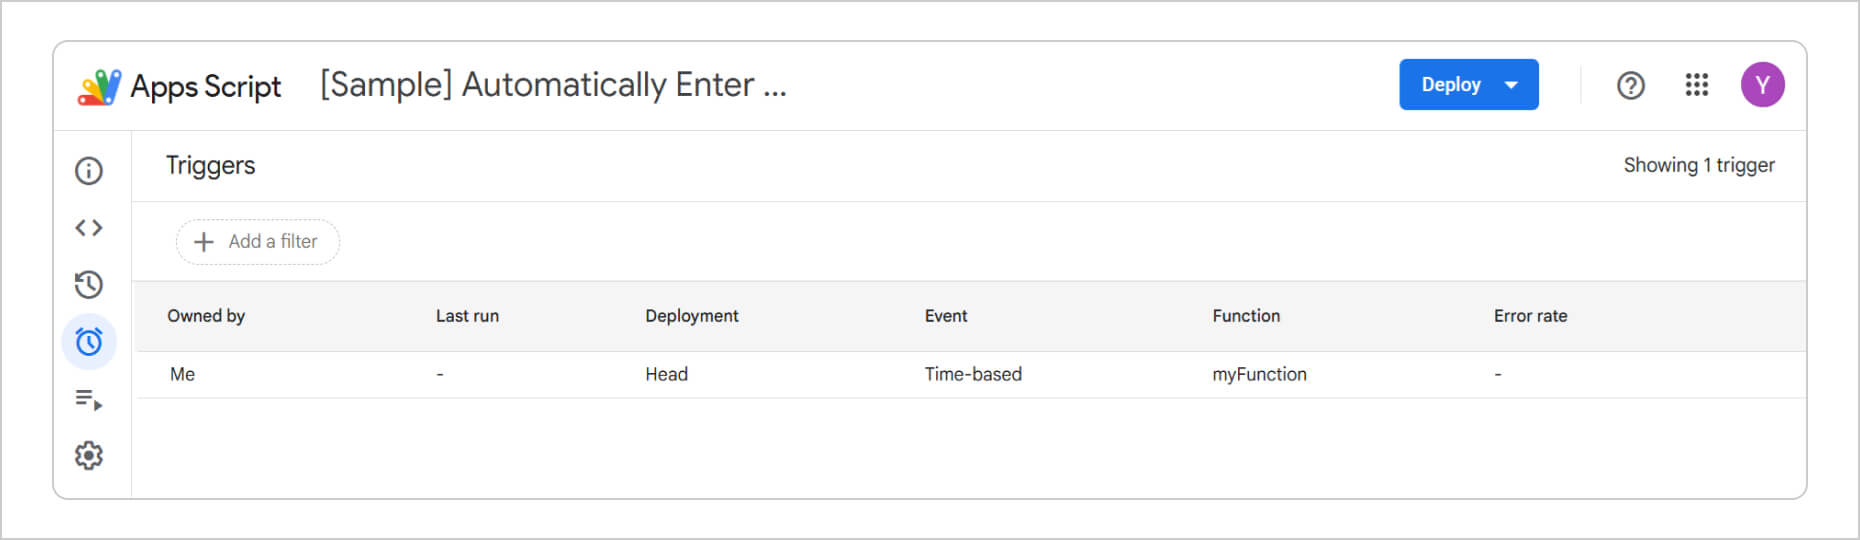
After saving, the configured trigger settings will be applied.
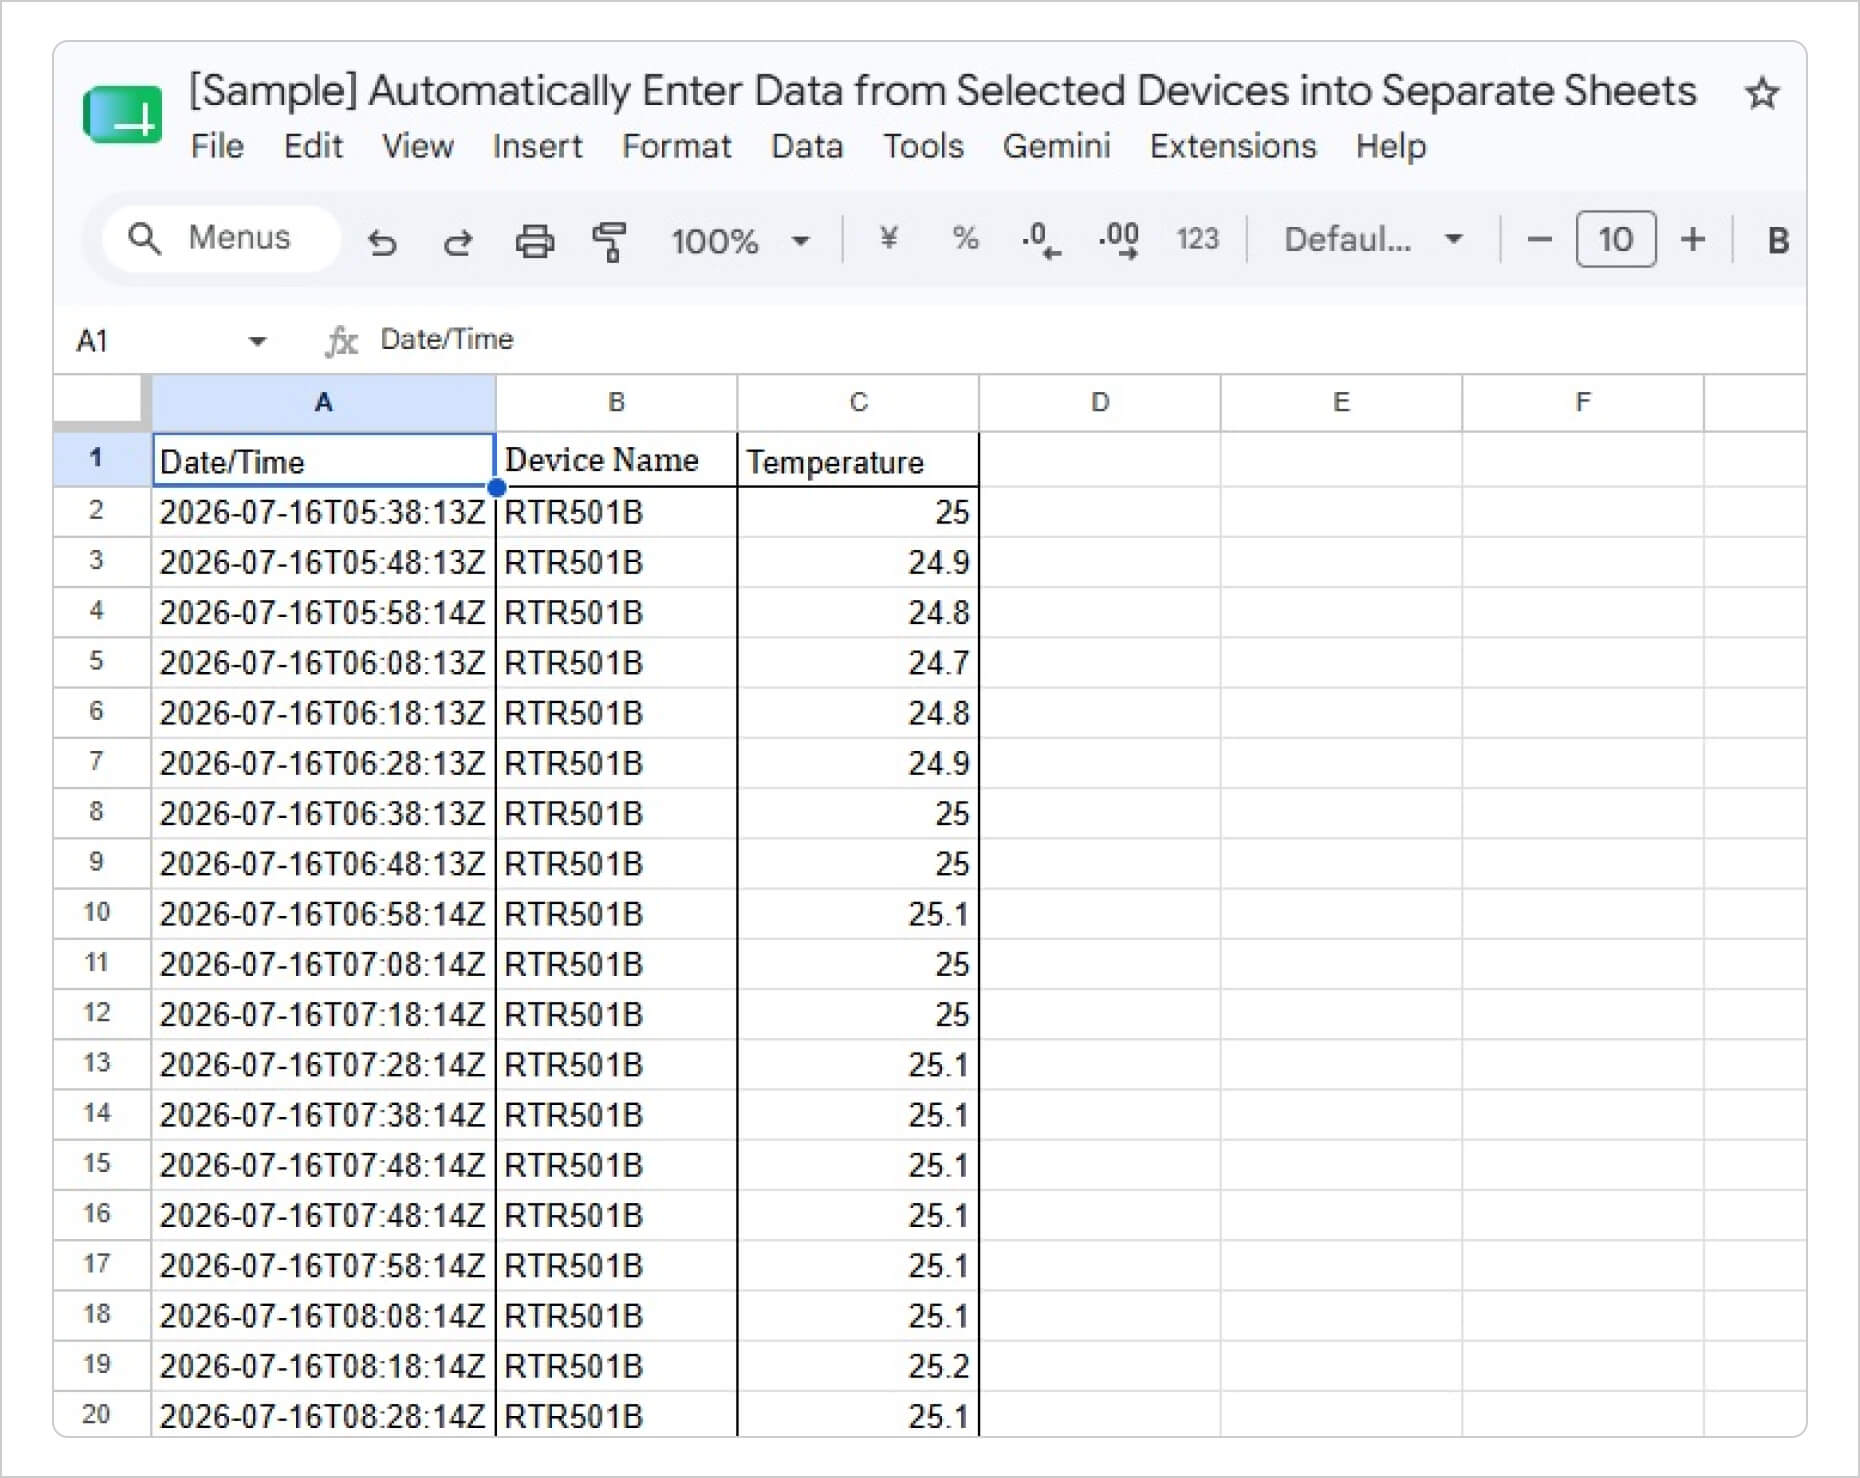
Return to the spreadsheet, and the data will begin to populate automatically. (*2)
(*1) API requests are subject to rate limits. For details, refer to "Get Current Readings" in the API documentation:
https://www.webstorage-service.com/docs/api/reference/devices_device.html
(*2) New cells are added automatically as data is imported. However, a workbook can contain a maximum of 10,000,000 cells. Before reaching this limit, save or delete data as appropriate.
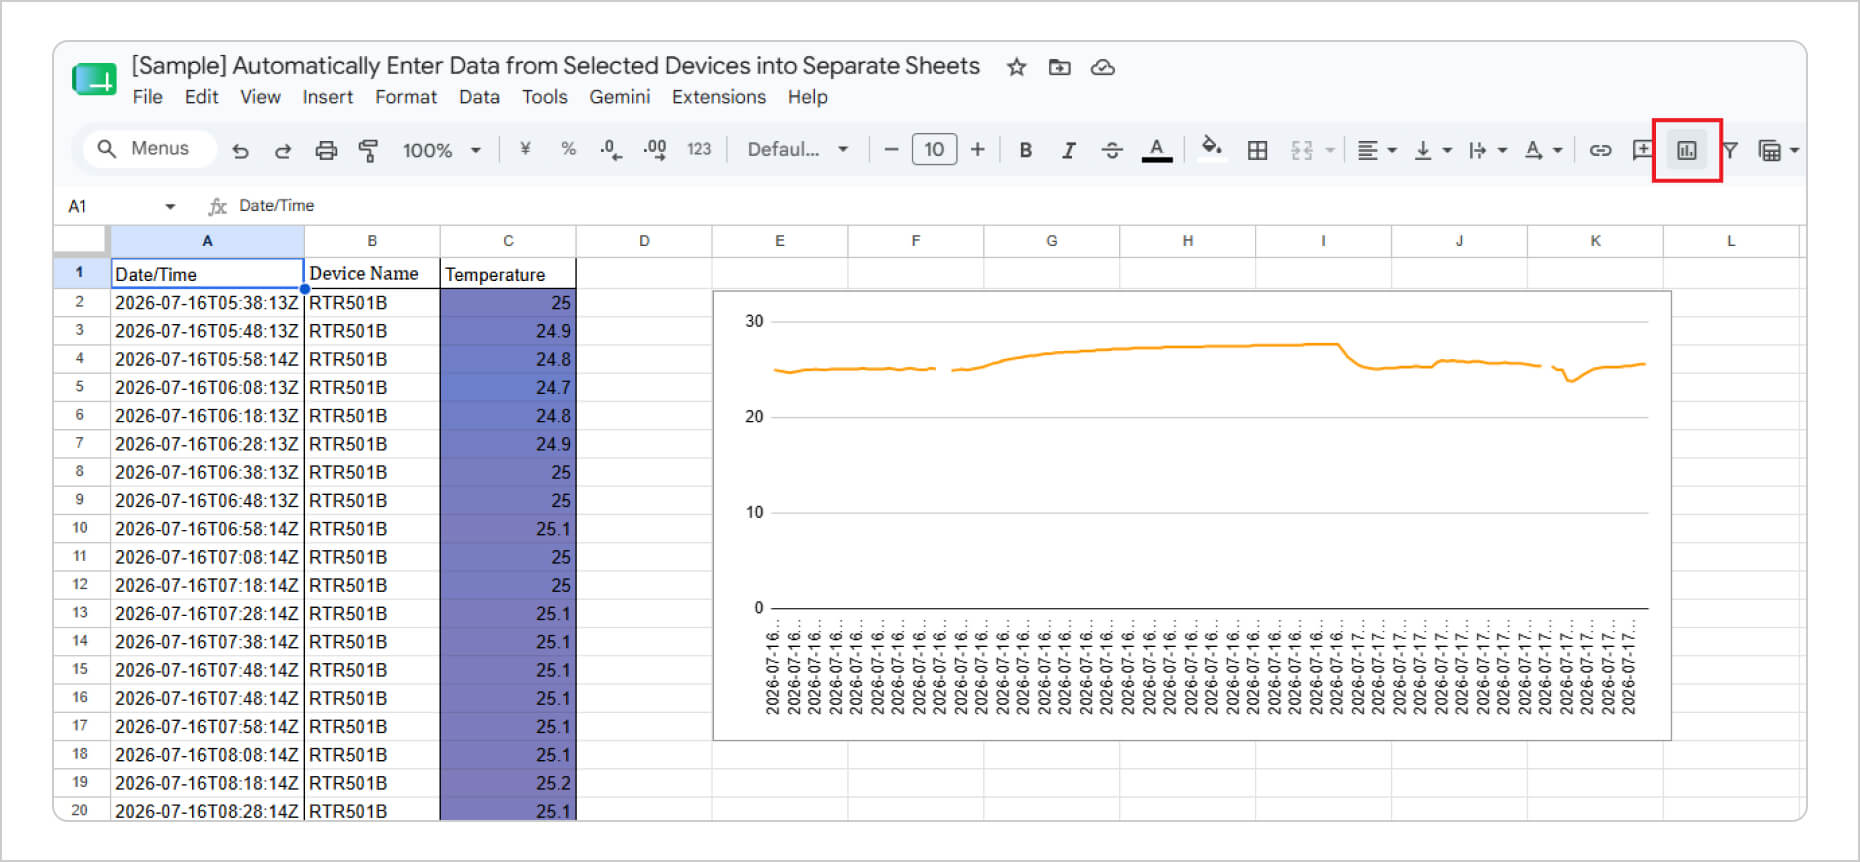
7. Setting Up the Color Scale
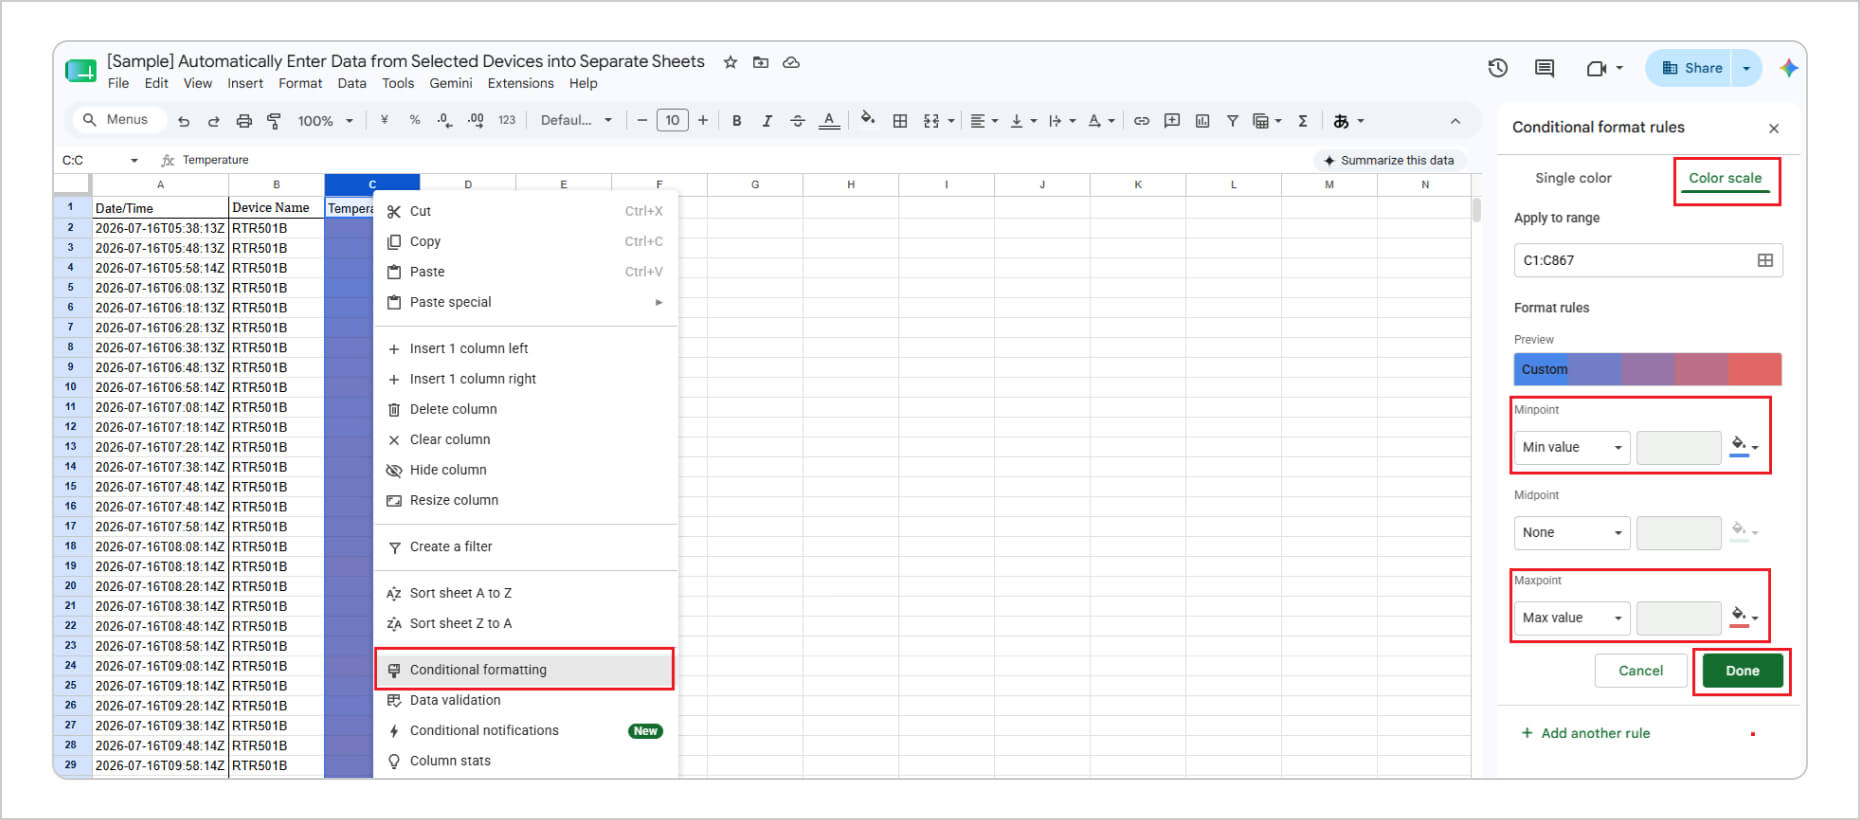
To apply color coding similar to the sample:
1. Select the column to be color-coded.
2. Right-click and select Conditional formatting.
3. Under Conditional format rules, select Color scale.
4. Set the desired colors for the Min value and Max value.
5. Select Done.
8. Creating a Graph
Select the data column you want to graph, then click Insert chart on the toolbar.
Configure the horizontal and vertical axis titles as needed.
For detailed instructions on creating and customizing charts, refer to the Google Help page here.
9. Sharing the Spreadsheet
When sharing the spreadsheet, configure the sharing permissions so that other users cannot access the Apps Script. For more information about sharing settings, refer to Google's Help page here.
10. Conclusion
In this article, we introduced a method for automatically entering data from specified devices into separate sheets within a spreadsheet.
If many devices require automatic data entry, organizing the data into separate sheets can make it easier to review.
If separate sheets are not required, you can instead use the method introduced in the article, "How to Automatically Enter Data and Calculate Indoor WBGT in a Spreadsheet."
Choose the method that best fits the number of devices and your monitoring needs.
Disclaimer
The script introduced in this article is provided as a reference example. Operation is not guaranteed in all environments or under all conditions.
T&D Corporation assumes no responsibility for any loss, damage, or other consequences resulting from the use of the information provided in this article or from executing the script.