RTR500B Series FAQs
Frequently Asked Questions by Topic
- Where can I check the Registration Code for my RTR500BW/500BM?
-
Supplied Code Label
You can find the code on the registration code label that came with the product.Mobile App "T&D 500B Utility"
You can find the device info by opening [Nearby Devices] - [Base Unit Settings] - [System].Software "RTR500BW for Windows" or "RTR500BM for Windows"
You can find the info in [Settings Utility] - [Settings Table] - [Base Unit Settings].- Please be careful not to let a third party know your registration code. The registration code cannot be changed or reissued.
- The computer does not seem to recognize the device connected by USB, why not?
-
If your device is not recognized after installing the Windows software and using it for the first time, go to the Start Menu and click on [Help for Unit Recognition Failure]. Here you can check if the USB device driver has been properly installed.
NoteBy opening [Help for Unit Recognition Failure] you will find explanations about a shortcut button to open the device manager and instructions about how to re-install the USB device driver.
If your computer stops recognizing your device while it is in use, check and/or try the following.
Base Unit / Repeater / Remote Unit:
- Make sure the USB device (Base Unit, Repeater or Remote Unit RTR-574/576) is properly connected to the computer with the supplied USB cable.
- Make sure there is only one device of each type (Base, Repeater, Remote) connected at any one time.
- For optical communication devices (RTR501B/502B/503B/505B/507B, RTR-501/502/503/505/507S), make sure the unit is placed on the USB-connected Base Unit correctly.
(Align the optical communication area of the Remote Unit and Base Unit.) - Make sure there is sufficient battery power remaining in the Remote Unit.
(Low battery will cause a communication error.)
Computer:
- Connect a different USB device (mouse, digital camera, etc...) to your computer and see if it operates properly.
- If your computer has more than one USB port, try connecting the Base or Remote Unit USB cable to a different port.
- If you have more than one computer, try connecting to it with the same cable and device.
- Can the RTR500B Series be used in any country in the world?
-
The RTR500B Series is designed to comply with the following wireless certification requirements and must not be used in regions where different wireless standards are enforced.
- US Model: FCC (USA), ISED (Canada)
- EU Model: CE (EU), UKCA (Great Britain)
US model and EU model cannot be used together because they have different wireless specifications.
For more details please contact your local distributor before purchase.
- I want to use outdoors; are the devices waterproof?
-
The body is waterproofed and can withstand rain to some extent. But water may get inside the body during sudden temperature changes such as when it begins raining and the body has been warmed by sunlight.
When using it outdoors, regardless of whether it is waterproof or not, we strongly recommended devices be put into protective cases from which cables and sensors can pass through and measures be taken to prevent water and dust from entering the device.Waterproof resistance is as follows for various devices:
RTR501B, RTR-501: IP67 (Immersion Proof)
RTR502B, RTR-502: IP64 (splash proof / rated for use in daily life)
RTR503B/505B/507B, RTR-503/505/507: IP64 (splash proof / rated for use in daily life)
The input modules and temperature-humidity sensor are not water resistant.
Base Units, RTR-574/576: Non-waterproof
- When and how should I update the firmware?
-
When a firmware update is announced on our website, we will push notify users via RTR500B Series Windows software and the smartphone app.
Firmware updates are done to fix malfunctions and add new functionality, and we highly suggest that you always keep the firmware and the Windows software / Smartphone apps up to date.IMPORTANT- Firmware updates require that the device be connected via USB to a PC.
- During the update, the downloading of recorded data and warning monitoring will be temporarily suspended.
- If there is a blackout or other loss of power, are the settings still saved in the RTR500BW / 500BM?
-
If there is a loss of power including from a blackout or running out of batteries, all settings, addresses and registration info are saved.
However, if [Clock Settings] - [Auto-Adjustment] is set to OFF, the clock will be reset and you will need to set the time after the power is restored.
Devices that are set to ON are automatically corrected.
- Is it okay to change the batteries while the RTR500BM is in operation?
-
If the unit is connected to an AC adaptor or some other external power source, it is possible to change the batteries.
If the unit is running only on battery power, first turn the operation switch to the STBY position and then change the batteries.NoteIf the timing of an auto-transmission is during a battery replacement, the data in the initial data transmission range* will still be sent after the device being restarted by moving the operations switch to Run.
For details see:
[RTR500BM for Windows] - [Recorded Data Transmission Settings]
[T&D 500B Utility Mobile App] - [Sending Recorded Data]
- How long is the battery life of the RTR500BM if it is used only with batteries?
-
About 2 days under the following conditions: only one Remote Unit and no Repeaters, downloading data once a day, sending current readings at 10-min interval
When [Battery Warning] is checked in the Condition for Warning Output (Contact Output), the low battery warning on the Base Unit/Remote Unit and power failure/insufficient power supply voltage of the external power supply connected to the Base Unit will be monitored.
For details about the setting, see RTR500BM for Windows - [Current Readings / Warning Settings]NoteBattery life depends on factors such as number of warning reports sent, ambient temperature, radio environment, frequency of communication, and quality of the battery being used.
- Where can I check the Registration Code for my RTR500BW/500BM?
-
Supplied Code Label
You can find the code on the registration code label that came with the product.Mobile App "T&D 500B Utility"
You can find the device info by opening [Nearby Devices] - [Base Unit Settings] - [System].Software "RTR500BW for Windows" or "RTR500BM for Windows"
You can find the info in [Settings Utility] - [Settings Table] - [Base Unit Settings].- Please be careful not to let a third party know your registration code. The registration code cannot be changed or reissued.
- The computer does not seem to recognize the device connected by USB, why not?
-
If your device is not recognized after installing the Windows software and using it for the first time, go to the Start Menu and click on [Help for Unit Recognition Failure]. Here you can check if the USB device driver has been properly installed.
NoteBy opening [Help for Unit Recognition Failure] you will find explanations about a shortcut button to open the device manager and instructions about how to re-install the USB device driver.
If your computer stops recognizing your device while it is in use, check and/or try the following.
Base Unit / Repeater / Remote Unit:
- Make sure the USB device (Base Unit, Repeater or Remote Unit RTR-574/576) is properly connected to the computer with the supplied USB cable.
- Make sure there is only one device of each type (Base, Repeater, Remote) connected at any one time.
- For optical communication devices (RTR501B/502B/503B/505B/507B, RTR-501/502/503/505/507S), make sure the unit is placed on the USB-connected Base Unit correctly.
(Align the optical communication area of the Remote Unit and Base Unit.) - Make sure there is sufficient battery power remaining in the Remote Unit.
(Low battery will cause a communication error.)
Computer:
- Connect a different USB device (mouse, digital camera, etc...) to your computer and see if it operates properly.
- If your computer has more than one USB port, try connecting the Base or Remote Unit USB cable to a different port.
- If you have more than one computer, try connecting to it with the same cable and device.
- If there is a blackout or other loss of power, are the settings still saved in the RTR500BW / 500BM?
-
If there is a loss of power including from a blackout or running out of batteries, all settings, addresses and registration info are saved.
However, if [Clock Settings] - [Auto-Adjustment] is set to OFF, the clock will be reset and you will need to set the time after the power is restored.
Devices that are set to ON are automatically corrected.
- The Transmission Test ends in failure, why?
-
Check and/or try the following.
Basic Items to be Checked:
- Make sure the RTR500BW is connected to a network (check the LED display)
- Check to make sure there are no physical problems such as a disconnected LAN cable, trouble with the HUB, the router or the wireless LAN access point.
- In the transmission test screen are there any parts in red (improper setting)?
- Are there any entry mistakes in [Network Settings]?
If the transmission method has been set to "HTTP" please check the following:
- Make sure all entries in [HTTP Settings] are correct.
- Does your network environment require a proxy?
(Communication via proxy server is not supported.)
If the transmission method has been set to "FTP" please check the following:
- Are there any entry mistakes in [FTP settings]?
- Is communication possible using the same settings with FTP client software?
- Is FTP communication blocked by firewall settings in the router?
If you can't solve this problem after checking the above, contact your provider or HTTP(S)/ FTP Server administrator.
If after checking all of the above and making any necessary changes there is still no improvement, please contact your local distributor.
- How should I make IP address and subnet mask settings?
-
The IP address and subnet mask settings vary depending upon your networking environment (structure).
Please contact your network administrator.Example: When the subnet mask for the PC connected to the LAN is "255.255.255.0" and the IP address is "192.168.100.1"
The subnet mask should be set the same as the PC: "255.255.255.0"
The IP address should be set to 192.168.100.***.- Make sure to set the last three digits,***, to a number between 2-254 that is not the same as any other computer connected in your network.
NoteIf you are using DHCP (for auto assignment of an IP address) there is no need to make these settings. If you are not sure as to whether it is possible to use DHCP, please consult your network administrator.
- I am not sure of the Default Gateway address, what should I do?
-
This refers to the IP address of a device (router, etc.) that serves as a "gateway" when communicating with a network outside the currently connected network. The Default Gateway Address will vary depending upon your networking environment (structure). Please consult your network administrator for details.
NoteIf you are using DHCP (for auto assignment of an IP address) there is no need to make this setting. If you are not sure as to whether it is possible to use DHCP, please consult your network administrator.
- I don't know my DNS Server, what should I do?
-
The DNS server refers to the device that associates a domain name (EX: tandd.com) with an IP address.
The DNS Server will vary depending upon your networking environment (structure). Please consult your network administrator for details.NoteIf you are using DHCP (for auto assignment of an IP address) there is no need to make this setting. If you are not sure as to whether it is possible to use DHCP, please consult your network administrator.
- I am not sure of the settings for connecting to a Wireless LAN, what should I do?
-
Entries will depend upon your network environment.
Please contact your network administrator for details.Wireless LAN Channel Number
To help avoid interference and reduce the chances of poor wireless LAN transmission, bandwidth to be used by each device is allocated and this is called a "Channel".
Assign a channel to be used by the RTR500BW for wireless LAN communication.Wireless LAN SSID
Enter the name of the wireless LAN access point to be used for communication.Security Mode
This refers to a standard for encrypting contents of communication. Make sure to assign it in conjunction with the access point being used.
RTR500BW devices can use WEP64, WEP128, WPA-TKIP, and WPA2-AES.WEP Key
This is a password necessary when using WEP 64/128 as the security mode for the wireless LAN.
Make sure to enter it in coordination with the Wireless LAN Access Point Settings.Pre Shared Key
This is a password necessary when using WPA-TKIP or WPA2-AES as the security mode for the wireless LAN.
Make sure to enter it in coordination with the Wireless LAN Access Point Settings.
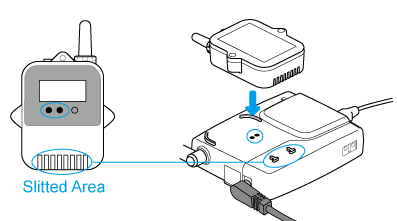
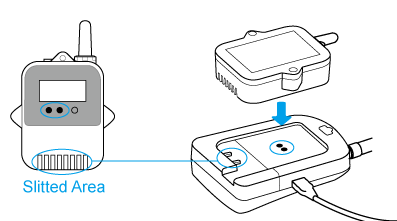
- The Remote Unit is not recognized by the Base Unit via Optical Communication, why not?
-
Check the following:
- Is the battery cover on the back of the Remote Unit fully closed?
(If light enters during communication, an error will occur.) - Remove any obstacles blocking the optical communication areas.
(Do not attach a tape or a sticker to the optical communication area even if it is transparent.) - Is the Remote Unit properly placed on the Base Unit?
(Make sure the slits in the Remote Unit fit tightly onto the ridges of the Base Unit.) - Make sure there is sufficient battery power remaining in the Remote Unit.
(Low battery will cause a communication error.)
- Is the battery cover on the back of the Remote Unit fully closed?
- Can I view the version info for the RTR500BW /500BM and its software?
-
Checking the device version version from the Windows Software:
You can find the info in [Settings Utility] in the [Settings Table] menu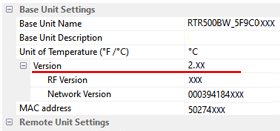
RTR500BW 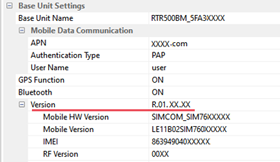
RTR500BM Checking the device version from the Smartphone app:
In the top screen of T&D 500B Utility, tap on the target device from either [Nearby Devices] or [WebStorage] tab, and in the Settings Menu for the target Base Unit open [System] to view the device info.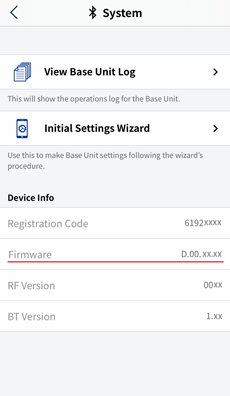
[System] - Device Info Checking the version of the "RTR500BW for Windows" software:
The software version can be found in the Settings Utility's Main Window in the [Help] menu under [Version].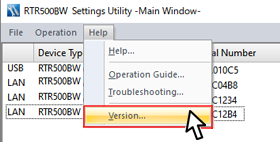
Main window - [Help] Menu Checking the version of the "RTR500BM for Windows" software:
You can find the software version info in the header of the [Settings Utility].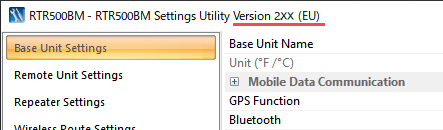
Checking the version of the "T&D 500B Utility":
To check the version of the app, in the top screen tap on the menu icon ( ) at the top left.
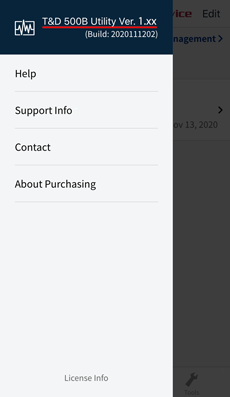
- When there are multiple Base Units being used in the same area, what is the best way to assign frequency channels?
-
With RTR500B Series it is best not to assign adjacent channels for units in the same area, as it may result in interference.
Channel Numbers and Corresponding Frequencies for RTR500B Series
We suggest you follow something like the example below for setting channels.
EXAMPLE: Base Unit A (Ch.0), Base Unit B (Ch.4), Base Unit C (Ch.7), Base Unit D (Ch.9), Base Unit E (Ch.11)EU Model CH Frequency (MHz) CH Frequency (MHz) 00 869.7125 06 869.8625 01 869.7375 07 869.8875 02 869.7625 08 869.9125 03 869.7875 09 869.9375 04 869.8125 10 869.9625 05 869.8375 11 869.9875 US Model CH Frequency (MHz) CH Frequency (MHz) 00 902.93760 11 915.60960 01 904.08960 12 916.76160 02 905.24160 13 917.91360 03 906.39360 14 919.06560 04 907.54560 15 920.21760 05 908.69760 16 921.36960 06 909.84960 17 922.52160 07 911.00160 18 923.67360 08 912.15360 19 924.82560 09 913.30560 20 925.97760 10 914.45760 21 927.12960 IMPORTANTThe communication frequency channel info cannot be changed after registration has been completed. If you wish to make changes to the communication frequency channel, you must first delete all Remote Units and Repeaters connected with that channel and re-register to a new wireless group.
- I can't carry out wireless communication with the Remote Unit, what should I do?
-
First check and try the following, and then test the wireless signal strength from the [Wireless Route Settings] menu in the software or app for the Base Unit. If there is no improvement, consider placing a Repeater between the Base Unit and the Remote Unit.
- Make sure there is sufficient battery power remaining in the Remote Unit.
(Low battery will cause a communication error.) - Make sure there are no obstacles that block radio waves between the Base Unit and the Remote Unit.
(For details see: [Please Read First] - [About Installing Wireless Devices]) - Try changing the frequency channels of RTR500B series units and/or any other wireless communication devices in the area.
(To make changes after having finished registration, it is necessary to delete all Remote Units with the same frequency channel setting from the Registration List and then register them again.) - If a Repeater is being used, check to make sure it is properly powered.
(When running on the batteries only, low battery will cause a communication error. Use an external power source to supply power.) - Make sure there is no device that emits strong electromagnetic waves near the Base Unit, Remote Unit(s) and Repeater(s). (If there is, move them about 1 meter (3 feet) apart.)
NoteFor details about frequency channels and bands see [Q. When there are multiple Base Units being used in the same area, what is the best way to assign frequency channels?] in the [RTR500BW Settings], [RTR500BM Settings] or [RTR500BC Settings] sections of [RTR500B Series FAQs].
- Make sure there is sufficient battery power remaining in the Remote Unit.
- I can't view Current Readings Data (.xml), what should I do?
-
The Current Readings Data (.xml) is not of the same format as Recorded Data and cannot be opened using T&D Graph. It can be viewed by creating a program for that purpose.
T&D can provide you with all of the necessary file format info for both recorded data (TRZ only) and current readings, as well as, communication specifications for RTR500BW and serial communication specs for RTR500BC. Please contact your local distributor.
- An optional serial communication cable "TR-07C"(sold separately) is necessary for serial communication with RTR500BC.
- Can I edit recorded data?
-
In order to maintain the integrity and trustworthiness of the recorded data, the graph applications do not allow you to make changes or edits. If it is still necessary to edit recorded data, you will need to output in text file format and use a common spreadsheet software such as Excel to make changes.
Note however that the text format data cannot be read by T&D graph applications.
- Is it possible to download recorded data without using wireless communication?
-
A Windows software called "T&D Tools" is available for directly downloading recorded data from a data logger and saving it to a PC.
For details see:
[RTR500BW for Windows] - [Other Data Collection Methods]
[RTR500BM for Windows] - [Other Data Collection Methods]
- I can't find the RTR500BW with the network search function, what should I do?
-
Check and/or try the following:
- Make sure the RTR500BW is properly powered.
(Use the AC adaptor or PoE to power the unit.) - Make sure the RTR500BW is connected to a network.
(Check the status of the LED Display and if network communication is not available, please refer to [Q. I can't seem to connect the RTR500BW to my network, what should I do?]) - Make sure the PC being used and the RTR500BW are connected within the same network.
(If the PC and RTR500BW are connected to separate networks, you will not be able to get a response from the Base Unit by searching the network that the computer is connected to. Nor will there be a response when search broadcasts are set to be filtered by network devices such as hubs. See if a connection can be made by setting an appropriate fixed IP address and gateway address to the RTR500BW, and in the main window of the Settings Utility under the [Operations] menu - [Search Network Settings], add the same fixed IP settings entered in the RTR500BW.)
If after trying the above the problem is not solved, consult your network administrator.
- Make sure the RTR500BW is properly powered.
- I can't send recorded data, warning reports or current readings, why not?
-
Check and/or try the following:
- Make sure the RTR500BW is not connected to your PC via USB.
(While it is connected to a PC with a USB cable, Recorded Data, Warning Reports and Current Readings can not be retrieved or sent.) - Make sure the RTR500BW is properly powered.
(Use the AC adaptor or PoE to power the unit.) - Make sure the RTR500BW is connected to a network.
(Check the status of the LED Display and if network communication is not available, please refer to [Q. I can't seem to connect the RTR500BW to my network, what should I do?]) - Check transmission test results and error codes.
(Perform a transmission test and check the error codes for causes of the problem. Refer to the Error Code List.) - Check the transmission schedule.
(Check to make sure that the schedules for transmitting Current Readings and Recorded Data are set as intended. Transmission Test data has no effect on data in T&D WebStorage Service.) - Check Remote Unit Settings.
(Make sure the warning limit and judgment time settings are correct. If only recorded data is not being sent, check the [Transmission of Recorded Data] in the Remote Unit Settings, and make sure it is turned ON.)
If after trying the above the problem is not solved, consult your network administrator.
- Make sure the RTR500BW is not connected to your PC via USB.
- I can't seem to connect the RTR500BW to my network, what should I do?
-
Check and/or try the following:
- Make sure the RTR500BW is properly powered.
(Use the AC adaptor or PoE to power the unit.) - Make sure the Network Settings are correct.
- Make sure the RTR500BW is not connected to your PC via USB.
(While it is connected to a PC with a USB cable, Recorded Data, Warning Reports and Current Readings can not be retrieved or sent.) - Check for problems such as LAN cable disconnection or trouble with the modem, HUB, or router.
(Check the status and try plugging and unplugging the LAN cable or restarting your network devices.) - Make sure the router's DHCP server is enabled.
- If MAC address filtering is enabled on the router or access point, it is necessary to first register the MAC address of your Base Unit.
(The MAC address can be found in the [Network Settings] menu in the T&D 500B Utility App by connecting the RTR500BW via Bluetooth.)
If a wireless LAN is being used, please check/try the following:
- Try restarting your computer or mobile device.
- Check for problems such as wireless LAN access point, modem or router.
(Read the user's manual for your network devices and try restarting or power cycling them.) - Check or change the network settings.
(Check for incorrect entries. If there are more than one SSID (network) available, try using a different one.) - Try adjusting the position of the RTR500BW.
(Move it closer to the access point.) - The number of devices connected to the router may be exceeding the limit.
If after trying the above the problem is not solved, consult your network administrator.
- Make sure the RTR500BW is properly powered.
- Where can I check the Registration Code for my RTR500BW/500BM?
-
Supplied Code Label
You can find the code on the registration code label that came with the product.Mobile App "T&D 500B Utility"
You can find the device info by opening [Nearby Devices] - [Base Unit Settings] - [System].Software "RTR500BW for Windows" or "RTR500BM for Windows"
You can find the info in [Settings Utility] - [Settings Table] - [Base Unit Settings].- Please be careful not to let a third party know your registration code. The registration code cannot be changed or reissued.
- The computer does not seem to recognize the device connected by USB, why not?
-
If your device is not recognized after installing the Windows software and using it for the first time, go to the Start Menu and click on [Help for Unit Recognition Failure]. Here you can check if the USB device driver has been properly installed.
NoteBy opening [Help for Unit Recognition Failure] you will find explanations about a shortcut button to open the device manager and instructions about how to re-install the USB device driver.
If your computer stops recognizing your device while it is in use, check and/or try the following.
Base Unit / Repeater / Remote Unit:
- Make sure the USB device (Base Unit, Repeater or Remote Unit RTR-574/576) is properly connected to the computer with the supplied USB cable.
- Make sure there is only one device of each type (Base, Repeater, Remote) connected at any one time.
- For optical communication devices (RTR501B/502B/503B/505B/507B, RTR-501/502/503/505/507S), make sure the unit is placed on the USB-connected Base Unit correctly.
(Align the optical communication area of the Remote Unit and Base Unit.) - Make sure there is sufficient battery power remaining in the Remote Unit.
(Low battery will cause a communication error.)
Computer:
- Connect a different USB device (mouse, digital camera, etc...) to your computer and see if it operates properly.
- If your computer has more than one USB port, try connecting the Base or Remote Unit USB cable to a different port.
- If you have more than one computer, try connecting to it with the same cable and device.
- If there is a blackout or other loss of power, are the settings still saved in the RTR500BW / 500BM?
-
If there is a loss of power including from a blackout or running out of batteries, all settings, addresses and registration info are saved.
However, if [Clock Settings] - [Auto-Adjustment] is set to OFF, the clock will be reset and you will need to set the time after the power is restored.
Devices that are set to ON are automatically corrected.
- Can I use any type of SIM card?
-
For details see: [RTR500BW/500BM/500BC] - [RTR500BM] - [SIM Card Preparation].
- Where can I check the IMEI number for my RTR500BM?
-
You can find the IMEI in [RTR500BM Settings Utility] - [Settings Table] - [Version].
- How do I make mobile data communication settings?
-
The following four pieces of information are required to set up mobile data communication: an APN (Access Point Name), a User Name, a Password, and an Authentication Type.
If you have questions or trouble, please contact your carrier or mobile network provider.
- I don't know my PIN number, what should I do?
-
This is a passcode to prevent theft or loss of the device or service, or unauthorized use by a third party. If you are unsure of your default PIN number, check the information which came with the SIM card or contact your carrier.
If a PIN number has not been assigned to your SIM card it is not necessary to enter a PIN number.Changes can be made to the PIN number.
For details see:
[T&D 500B Utility Mobile App] - [Mobile Communication Settings: RTR500BM]
[RTR500BM for Windows] - [Base Unit Settings]IMPORTANTIf you enter the wrong PIN a certain number of times in a row, the SIM card will be locked and you will not be able to use the Base Unit. Enter your PUK (personal unblocking key) and a new PIN to unlock the card. The PUK code is an 8-digit number found on the purchased SIM card package.
- I don't know my PUK number, what should I do?
-
- The PUK code is an 8-digit number found on the purchased SIM card package.
- If you don't have or can't find the package, please check the support information of the telecommunication company you have a contract with.
- If the wrong PUK number is entered a certain number of times in a row, the SIM card will be completely disabled.
- A message appears saying that "This SIM card cannot be recognized", what should I do?
-
If you are in LTE communication range, try rebooting the device by moving the operation switch on the side of the device to STBY and then back into Run again.
If the problem persists after rebooting the device, move the operation switch to STBY, disconnect all cables, and then check/try the following:
- Poor contact due to dirt or misalignment
(Wipe the SIM card and the card holder of the device with a soft cloth, check the orientation of the SIM card and reinsert it. For details see: [Base Unit RTR500BW/500BM/500BC] - [SIM Card Preparation]) - If you have a smart phone or another RTR500BM, try inserting the SIM card and see if it can be recognized.
(If the SIM card can be recognized, there is a problem with the RTR500BM. Please contact your local distributor.) - If you have another SIM card, insert it into the RTR500BM and see if it can be recognized.
(If it can be recognized, there is a problem with the SIM card. Please contact the SIM dealer of telecommunication company) - Check with your carrier to see if there is some problem.
(You may want to open the telecommunication company's website to check if there is a communication failure and make sure that the communication line is open and working properly.)
- Poor contact due to dirt or misalignment
- What should I do when getting the "A power source could not be confirmed" message?
-
When making settings for the mobile data communication or for carrying out a transmission test, it is necessary to have ample battery power in the RTR500BM.
Please replace the batteries in the unit or connect it to the supplied AC adaptor (AD-05A3 or AD-05C1).
- The "Transmission Test" in the RTR500BM Settings Utility ends in failure, what should I do?
-
Slide the operation switch on the side of RTR500BM from STBY to Run, and after about one minute, check the LED status to confirm the following:
The DAIG (orange) LED is ON or BLINKING
- Poor SIM card contact
(Try reinserting the SIM card or turn the device off and then back on.) - SIM card contract details
(Please make sure that the SIM card supports SMS, that the contract has not expired, and that the communication line has already been opened and is operating properly)
The ANT. LEVEL is not ON
- The device is not within LTE communication range. (Place it in a place where two or more lamps are on.)
- Is the LTE antenna (accessory) connected?
If the transmission method has been set to "HTTP(S)" please check the following:
- Make sure all entries in [HTTP(S) Settings] are correct.
- Make sure all entries in [FTP Settings] are correct.
- Using your FTP client software, make the same settings and see if you can send files to your FTP server.
If the transmission method has been set to "FTP" please check the following:
If you can't solve this problem after checking the above, contact your provider or HTTP(S)/ FTP Server administrator.
If after checking all of the above and making any necessary changes there is still no improvement, please write down the error code and contact your local distributor. - Poor SIM card contact
- The Remote Unit is not recognized by the Base Unit via Optical Communication, why not?
-
Check the following:
- Is the battery cover on the back of the Remote Unit fully closed?
(If light enters during communication, an error will occur.) - Remove any obstacles blocking the optical communication areas.
(Do not attach a tape or a sticker to the optical communication area even if it is transparent.) - Is the Remote Unit properly placed on the Base Unit?
(Make sure the slits in the Remote Unit fit tightly onto the ridges of the Base Unit.) - Make sure there is sufficient battery power remaining in the Remote Unit.
(Low battery will cause a communication error.)

- Is the battery cover on the back of the Remote Unit fully closed?
- Can I view the version info for the RTR500BW /500BM and its software?
-
Checking the device version version from the Windows Software:
You can find the info in [Settings Utility] in the [Settings Table] menu
RTR500BW
RTR500BM Checking the device version from the Smartphone app:
In the top screen of T&D 500B Utility, tap on the target device from either [Nearby Devices] or [WebStorage] tab, and in the Settings Menu for the target Base Unit open [System] to view the device info.
[System] - Device Info Checking the version of the "RTR500BW for Windows" software:
The software version can be found in the Settings Utility's Main Window in the [Help] menu under [Version].
Main window - [Help] Menu Checking the version of the "RTR500BM for Windows" software:
You can find the software version info in the header of the [Settings Utility].
Checking the version of the "T&D 500B Utility":
To check the version of the app, in the top screen tap on the menu icon () at the top left.
- When there are multiple Base Units being used in the same area, what is the best way to assign frequency channels?
-
With RTR500B Series it is best not to assign adjacent channels for units in the same area, as it may result in interference.
Channel Numbers and Corresponding Frequencies for RTR500B Series
We suggest you follow something like the example below for setting channels.
EXAMPLE: Base Unit A (Ch.0), Base Unit B (Ch.4), Base Unit C (Ch.7), Base Unit D (Ch.9), Base Unit E (Ch.11)EU Model CH Frequency (MHz) CH Frequency (MHz) 00 869.7125 06 869.8625 01 869.7375 07 869.8875 02 869.7625 08 869.9125 03 869.7875 09 869.9375 04 869.8125 10 869.9625 05 869.8375 11 869.9875 US Model CH Frequency (MHz) CH Frequency (MHz) 00 902.93760 11 915.60960 01 904.08960 12 916.76160 02 905.24160 13 917.91360 03 906.39360 14 919.06560 04 907.54560 15 920.21760 05 908.69760 16 921.36960 06 909.84960 17 922.52160 07 911.00160 18 923.67360 08 912.15360 19 924.82560 09 913.30560 20 925.97760 10 914.45760 21 927.12960 IMPORTANTThe communication frequency channel info cannot be changed after registration has been completed. If you wish to make changes to the communication frequency channel, you must first delete all Remote Units and Repeaters connected with that channel and re-register to a new wireless group.
- The transmission test was successful, but data cannot be found at T&D WebStorage Service, what should I do?
-
The test data itself will not be displayed in T&D WebStorage Service.
If a transmission test is successful, it means the communication between the Base Unit and T&D WebStorage Service is functioning normally.Check the following:
- Is the operation switch on the side of the RTR500BM switched to Run?
(For details see: [RTR500BM for Windows] - [Device Installation]) - Is the USB cable disconnected from the PC or the RTR500BM?
- Have you closed the Windows software / smart phone app settings screen?
(It the settings screen is left open, autonomous operation may not be allowed.) - Under [Current Readings / Warning Settings], is [Auto Transmission of Current Readings] set to ON?
(Current Readings can be checked in the [Data View] display of T&D WebStorage Service. If "Auto Transmission of Current Readings" is set to OFF, they will not be displayed.) - Under [Recorded Data Transmission Settings], is [Auto Transmission of Recorded Data] set to ON?
(Recorded data can be checked from the [Download] menu of T&D WebStorage Service. If "Auto Transmission of Recorded Data" is set to OFF, they will not be displayed.)
- Is the operation switch on the side of the RTR500BM switched to Run?
- I can't carry out wireless communication with the Remote Unit, what should I do?
-
First check and try the following, and then test the wireless signal strength from the [Wireless Route Settings] menu in the software or app for the Base Unit. If there is no improvement, consider placing a Repeater between the Base Unit and the Remote Unit.
- Make sure there is sufficient battery power remaining in the Remote Unit.
(Low battery will cause a communication error.) - Make sure there are no obstacles that block radio waves between the Base Unit and the Remote Unit.
(For details see: [Please Read First] - [About Installing Wireless Devices]) - Try changing the frequency channels of RTR500B series units and/or any other wireless communication devices in the area.
(To make changes after having finished registration, it is necessary to delete all Remote Units with the same frequency channel setting from the Registration List and then register them again.) - If a Repeater is being used, check to make sure it is properly powered.
(When running on the batteries only, low battery will cause a communication error. Use an external power source to supply power.) - Make sure there is no device that emits strong electromagnetic waves near the Base Unit, Remote Unit(s) and Repeater(s). (If there is, move them about 1 meter (3 feet) apart.)
NoteFor details about frequency channels and bands see [Q. When there are multiple Base Units being used in the same area, what is the best way to assign frequency channels?] in the [RTR500BW Settings], [RTR500BM Settings] or [RTR500BC Settings] sections of [RTR500B Series FAQs].
- Make sure there is sufficient battery power remaining in the Remote Unit.
- I can't view Current Readings Data (.xml), what should I do?
-
The Current Readings Data (.xml) is not of the same format as Recorded Data and cannot be opened using T&D Graph. It can be viewed by creating a program for that purpose.
T&D can provide you with all of the necessary file format info for both recorded data (TRZ only) and current readings, as well as, communication specifications for RTR500BW and serial communication specs for RTR500BC. Please contact your local distributor.
- An optional serial communication cable "TR-07C"(sold separately) is necessary for serial communication with RTR500BC.
- Can I edit recorded data?
-
In order to maintain the integrity and trustworthiness of the recorded data, the graph applications do not allow you to make changes or edits. If it is still necessary to edit recorded data, you will need to output in text file format and use a common spreadsheet software such as Excel to make changes.
Note however that the text format data cannot be read by T&D graph applications.
- Is it possible to download recorded data without using wireless communication?
-
A Windows software called "T&D Tools" is available for directly downloading recorded data from a data logger and saving it to a PC.
For details see:
[RTR500BW for Windows] - [Other Data Collection Methods]
[RTR500BM for Windows] - [Other Data Collection Methods]
- I can't send recorded data, warning reports or current readings, why not?
-
Run a "Transmission Test" from the Settings Utility.
If, after installing the device and getting successful results from the transmission test , you are still unable to transmit data, please try the following:- Check the power supply for the device.
(Make sure that the Base Unit and Repeaters have a properly working power supply from an external source and there is sufficient battery power remaining in the Remote Unit. Low battery power may cause communication errors.) - If you are sending data to our T&D WebStorage Service, make sure that you have not exceeded the Data Storage Limit.
(For more details see T&D WebStorage Service Details) - If you are sending to your own web server, please contact your provider or server administrator.
- Check the power supply for the device.
- When there are multiple Base Units being used in the same area, what is the best way to assign frequency channels?
-
With RTR500B Series it is best not to assign adjacent channels for units in the same area, as it may result in interference.
Channel Numbers and Corresponding Frequencies for RTR500B Series
We suggest you follow something like the example below for setting channels.
EXAMPLE: Base Unit A (Ch.0), Base Unit B (Ch.4), Base Unit C (Ch.7), Base Unit D (Ch.9), Base Unit E (Ch.11)EU Model CH Frequency (MHz) CH Frequency (MHz) 00 869.7125 06 869.8625 01 869.7375 07 869.8875 02 869.7625 08 869.9125 03 869.7875 09 869.9375 04 869.8125 10 869.9625 05 869.8375 11 869.9875 US Model CH Frequency (MHz) CH Frequency (MHz) 00 902.93760 11 915.60960 01 904.08960 12 916.76160 02 905.24160 13 917.91360 03 906.39360 14 919.06560 04 907.54560 15 920.21760 05 908.69760 16 921.36960 06 909.84960 17 922.52160 07 911.00160 18 923.67360 08 912.15360 19 924.82560 09 913.30560 20 925.97760 10 914.45760 21 927.12960 IMPORTANTThe communication frequency channel info cannot be changed after registration has been completed. If you wish to make changes to the communication frequency channel, you must first delete all Remote Units and Repeaters connected with that channel and re-register to a new wireless group.
- The transmission test in the RTR500BC Settings Utility ends in failure. What should I do?
-
Check and/or try the following.
Basic Items to be Checked:
- Make sure your PC is connected to a network such as the Internet or your company LAN. (Try opening a website in a web browser.)
- Review any items shown in red on the transmission test screen (improper settings).
- Try the same settings on another PC to check whether the same problem occurs. (This helps determine whether the issue is environment-dependent.)
If the issue is not resolved, check the transmission destination settings (E-mail / FTP) below.
Items to Check in [E-mail Settings]:
- Check that the Recipient Address, SMTP Server Name, User ID, and Password are entered correctly.
- Make sure the Sender E-mail Address matches the account used for Password Authentication or OAuth 2.0 Authentication.
- Check that mail is not being blocked by a spam-blocking function or security/antivirus software.
- Make sure SMTP communication is not being blocked by your router or firewall settings.
- If you authenticated with an Exchange Online (work or school) account, consult your tenant administrator (IT administrator, etc.) about the error details.
- Check the error logs. (Check the mail log file and error code list.)
Storage Location for Mail Log Files: C:\Users\(Login User Name)\Documents\TandD Corp\RTR500BC for Windows\mltmp
Items to Check in [FTP Settings]:
- Check that the FTP Server Name, User ID, and Password are entered correctly. (If you are using T&D WebStorage Service, the FTP Server Name is ftp.webstorage-service.com and the User ID and Password are the same as for when you login to T&D WebStorage Service.)
- Check to make sure that the destination folder name specified in the [Current Readings / Warning Settings] menu and/or the [Recorded Data Download Settings] menu is correct.
- Make sure FTP communication is not being blocked by your router or firewall settings.
If you are unsure of the settings, please consult with the network administrator (provider, corporate network administrator, etc...).
- OAuth 2.0 authentication fails in the E-mail Settings. What should I do?
-
- Check that HTTP(S) communication is not being blocked by proxy server or firewall settings.
- If "Approval required" is displayed in an Exchange Online environment, request approval from your tenant administrator. After approval is granted, click the [Sign in with Microsoft] button and set up authentication again.
If after trying the above the problem is not solved, consult your network administrator.
- Is it possible to set the RTR500BC to just save the recorded data to a PC?
-
Yes, settings for this can be done in the RTR500BC Settings Utility under the [Recorded Data Download Settings] Menu.
Under [Transmission Method] by selecting "Do not Send" and by setting "Saving Recorded Data" to ON, the data will be saved to PC but not transmitted elsewhere.
- The Remote Unit is not recognized by the Base Unit via Optical Communication, why not?
-
Check the following:
- Is the battery cover on the back of the Remote Unit fully closed?
(If light enters during communication, an error will occur.) - Remove any obstacles blocking the optical communication areas.
(Do not attach a tape or a sticker to the optical communication area even if it is transparent.) - Is the Remote Unit properly placed on the Base Unit?
(Make sure the slits in the Remote Unit fit tightly onto the ridges of the Base Unit.) - Make sure there is sufficient battery power remaining in the Remote Unit.
(Low battery will cause a communication error.)
- Is the battery cover on the back of the Remote Unit fully closed?
- I can't carry out wireless communication with the Remote Unit, what should I do?
-
First check and try the following, and then test the wireless signal strength from the [Wireless Route Settings] menu in the software or app for the Base Unit. If there is no improvement, consider placing a Repeater between the Base Unit and the Remote Unit.
- Make sure there is sufficient battery power remaining in the Remote Unit.
(Low battery will cause a communication error.) - Make sure there are no obstacles that block radio waves between the Base Unit and the Remote Unit.
(For details see: [Please Read First] - [About Installing Wireless Devices]) - Try changing the frequency channels of RTR500B series units and/or any other wireless communication devices in the area.
(To make changes after having finished registration, it is necessary to delete all Remote Units with the same frequency channel setting from the Registration List and then register them again.) - If a Repeater is being used, check to make sure it is properly powered.
(When running on the batteries only, low battery will cause a communication error. Use an external power source to supply power.) - Make sure there is no device that emits strong electromagnetic waves near the Base Unit, Remote Unit(s) and Repeater(s). (If there is, move them about 1 meter (3 feet) apart.)
NoteFor details about frequency channels and bands see [Q. When there are multiple Base Units being used in the same area, what is the best way to assign frequency channels?] in the [RTR500BW Settings], [RTR500BM Settings] or [RTR500BC Settings] sections of [RTR500B Series FAQs].
- Make sure there is sufficient battery power remaining in the Remote Unit.
- I can't view Current Readings Data (.xml), what should I do?
-
The Current Readings Data (.xml) is not of the same format as Recorded Data and cannot be opened using T&D Graph. It can be viewed by creating a program for that purpose.
T&D can provide you with all of the necessary file format info for both recorded data (TRZ only) and current readings, as well as, communication specifications for RTR500BW and serial communication specs for RTR500BC. Please contact your local distributor.
- An optional serial communication cable "TR-07C"(sold separately) is necessary for serial communication with RTR500BC.
- Can I edit recorded data?
-
In order to maintain the integrity and trustworthiness of the recorded data, the graph applications do not allow you to make changes or edits. If it is still necessary to edit recorded data, you will need to output in text file format and use a common spreadsheet software such as Excel to make changes.
Note however that the text format data cannot be read by T&D graph applications.
- I can't download recorded data with the RTR500BC, why not?
-
Check the following:
- Is RTR500BC Data Viewer running at the same time that is set for download?
- Is the Base Unit connected to the PC?
- Is there stable signal strength between the Base Unit and Remote Unit?
- In the Remote Unit Settings is [Auto Download] set to ON?
- Is RTR500BC Data Viewer running at the same time that is set for download?
- I can't send recorded data, warning reports or current readings, why not?
-
Check and/or try the following:
- Is RTR500BC Data Viewer always running constantly?
- Is the Base Unit connected to the PC?
- Is there stable signal strength between the Base Unit and Remote Unit?
- Try running a transmission test from the [Transmission Test] Menu in the RTR500BC Settings Utility and see if it is successful or not.
Check the Log
In the RTR500BC Data Viewer - [View] menu, open [View Log] to see if recorded data was sent or not.Check the "Pause Polling" Function
In the RTR500BC Data Viewer - [Settings] menu, see if [Pause Polling] has a check mark next to it. If it does, remove the check mark by clicking on it. Periodic processes such as auto download of recorded data, monitoring of current readings and warning signals will be resumed.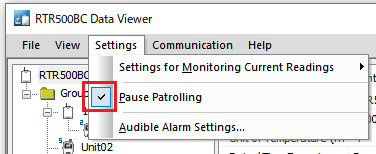
- The date and the time of the downloaded recorded data are different from the actual date and time of recording. Why?
-
Check if the date and time on your computer are correct.
The RTR500BC does not have an internal clock. When you set up a programmed recording start or when you download data, the date and time shown are taken from your computer's clock.
- Auto-download does not occur at the set time, what may be the problem?
-
Check the following:
- Are the date and time of the PC to which the RTR500BC connected correct?
(The RTR500BC does not have an internal clock and operates using the clock settings of your PC) - Is RTR500BC Data Viewer running at the same time that is set for auto-download?
- Are there any errors in the Auto-Download Log?
(In the RTR500BC Data Viewer, under the [View] Menu - open [View Log] to check the Auto-Download Log for errors. If an error has occurred, try testing the signal strength to check the communication capability with the Remote Unit.)
Also, if multiple processes are overlapped at the same time, the RTR500BC will determine the priority in the order of 1. Warning, 2. Current Readings, and 3. Recorded Data, so the time for auto-download may shift.
- Are the date and time of the PC to which the RTR500BC connected correct?
- Where is the downloaded recorded data being saved?
-
Check and/or change the specified storage location in the RTR500BC Settings Utility under the [Recorded Data Download Settings] menu - [Storage Folder for Recorded Data].
The default setting is in the "Documents" or "My Documents" folder under "TandD Corp\RTR500BC for Windows\data".
Even if you manually download from the RTR500BC Data Viewer - [Communication] menu, unless otherwise specified that recorded data will be saved to the above folder.
- I specified to download "All Data" but the data doesn't seem to be the total number of readings, is something wrong?
-
This may happen under the following conditions:
- When data is downloaded via wireless communication (RTR500BC for Windows - [Communication] Menu - [Download Data (Wireless)])
- The Recording Interval Setting is very short (about 1 min or less)
When downloading from RTR-574 and RTR-576 units, each downloading session for each channel is broken up into two successive parts. If the downloading interval is short, while the first part is being downloaded newly recorded additional data will be logged into the channels of the second part of the download but no data will exist for the first part.
The RTR500BC only outputs complete sets of "Recorded Data" in which data exists for both parts of the downloading session.
Therefore when the recording interval is short, the number of measurements logged in a Remote Unit may be more than the number of "Recorded Data" which was able to be downloaded.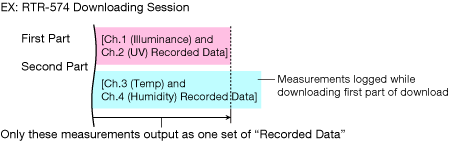
- Current Readings are not refreshed at the set monitoring / transmission interval. Why?
-
When monitoring or sending current readings, the displayed readings are the most recently recorded readings. If the Remote Unit's recording interval is longer than the current readings monitoring / transmission interval, the intended monitoring may not be possible.
Please check both settings and make changes as necessary.An example of not refreshing at the set interval:
When the recording interval is set to 1 hour and current readings transmission interval is set to 10 min (The current reading will only be refreshed every hour upon a new recording).
- Is it possible to stop "RTR500BC for Windows" from automatically starting when I open Windows?
-
You can disable it from running at startup using the following procedure:
IMPORTANTIf you remove RTR500BC for Windows from startup programs, the warning monitoring and auto-download of recorded data functions will also be disabled. When you restart or log into Windows, you will need to manually start RTR500BC Data Viewer to activate them.
Windows 10
-
Quit all applications and press [Ctrl]+[Shift]+[Esc] at the same time to open "Task Manager".
-
Click the [Startup] Tab to show a list of applications that are configured to run automatically when Windows starts.

-
Right click on [RTR500BC for Windows] and from the menu select [Disable].
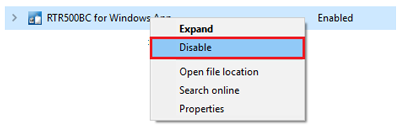
-
- Is there any way to backup Remote Unit Registrations?
-
In the "Documents or (My Documents)" folder, it is possible to copy and backup the "TandD Corp\RTR500BC for Windows" folder.
To restore, quit RTR500BC for Windows and then overwrite the copied folder to the above folder.
- Is it possible to check the remaining battery levels in Remote Units and Repeaters?
-
Yes, battery levels can be checked using the following methods:
Remote Units / Repeaters: [Wireless Route Settings] Menu
In the settings application for the Base Unit you are using, in the [Wireless Route Settings] menu, click on [Test Signal Strength]. A message will be displayed for devices with low battery power.Remote Units: Via Web Browser
You can check in the [Data View] tab of T&D WebStrorage Service.
Refer to [T&D WebStorage Service] - [Data View]Remote Units: Current Readings Monitoring Window
You can check the battery level of Remote Units in the Current Readings Monitoring Window. Refer to [RTR500BC for Windows] - [RTR500BC Data Viewer] - [View] - [Monitor Current Readings]Remote Units: Warning Report Mail
By setting [Battery Warning] as a condition for warning transmission, you can receive a notification email when the Remote Unit's battery level is low. Refer to [RTR500BC for Windows] - [Software Operational Settings] - [Current Readings / Warning Monitoring Settings]Repeaters: Check via PC
Connect the Repeater to a PC by USB cable and in the settings application for the Base Unit you are using you can get Repeater information.
- Is it possible to return an RTR500BC to a Base Unit after it has been registered as a Repeater?
-
Yes, by initializing the unit it will return to function as a Base Unit.
In the RTR500BC Settings Utility from the [Tools] Menu select [Initialize Base Unit / Repeater] and follow directions.
- There are devices nearby but they don't show up in the app's search results list, why not?
-
If you open the app and nearby Base Units do not show up in the [Nearby Devices] list, or the registered devices do not show up in the [
 Device List], please check the following:
Base Unit / Repeater / Remote Unit
- Make sure the Remote Unit has batteries installed with sufficient power remaining.
(Low battery will cause a communication error.) - Make sure the Base Unit / Repeater is properly powered.
(The power LED on the device should be on.) - Make sure Bluetooth is enabled in the device settings for each Base Unit, Repeater and Remote Unit.
- The device may not show up because it is communicating with another device via Bluetooth.
iOS Device Settings
- Control Center > Turn on Bluetooth ( https://support.apple.com/)
- Settings > Turn on Bluetooth
- Settings > Privacy > Bluetooth > Turn on 500B Utility
- App list in Settings > 500B Utility > Turn on Bluetooth
- Make sure the Remote Unit has batteries installed with sufficient power remaining.
- The Remote Unit is not recognized by the Base Unit via Optical Communication, why not?
-
Check the following:
- Is the battery cover on the back of the Remote Unit fully closed?
(If light enters during communication, an error will occur.) - Remove any obstacles blocking the optical communication areas.
(Do not attach a tape or a sticker to the optical communication area even if it is transparent.) - Is the Remote Unit properly placed on the Base Unit?
(Make sure the slits in the Remote Unit fit tightly onto the ridges of the Base Unit.) - Make sure there is sufficient battery power remaining in the Remote Unit.
(Low battery will cause a communication error.)
RTR500BW 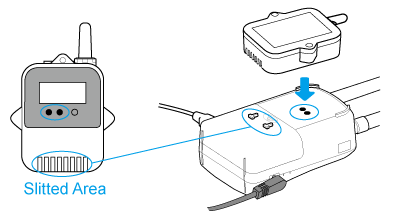
RTR500BM - Is the battery cover on the back of the Remote Unit fully closed?
- Warning e-mails do not arrive at the e-mail address I registered in T&D WebStorage Service, what should I do?
-
Check the following:
- Have you registered the Base Unit to T&D WebStorage Service?
(To monitor for warnings with RTR500BW/500BM, log into T&D WebStorage Service and register the Base Unit from the [Device Settings] window. If you plan to use more than one Base Unit, you must register them one at a time. Refer to: [T&D WebStorage Service] - [Devices]) - Is the address correct?
- Are there any settings to reject reception such as a junk mail filter?
(If there are settings make sure that the T&D WebStorage Service domain @webstorage-service.com or @webstorage.jp is added to those domains from which mail is accepted.)
- Have you registered the Base Unit to T&D WebStorage Service?
- I can't seem to connect the RTR500BW to my network, what should I do?
-
Check and/or try the following:
- Make sure the RTR500BW is properly powered.
(Use the AC adaptor or PoE to power the unit.) - Make sure the Network Settings are correct.
- Make sure the RTR500BW is not connected to your PC via USB.
(While it is connected to a PC with a USB cable, Recorded Data, Warning Reports and Current Readings can not be retrieved or sent.) - Check for problems such as LAN cable disconnection or trouble with the modem, HUB, or router.
(Check the status and try plugging and unplugging the LAN cable or restarting your network devices.) - Make sure the router's DHCP server is enabled.
- If MAC address filtering is enabled on the router or access point, it is necessary to first register the MAC address of your Base Unit.
(The MAC address can be found in the [Network Settings] menu in the T&D 500B Utility App by connecting the RTR500BW via Bluetooth.)
If a wireless LAN is being used, please check/try the following:
- Try restarting your computer or mobile device.
- Check for problems such as wireless LAN access point, modem or router.
(Read the user's manual for your network devices and try restarting or power cycling them.) - Check or change the network settings.
(Check for incorrect entries. If there are more than one SSID (network) available, try using a different one.) - Try adjusting the position of the RTR500BW.
(Move it closer to the access point.) - The number of devices connected to the router may be exceeding the limit.
If after trying the above the problem is not solved, consult your network administrator.
- Make sure the RTR500BW is properly powered.
- Warning e-mails do not arrive at the e-mail address I registered in T&D WebStorage Service, what should I do?
-
Check the following:
- Have you registered the Base Unit to T&D WebStorage Service?
(To monitor for warnings with RTR500BW/500BM, log into T&D WebStorage Service and register the Base Unit from the [Device Settings] window. If you plan to use more than one Base Unit, you must register them one at a time. Refer to: [T&D WebStorage Service] - [Devices]) - Is the address correct?
- Are there any settings to reject reception such as a junk mail filter?
(If there are settings make sure that the T&D WebStorage Service domain @webstorage-service.com or @webstorage.jp is added to those domains from which mail is accepted.)
- Have you registered the Base Unit to T&D WebStorage Service?
- I can't login to T&D WebStorage Service, what should I do?
-
Make sure that the combination of User ID and Password are correct.
If you can't remember or have lost your password, please get a new one reissued at T&D WebStorage Service. (Login Page > Forgotten your Password?)
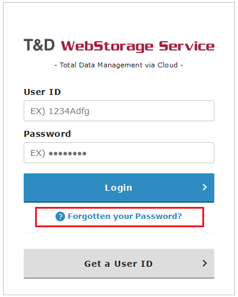 IMPORTANT
If you lose your user ID, you will not be able to use the data stored in the T&D WebStorage Service.
- Is it possible to share data on T&D WebStorage Service without changing any configurations or deleting data?
-
It is possible when using a web browser to share data by creating a Read-Only account.
These can be created in T&D WebStorage Service under [Account] Menu - [Read-Only Account Settings].
With a Read-Only account it is possible to view data but it is not possible to delete data or make any settings changes.
- I can't view the recorded data that was auto-uploaded to the T&D WebStorage Service, what should I do?
-
Check the following:
- Have you registered the Base Unit to T&D WebStorage Service?
(To view the data uploaded by the RTR500BW/500BM, log into T&D WebStorage Service and register the Base Unit from the [Device Settings] window. If you plan to use more than one Base Unit, you must register them one at a time. Refer to: [T&D WebStorage Service] - [Device Settings]) - Check for problems such as a broken or unplugged LAN cable, or trouble with the access point, HUB, or router.
- Have you registered the Base Unit to T&D WebStorage Service?
- Where can I make recipient e-mail address settings for RTR500BW/500BM warning mail?
-
You can make settings from T&D WebStorage Service under [Account] Menu - [Set Warning Recipients]. In addition to the e-mail account you used to register, you can add up to 3 other email addresses.
(For details see: [T&D WebStorage Service] - [Warning Mail Settings])
- Is it possible to increase the number of e-mail addresses or change the recipient address depending on the name of the Remote Unit or the type of warning?
-
With T&D WebStorage Service, it is not possible to increase the number of recipients or filter and send using specific conditions. But if you set the address to a cloud-compatible mail service (Gmail, Outlook, etc.), the filtering function of that mail service can be used and mail can be forwarded to more addresses. Since forwarding is not done via a PC, you can use it as if you were increasing the number of recipients.
Also, if you specify an e-mail address with the filter function of the e-mail service and create a filter using a specific word such as the name of the installation location, Remote Unit name, or type of warning, it is possible to send mail to a specific address depending upon the set conditions.
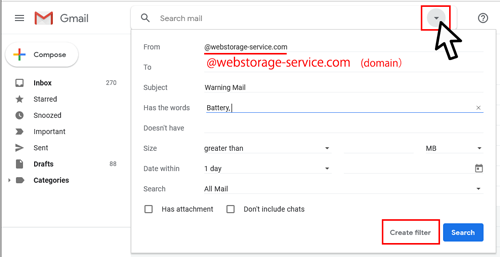
EX: Gmail Filter Settings NoteThe types of warning are explained in [T&D WebStorage Service] - [Alert View] - [Warning Status Report] in this Help.