How to Use the T&D Thermo
Introduction
T&D Thermo is a mobile application that allows you to make device settings, download and view the recorded data in graph, and create reports for the TR4A Series, TR7 Series and TR32B data loggers using your smartphone or tablet.
- Here explains how to use T&D Thermo with the TR4A series.
- In this Help, T&D Thermo is also referred to as "this app" or "the app".
Compatible Operating Systems and Devices
Android OS, iOS
For compatible OS versions, please refer to the download page of T&D Thermo.
| Compatible Devices | |
|---|---|
| TR4A Series | TR41A / 42A / 43A, TR41 / 42 / 45 |
| TR7 Series | Wireless LAN Type: A2: TR71A2 / 72A2 / 72A2-S / 75A2 A: TR71A / 72A / 72A-S / 75A wb: TR-71wb / 72wb / 72wb-S / 75wb wf*: TR-71wf / 72wf / 72wf-S / 72wf-H / 75wf Wired LAN Type*: nw*: TR-71nw / 72nw / 72nw-S / 75nw / 72nw-H |
| log-EZ | TR32B |
| * No Bluetooth functionality In this Help, these compatible devices are also referred to as simply the "device", "unit", "data logger" or "logger". |
|
T&D Thermo App Version
We recommend that you keep your app updated.
See below for how to check the current app version:
Reading the Display - List Display (home screen) - Other Menus
Device Firmware Version
We recommend that you keep your device's firmware updated.
It is possible to update the firmware of the TR4A Series device using the T&D Thermo App. See below for details:
Configuring Device Settings - Firmware Update
Getting Ready
Set up a T&D WebStorage Service Account
T&D WebStorage Service is a cloud service to store data recorded by T&D data loggers. The stored data can be accessed for viewing and downloading via PC and smart phone from anywhere, anytime.
By using T&D WebStorage Service with the T&D Thermo app, data retrieved by the app can be sent to T&D WebStorage Service, and data stored in the WebStorage Service can also be accessed from T&D Thermo.
- The T&D WebStorage Service User ID cannot be reissued so please keep it in a safe place. If you lose your user ID, you will not be able to access the data stored in your account.
- If you wish to use the app without the cloud service (T&D WebStorage Service), proceed to [Add a Device to the App].
- Make sure that the mobile device's Bluetooth function is switched to ON.
- If you change your smartphone/tablet, it is necessary to perform device registration again.
-
Install T&D Thermo on your mobile device and open it.
Tap [OK] to allow Bluetooth access.
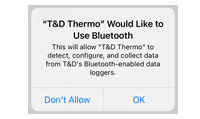
-
Tap the Menu icon (
 ) - [Account Management].
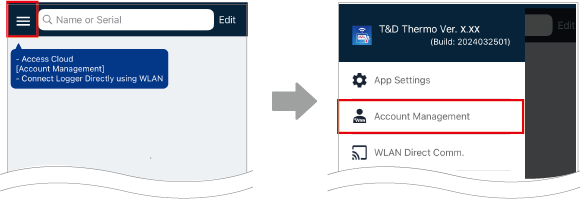
-
Tap [Selected Account].
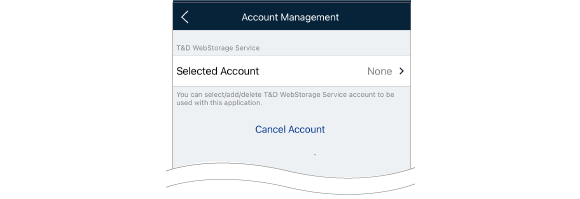
Here you will see the user ID (account) which has been added or selected, if any. -
If you do not already have a T&D WebStorage Service account, create one by tapping [Get a user ID]. (Follow the messages as they appear on screen.)
If you already have an account, enter the User ID and Password and tap [Apply].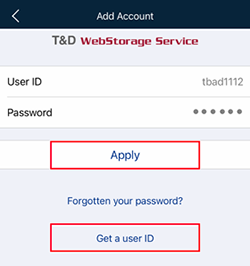
Multiple accounts can be added and switched.
-
Tap the (
 ) icon in the upper left corner of the screen to go back to the home screen and add a device. (Refer to [Add a Device to the App] below.)
If there are devices already registered to the account, they will be displayed in the device list on the home screen.
Add a Device to the App
-
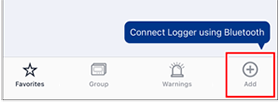
Tap the [+ Add] Button in the lower right corner of the home screen to open the Add Device screen.
-
The serial number and registration code are required to register the device. By selecting the desired device in the list of Nearby Bluetooth Devices, its serial number will be entered automatically.
Or you can directly enter the serial number. -
Enter the registration code (that can be found on the label supplied with the product) and tap [Apply].
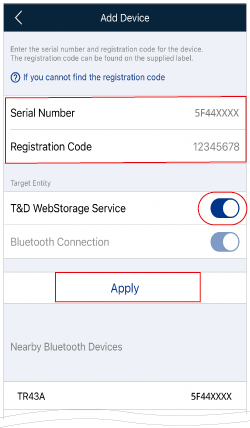
If you have lost the registration code label, see: TR4A Series FAQ - [Device / Power / Sensors] - [Q. Where can I find the Registration Code and Serial Number?]
-
When adding multiple loggers, repeat the process one unit at a time.
Tap
 to go back to the home screen.
- If you have the serial number and registration code information for the device at hand, you can also register devices that are not nearby.
- When [T&D WebStorage Service] is set to OFF in the [Target Entity] field, the device will not be registered to T&D WebStorage Service.
- If you wish to add devices to your T&D WebStorage Service account later, tap [+ Add] in the lower right corner of the app home screen and then enter the serial number and registration code for the device, or log in to the T&D WebStorage Service from a web browser such as Edge or Chrome, and add devices from the [
 Devices] menu.
Collecting and Viewing Data
Data Collection
The following describes the procedure for collecting and saving recorded data from devices using Bluetooth communication.
-
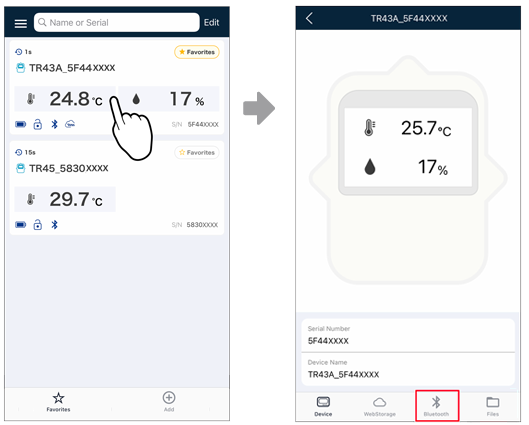
Select and tap the device in the list to open the Device Info screen.
-
Tap Bluetooth(
 ) to connect with the device.
 -
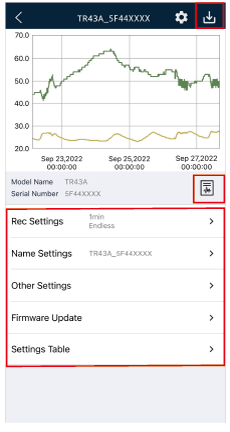
The app starts collecting data from the logger and plots a graph.
The collected data is sent to the T&D WebStorage Service account.
-
If necessary, proceed with Report Creation(
 ), Download(
 ), and Device Settings.
- If a transmission error to the T&D WebStorage Service occurs, [
 Unsent Data] will appear on the list screen. By refreshing the list while the mobile device is online, the app will resend the data to the T&D WebStorage Service.
 - The number of readings to be collected and displayed in a graph can be selected from the setting button(
 ) on the graph screen.
 - Please use the latest firmware for your device. (Refer to Firmware Update)
Graph Display and Operation
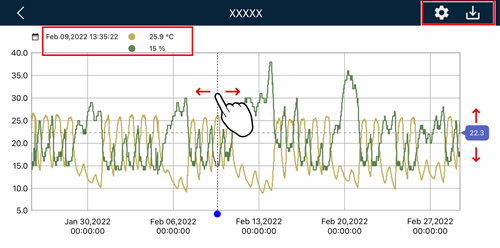
The collected data will be displayed in a graph.
By rotating your mobile device, the graph will go into landscape mode.
-
 [Download] Button
-
Tap this to download the data to your smartphone or tablet. All data recorded by the logger since the previous download will be stored as a new file and can be found in the File List.
- If you quit the application or go back to the previous screen without downloading, the data will not be saved on your mobile device and you will need to open the graph again if necessary.
-
 [Graph Settings] Button
-
Tap this to view or change the Graph Display Count setting.
You can select to display 1000, 2000, 4000, 8000, 16000 readings or All data in the graph.- Default setting is 16000 readings.
- See: [Recording Settings] - [Estimation of time until [FULL] is displayed]
- Moving Vertical Cursor
-
A long press on the graph in full screen mode will bring up a vertical cursor.
- Slide right and left to move the cursor.
- The screen will show the date, time, and readings for the cursor position.
- Moving Horizontal Cursor
-
Slide up and down to move the cursor (in landscape mode).
- Zoom in and out
-
Pinch in or out anywhere on the graph (in portrait/landscape mode).

Report Creation and Output
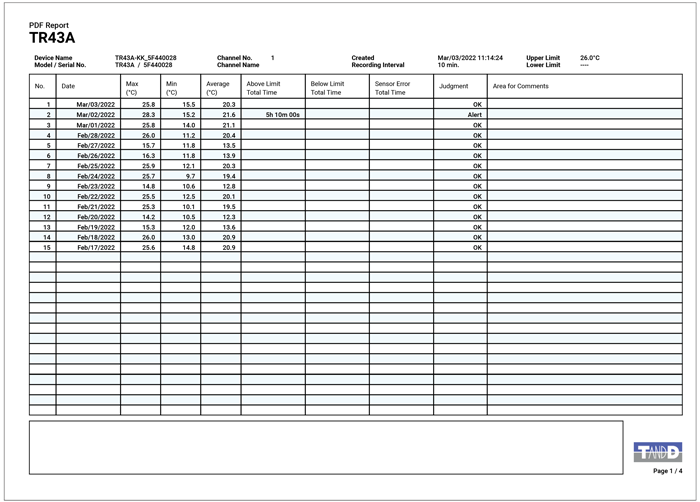
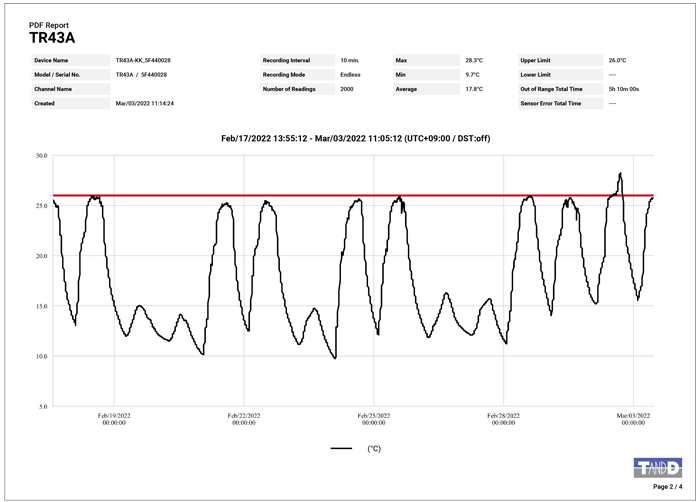
Here you can create a data report in PDF format. The report can then be printed, saved or shared via email or apps that can handle PDF files.
Tap ( ) to open the Report Settings screen.
Make the necessary settings and tap [Create] to create a report.

- Title
-
Optional (up to 30 characters)
- If empty the title will be [Report for Device Name].
- Output Channel(s)
-
Select the channel(s) to output to the report. A separate file will be created for each channel.
- Upper Warning / Lower Warning
-
Turn on and set the limit value(s) if desired.
The report will show the total time above/below limit and judgment whether there are any out of limit values. (Also shown by the colored lines on the graph.)- This setting is used to show if measurements in the report are within specified range, and does not function as a warning notification.
- The same title and settings will be displayed from the second time; please change if necessary.
- Report creation time and the number of pages depend on the amount of data.
- A report can also be created from the File List Screen.
- Data retrieved from the cloud (T&D WebStorage Service) cannot be output in a report.
- The generated PDF file cannot be sent to T&D WebStorage Service.
Report Sample
Print, Email, Share, or Save a Report
Select the output option for the generated report.
If you exit the app or go back to the previous screen without saving the report, data will be lost. You will need to create a report again.
-
 Print
Print
-
Tap here to print the report to any compatible printer nearby.
- iOS: AirPrint enabled printers
- Android: Wi-Fi enabled printers (The printer plug-in needs to be installed on your smartphone or tablet.)
-
 Email
Email
-
Tap here to send the report as an attachment via email
-
 Share & Save
-
Tap here to open the Share/Save menu for your OS.
(Icons may vary depending on the OS.)
Configuring Device Settings
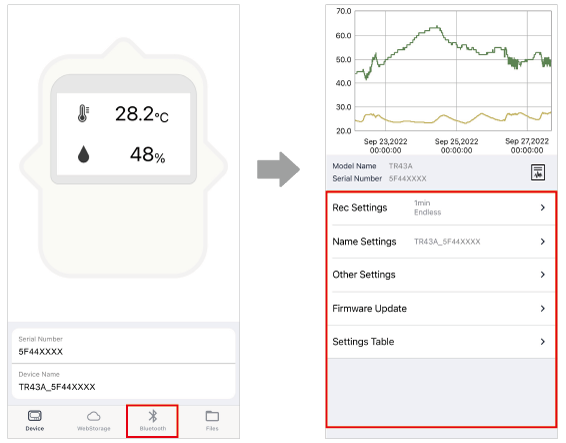
On the Device Info screen tap [Bluetooth] to open the Graph and Settings Menu, where you can check or change the settings via Bluetooth.
Note: Settings cannot be changed via [WebStorage] for the TR4A series.
Recording will begin with the following settings upon insertion of the battery.
| Recording Mode | Endless |
|---|---|
| Recording Interval | 10 minutes |
| Recording Start | Immediate Start |
| Device Name | Model_Serial Number |
| Sensor Type (TR45) | Thermocouple Type K |
Recording Settings
Tap [Rec Settings], change the necessary settings, and then tap [Apply] to apply the changes. The logger will start recording based on the settings you made.
Upon the start of a new recording session, all recorded data stored in the logger will be deleted.
- Recording Start/Stop
-
Immediate Start: When the setting is applied, the logger starts recording and the REC mark will light up on the LCD display.
Programmed Start: Set the date and time to start recording. The logger will enter standby mode and the REC mark will blink on the LCD display.
Stop: The logger will stop recording and the REC mark on the LCD display will disappear. - Rec Interval
-
Select from 15 choices: 1, 2, 5, 10, 15, 20, 30 sec. or 1, 2, 5, 10, 15, 20, 30, 60 min.
- Rec Mode
-
Endless: Upon reaching the logging capacity, the oldest data will be overwritten and recording will continue.
One Time: Upon reaching the logging capacity, recording will automatically stop.- When Recording Mode has been set to One Time and the logger reaches its logging capacity, recording will automatically stop and in the LCD the measurement and the word FULL will alternately appear.
- Sensor Type (TR45)
-
Select a sensor type to be used. When replacing with a different type of sensor, it is necessary to reconfigure.
- Temperature Unit
- The unit of temperature (°C or °F) can be changed.
| TR41A/42A、TR41/42/45 (Logging Capacity: 16,000 readings) |
TR43A (Logging Capacity: 8,000 temperature and humidity data sets ) |
||
| Rec Interval | 1 sec | 4 hr and 26 min | 2 hr 13 min |
| 30 sec | 5 days 13 hr | 2 days 18 hr | |
| 10 min | About 111 days | About 55 days | |
| 60 min | About 1 year and 10 months | About 11 months | |
Name Settings
Tap [Name Settings], change the necessary settings, and then tap [Apply] to apply the changes.
TR41A/42A/43A: Up to 26 characters
TR41/42/45: Up to 16 characters
( ¥/:;,*?"<>|&' are not allowed / UTF-8 is used)
- Device Name
-
The device name can be edited for easier identification.
- Ch.1 Name / Ch.2 Name
-
The channel name can be set.
Security (Bluetooth Lock)
You can use the lock function to prevent unauthorized access to the logger via Bluetooth from other mobile devices.
-
From the [Other Settings] menu, tap [Bluetooth Lock] to turn it ON.
-
For TR41A/42A/43A, set a 6-digit passcode.
-
Tap [Apply] to send to the logger.

- The same passcode can be used for multiple devices.
- When you enter the wrong passcode four times in a row, the communication will be disabled for one minute.
- If the lock function has been activated and you wish to access the logger from another mobile device, you need to enter the set passcode. Once authentication has been successful, it will not be necessary the next time.
- The passcode can be found in the Settings Menu - [Settings Table] - [BLE Passcode].
- To change the passcode, enter a new passcode and tap [Apply].
Reset Bluetooth Passcode
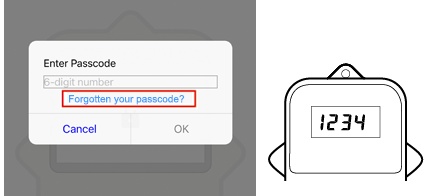
On the passcode entry screen that appears when attempting to communicate with the locked device, tap [Forgotten your passcode?].
A 4-digit reset code will be displayed on the device LCD display. Enter that number and tap [OK] to reset the security setting.
Firmware Update
The firmware update includes updating the device and Bluetooth firmware.
When a new firmware is available, you will see a "New Firmware Available" message on the [Firmware Update] menu when connecting the device via Bluetooth.
Tap the message to open the [Firmware Update] screen.
Tap [Start] to start the update process.
- The firmware update will take a few minutes to complete. Make sure you are within Bluetooth range of the device and do not close the app while the update is in progress.
- If "Firmware update failed" message appears, go back to the home screen, connect to the device via Bluetooth and try the firmware update process again.
Firmware updates are performed to fix malfunctions and improve the functionality of the device. We highly recommend that you keep the firmware up to date.
Checking/Exporting Settings Table
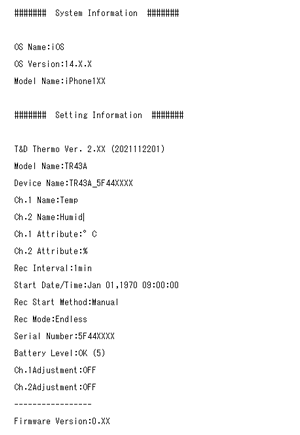
Tap and open [Settings Table] to view the settings for the device. By tapping [Log] in the upper right corner of the screen, the settings can be exported to a text file, which can then be sent by email or saved to your mobile device.
Output Example
Accessing Data in the Cloud / File List
Viewing Data Stored in the T&D WebStorage Service
The data storage period varies depending on the recording interval of the logger. For details see the T&D WebStorage Service Details.
Via T&D Thermo App
Tap [WebStorage] from the device info screen to access your T&D WebStorage Service account and view the stored data in graph. (See: [Graph Display and Operation])
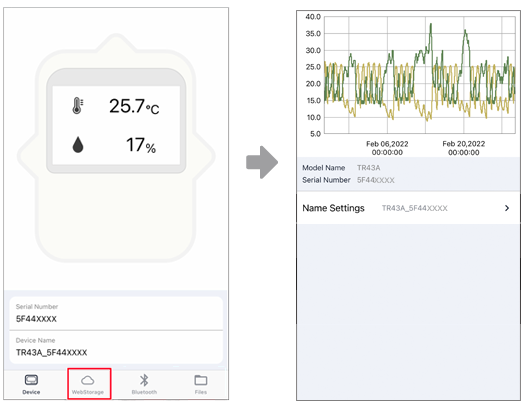
Data sent to the cloud from the file list cannot be displayed here. (See: [File List])
Via Web Browser
Open your web browser and log in to the T&D WebStorage Service, and view the data on the [Data View] screen. (See: [How to Use the T&D WebStorage Service])
Via T&D Graph Software
By installing the T&D Graph software, you can access and view the data stored in the T&D WebStorage Service for analysis on a PC. (See: [How to Use the T&D Graph])
Viewing Data Stored on the Mobile Device
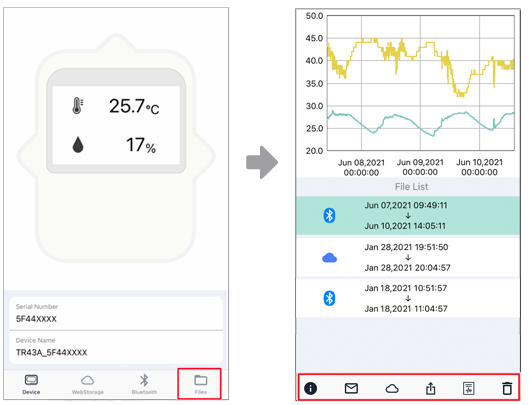
By tapping on [Files] at the bottom of the Device Info Screen, a list will appear of the data files saved to your mobile device.
Select and tap a file to view in graph. (See: [Graph Display and Operation])
Process data as needed. (See: [File List])
Using Adjustment Function
When using the adjustment function, measurements are displayed and recorded after being adjusted according to the conditions set by the user.
- When you are carrying out adjustment settings and formulating equations please take care with the settings and take personal responsibility for the process.
- Note that the recorded data in the device will be erased when recording is resumed.
-
Tap [Bluetooth] from the device info screen to open the Graph and Settings Menu, where you can check or change the settings via Bluetooth.
If a recording is in progress, stop recording first before you proceed. (From the [Rec Settings] menu, tap [Stop] to stop the recording.)
-
Tap [Other Settings].
-
Under [Adjustment], tap the channel to which you wish to make adjustments.
If you wish to make new adjustments on an already adjusted channel, it is recommended to tap [Initialize] to reset the settings first. (Initialized setting: y=1x+0)
-
Select the adjustment method (1 Point Adjustment or 2 Point Adjustment), make adjustment entries, and then tap [Apply]. (Refer to Adjustment Entries and Guidelines)
-
Start recording from the [Rec Settings] menu.
The adjustment equation can also be found in the [Settings Table].
Adjustment Entries and Guidelines
The adjustment equation y=ax+b is determined by the adjustment entries. (x: Measurement Value, y: Post-adjusted Value)
An equation with a slope (a) and/or an intercept (b) exceeding the following ranges cannot be set.
| Temperature, Humidity | ||
| Slope (a) | Range | 0<a≤2 |
|---|---|---|
| Significant Digits | 3 decimal places | |
| Intercept (b) | Range | within ±30 °C within ±30 % |
| Significant Digits | same as that of the data logger's measurement resolution | |
There are two possible methods of adjustment:
1 point Adjustment (Use when measuring in a range of ±20 °C)
2 point Adjustment (Use when measuring in a wide range).
- The difference between the values entered for "Before" and "After" must be ±5 °C or less. (Entries for temperature and humidity can be made in units of 0.1.)
- Making adjustment settings will not guarantee the improvement of measurement accuracy for the whole measurement range.
- By making new adjustment settings to an already adjusted device without first clicking the Initialize button, the new adjustment equation will be used to further adjust the previously adjusted result. Please be careful that in this case, the difference between the actual measurement (original value) and the post-adjusted value will be bigger than it should be.
EX: When changing 0 to 0.1 (+0.1) in the first adjustment and 0 to 0.2 (+0.2) in the second adjustment, the difference will be 0.3 (0.1+0.2). - For 2 point Adjustment, it is important to make sure the points are not too close to each other. The probability of measurement errors will increase in other ranges outside of the two points. It is recommended to make the space between the two points 20 % or more of the measurement range for the Remote Unit.
- When carrying out adjustment to the slope, adjustments will become larger in areas outside of the 2 points which were entered.
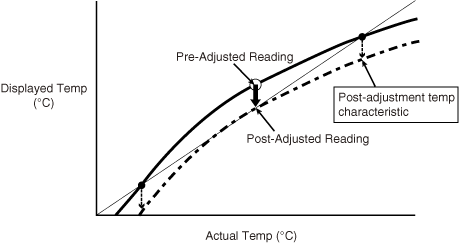
1 Point Adjustment
Use this to adjust all measurements with the same offset. (The whole graph will be adjusted up or down, keeping the same slope.)
This adjustment method changes only the intercept (b) where the slope (a) is considered to be the value of "one".
For example, the Remote Unit is measuring 10.2 °C, but the standard says the actual measurement should be 10 °C
Enter 10.2 in the "Before" box and 10 in the "After" box.
The conversion equation will be y=x−0.2 and for all measurements an adjustment to the offset of −0.2 will be made.
2 Point Adjustment
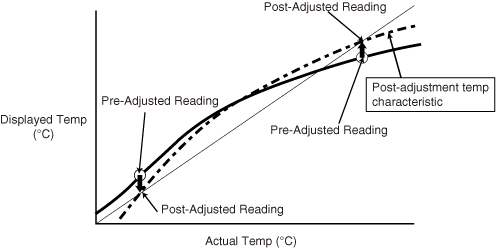
Use this to adjust measurements in a wide range or when adjustment cannot be carried out using only one point. The slope will change.
The adjustment equation will be calculated from two points: the slope (a) and the intercept (b).
For example, the data logger is measuring 0.2 °C and 9.6 °C, but the standard says the actual measurements should be 0 °C and 10 °C.
Enter 0.2 and 9.6 in the "Before" boxes and 0 and 10 in the "After" boxes.
In this case the slope (a) is (10−0)/(9.6−0.2)=1.06.
The conversion equation is y=1.06x−0.213 with the intercept being −0.213.
Editing Device List
Sorting the List
Favorites
All loggers that have been selected as [Favorites] will appear at the top of the list.
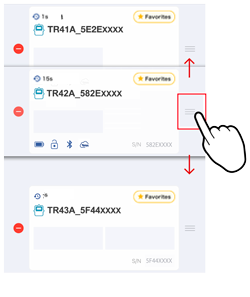
You can change the order of your favorites as shown below.
-
Tap [Edit] in the upper right corner of the screen.
-
Press and hold the right side icon and then drag to the desired location.
-
After finishing (whether or not you edited the list) return to the previous screen by tapping [Done].
iOS 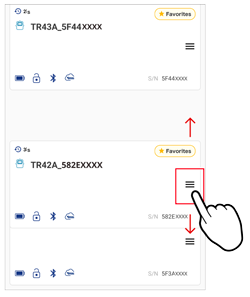
Android
When the list includes the TR4A and TR7 series models, [Group] and [Warnings] are also displayed as sorting criteria.
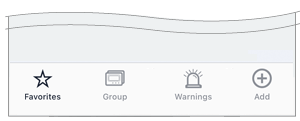
- Group
-
Sort by the device name.
- Warnings
-
Not available for TR4A.
Deleting Loggers
This will delete the selected unit from the device list.
- By deleting a logger from the list, its recorded data stored in the mobile device will be deleted. Also, the data will be deleted from T&D WebStorage Service.
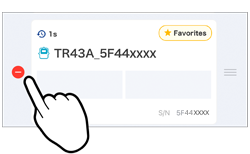
iOS:
-
Tap [Edit] in the upper right corner of the screen.
-
Tap on the icon (
 ) and then [Delete] to delete the selected device.
 -
After finishing (whether or not you deleted devices) return to the previous screen by tapping [Done].
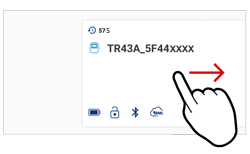
Android:
-
Tap [Edit] in the upper right corner of the screen.
-
Slide right to delete the device from the list.
-
After finishing (whether or not you deleted devices) return to the previous screen by tapping [Done].
Changing WebStorage Accounts
You can switch/add/delete T&D WebStorage Service accounts from the menu icon (![]() ) in the upper left corner of the home screen.
) in the upper left corner of the home screen.
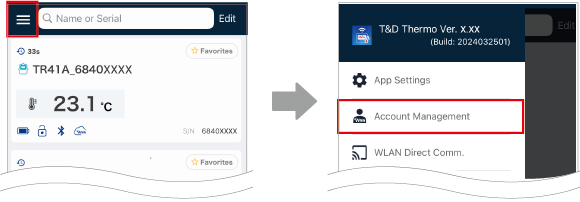
[Account Management] screen
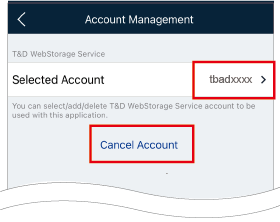
- Selected Account
-
If you have not registered any accounts to the app, [None] will be displayed.
By tapping [Selected Account], the setting screen which allows you to switch, add, and delete accounts will open. - Cancel Account
-
You can cancel the selected account. (This will permanently delete your account.)
By tapping Cancel Account, the setting screen will open via web browser.
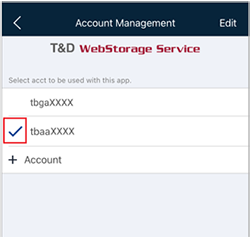
Switch Account
If you have multiple accounts added, you can select to switch to another account.
The home screen will display a list of devices registered to the account.
Add Account
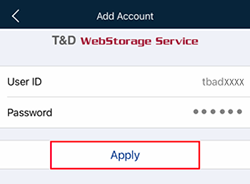
-
Tap [+ Account].
If you have not registered any accounts in the app, the [Add Account] screen will directly open. -
Enter the User ID and Password for the account you wish to add, and tap [Apply].
Delete Account
Delete the account from the app. (This disassociates your account from this app.)
iOS:
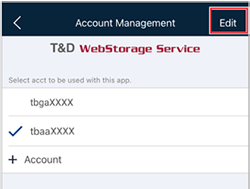
-
Tap [Edit] in the upper right corner of the screen.
-
Tap on the icon (
 ) and then [Delete] to delete the selected account.
Android:
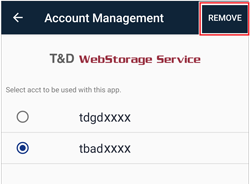
-
Select the account which you want to delete.
-
Tap [REMOVE] in the upper right corner of the screen.
Reading the Display
List Display (home screen)
The fields on this screen are continuously updated while the screen is open.
Tap a device in the list to open the device info and connect. By connecting to the device, you can collect and view data, change settings, check the stored data, etc.
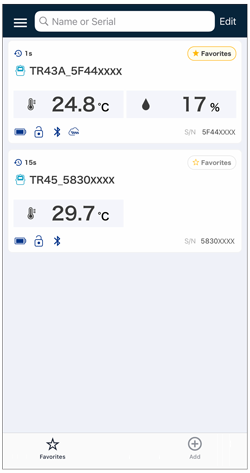
Listing Details
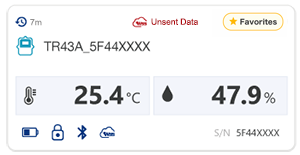

Device Name
The device name can be changed in Name Settings.
(Default Setting: Model_Serial Number)

Measurement Reading
This area is also used to display the following.
Hyphens: Indicates that measurement is not possible due to a sensor error (No sensor connected, improper connection, damaged, etc.)

LOCK: Indicates that the device is locked in Security Setting.

Status Icons
Indicates the status of the device during communication. (See: Status Icons)

Favorites
Tap to select (or deselect) the star icon. The loggers that have been selected as Favorites will appear at the top of the list.
- You can also sort the favorites.

Data Refresh Info
Shows the time elapsed since the update.

Unsent Data
Indicates that there is data that could not be sent to the cloud (T&D WebStorage Service) upon completion of data collection.
- By refreshing the list on the home screen while the mobile device is online, the app will resend the data to the cloud.
Waiting for data...
This message will be displayed under the following conditions:
- The device is added to the app but no data is received via Bluetooth.
- The device is registered to the WebStorage account but no data is uploaded.

Devices registered to the T&D WebStorage Service should be added to the app using the following procedure.
- Tap on [Waiting for data...] to open the info screen for the device.
- Tap
 to connect. The [Add Device] screen will open.
 - Add the device by entering its registration code and tapping [Apply].
- The app will collect data from the device and plot a graph.
Other Menus

Edit List
You can Edit the List, including deleting and rearranging the devices.

Menu
You can check the version info* for the app.
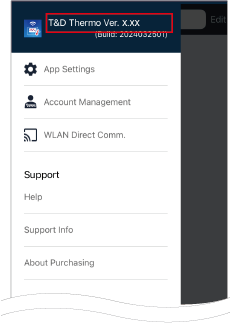
App Settings: You can add devices to the app.
Account Management: You can select/add/delete T&D WebStorage Service account to be used with the app.
WLAN Direct Communication: Menu available for the TR-7wb and TR-7wf
Help: Opens this Help
Support Info: Link to the latest information on T&D products
About Purchasing: Link to the Distributor List
*When the automatic app update feature is disabled on your mobile device, we recommend that you check the Revision History on the app page and update to the latest version if necessary.

Search
Search by Group Name, Device Name or Serial Number and display found loggers in list (partial match included).

List Sorting
You can sort the device list according to an available criteria. (See: Sorting the List)
- When the list includes the TR4A and TR7 series models, [Group] and [Warnings] are also displayed as sorting criteria.

Add Device
You can Add Devices to the app.
Status Icons
The color of the icons depends on the status of Bluetooth communication.
![]() (Blue): In communication range
(Blue): In communication range
![]() (Gray): Out of communication range
(Gray): Out of communication range

Battery Level
Indicates the battery status in two levels:
 Sufficient
 Change Battery (The battery warning mark
 is displayed on the logger's LCD)
- A low battery not only causes communication errors but may also result in loss of recorded data.

Lock (Security)
Indicates the security status for Bluetooth communication. (See: [Security Setting])
 (ON): Can only be viewed and configured by entering the set passcode.
 (OFF): No restriction

Bluetooth
This will appear in blue when Bluetooth communication is possible.
If the icon is not displayed, follow the steps below to add a device to enable communication.
- Tap on list to open the info screen for the device.
- Tap
 to connect. The [Add Device] screen will open.
 - Add the device by entering its registration code and tapping [Apply].

WebStorage
Indicates that the device is registered to T&D WebStorage Service.
- Data collected via Bluetooth is automatically uploaded and stored in the WebStorage account.
- You can access and view stored data in graph.
Device Info Screen
Tapping on a device in the list display (home screen) opens the screen as shown below.
To go back to the previous screen, tap![]() .
.
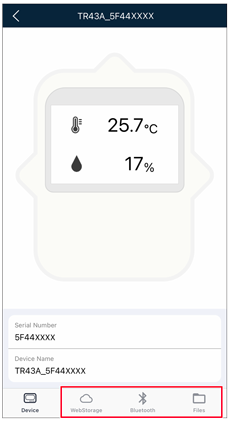

WebStorage
This will retrieve recorded data stored in the cloud (T&D WebStorage Service) and display in Graph.
If it does not work properly, check the following possible causes.
- The mobile device is offline.
- The incorrect account is selected.
(See: [Switch Account]) - The account password has been changed.
(You need to re-register the account. See: [Set up a T&D WebStorage Service Account]) - The device is not registered to your account.
(Tap [+ Add] in the lower right corner of the app home screen and then enter the serial number and registration code for the device, or log in to the T&D WebStorage Service from a web browser such as Safari or Chrome, and add the device from the [ Devices] menu.)
 - Data uploaded to the cloud from the file list cannot be displayed here. (See: [File List])

Bluetooth
Tap here to communicate with the logger via Bluetooth.
Recorded data will be downloaded and the Graph and Settings Menu will open.

Files
Use this to open files stored in your mobile device.
File List Screen
This is where you can access the data files stored on the mobile device.
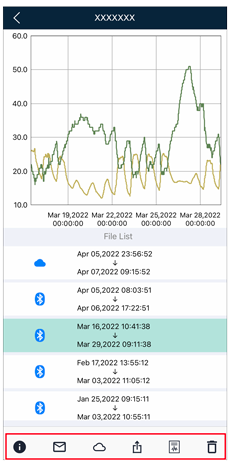
- The mark (
 ) in the file list indicates the communication method used to collect the data.
 - At the top of the list will appear the most recently saved data.
- Select and tap a file to view in graph. By rotating your mobile device, the graph will go into landscape mode and graph operations can be performed.

File Info
This shows the date and time of saving, the method of collection and device info.
- This icon will not appear on Android devices; press and hold on the target file to open file information.


Send via E-mail
This allows you to attach the file to an e-mail for sending.

Upload to Cloud
This will upload the file to T&D WebStorage Service.
- The data obtained from T&D WebStorage Service cannot be uploaded.
- The uploaded files can be accessed from the [
 Download] menu of T&D WebStorage Service for graph view and download (in trz format).

Share Data
Tap here to open the Share Menu for your OS. (Icons differ for iOS and Android operating systems.)
- It is possible to open and view the selected recorded data with applications which can read CSV files. (View in spreadsheet software, send as e-mail attachments and so on)

Create Report
This will open the Report Settings screen. (See: Report Creation and Output)
- Data retrieved from the cloud (T&D WebStorage Service) cannot be output in a report.

Remove
Use this to remove the file from your mobile device.