TR7 Series FAQs
Frequently Asked Questions by Topic
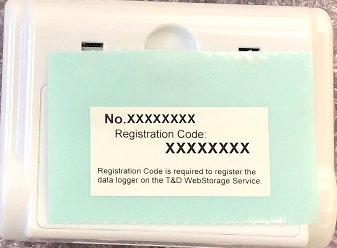
- Where can I find the registration code and serial number?
-
The registration code can be found on the supplied registration code label.
The serial number can be found on the same label as the registration code, or on the bottom of the device.IMPORTANTPlease be careful not to let a third party know of your registration code. The registration code cannot be reissued or changed.
If the registration code label has been misplaced, you can use this app or the PC software as shown below.
T&D Thermo:
By registering a device capable of Bluetooth or direct wireless LAN connection to the app, you can find the information in the Settings Menu - Settings Table.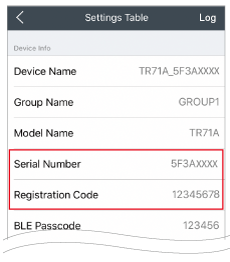
TR7 for Windows:
Connect the target logger to a PC and in the lower left frame you will find device information.
- What is the difference between Normal and Vaccine Mode?
-
It is a measurement mode compliant with the directives on vaccine management laid out by the Center for Disease Control and Prevention (CDC).
Compatible Products:
TR71A2, TR75A2, TR71A and TR75AYou can change this setting by opening the logger's Setting Menu via Bluetooth and going to [Rec Settings] - [Measurement Mode].
Operational differences by mode are as follows:
Normal Mode Vaccine Mode Max/Min Values Max/Min temperature reading since the start of recording or reset (via buttons or software/app) Max/Min recorded value since the start of recording or reset (via buttons or software/app) Warning Judgment Time 30 sec to 60 min (9 selections)
A warning will be issued when a measurement exceeds the set threshold value or a sensor error occurs for longer than the set judgment time.0 sec (Same as recording interval)
If a recorded value exceeds the set threshold value or if a sensor error occurs, a warning will be issued.Warning Display
[ALM] IconWarning alarms for exceeding a set upper and lower limit and for sensor errors will both disappear when the warning condition is resolved. Warning alarms for exceeding a set upper and lower limit will not disappear even after a value returns to within the threshold range.
Warning alarms for sensor errors will disappear upon return to normal.
- What is the battery life for the data loggers?
-
Estimated battery life is as follows:
TR7A2 (Rec Interval ≥ 1 min, Bluetooth ON)
TR7A, TR-7nw/wb (Rec interval ≥ 10 sec, Bluetooth ON (excluding nw))Auto-Upload Interval 1 min 10 min 1 hr 3 hrs 6 hrs or more Auto-Upload Pause Period
(Power Saving Settings)*OFF Approx. 5 days Approx. 1.5 months Approx. 7 months Approx. 14 months Approx. 18 months 8 hrs Approx. 8 days Approx. 2 months Approx. 9 months Approx. 17 months − 12 hrs Approx. 10 days Approx. 3 months Approx. 12 months Approx. 18 months − *By setting time to pause Auto-Upload, it is possible to reduce battery consumption (available only when the Auto-Upload Interval is three hours or less). Auto-Upload Interval 1 min 10 min 1 hr 12 hrs or more TR71A/72A(-S)/75A
TR-71wb/72wb(-S)Approx. 10 days Approx. 2 months Approx. 12 months Approx. 15 months TR-71nw/72nw(-S/-H) Approx. 10 days Approx. 2 months Approx. 12 months Approx. 18 months TR-75nw Approx. 10 days Approx. 2 months Approx. 7 months Approx. 12 months TR-75wb Approx. 10 days Approx. 2 months Approx. 10 months Approx. 12 months - Battery life varies depending upon multiple factors including frequency of communication, LAN environment, ambient temperature, recording interval, and battery performance. All estimates are based on operations carried out with a new battery and are in no way a guarantee of actual battery life.
- Shown above is the estimated battery life with Auto-Upload and Bluetooth (A/wb) ON. Battery life can be extended 1.2 times by going to [Bluetooth Communication Settings] in TR7 for Windows and turning OFF Bluetooth communication.
If you wish to measure over a long period of time, please use an external power supply.
- USB Bus Power 5 V 200 mA
- AC Adapter USB Mini-B Type (option AD-05A2 or AD-05C2)
- PoE IEEE 802.3af (for TR-7nw)
Battery Warning Mark and Warning Mail Transmission
A warning report mail will be sent when the Battery Warning is enabled in Warning Settings and a low battery condition is detected (when the battery warning mark blinks or lights up on the device LCD). See below for details.
TR7A2/A BLINKING: Low battery indication (warning mail transmission) ON: Auto-Upload of recorded data will stop. (Recording will continue.) TR-7nw/wb ON: Low battery indication (warning mail transmission)
If the battery is left unchanged until the LCD display goes blank, all recorded data in the logger will be lost.TR-7wf ON: Low battery indication (NO warning mail transmission)
If the battery is left unchanged until the LCD display goes blank, all recorded data in the logger will be lost.- Regardless of whether the warning setting is ON or OFF, you can check the battery status at any time via the mobile app T&D Thermo or a web browser (T&D WebStorage Service / T&D Data Server).
- Where can data loggers be placed?
-
They can be placed in a variety of locations depending on the purpose for recording data. We suggest placing it in environments which satisfy the following conditions.
- Places where water and oil will not be in contact with the device and sensor
- Places that are not affected by smoke, dust and condensation
- Places where Bluetooth Communication can be carried out without interference.
- Places where there is access to the WLAN/LAN (for auto upload of recorded data to T&D WebStorage Service or T&D Data Server)
- Places where it is easy to collect the device (for downloading data to a PC via USB connection)
- Places where it is possible to carry out button operation on the logger (TR-7wb/wf only; for WLAN direct communication with a mobile device)
- Places where water and oil will not be in contact with the device and sensor
- Readings from the internal temperature sensor (or the thermocouple) are incorrect, what may be the problem?
-
Internal Temperature Sensor (TR71A2/71A, TR-71nw/71wb/71wf)
Devices themselves generate heat and this effects internal sensors. Depending upon the frequency of auto-transmission communications an increase of up to 0.3 °C may occur. Especially when an external power supply is being used, measurements may increase significantly. In such cases, we recommend using an external sensor.Thermocouple Temperature (TR75A2/75A, TR-75wb/75nw/75wf)
Please make sure that the actual sensor being used matches the settings found in "T&D Thermo" under [Recording Settings] or in "TR7 for Windows" - [Recording Start] Tab - [Sensor Type Settings].
When using an external power supply, connect the GND terminal to ground to avoid noise affecting the measurement. If grounding is difficult, make sure that the sensor does not come into direct contact with conductive materials such as metal or water.
- Can the TR7 Series be used worldwide?
-
The wired LAN devices can be used in all areas and countries throughout the world.
The wireless LAN models are designed to comply with the following wireless certification requirements:
FCC (USA), ISED (Canada), CE (EU), UKCA (Great Britain), KC (South Korea)*, NCC (Taiwan)*, ARIB (Japan).
*The TR-7wf has not been certified for use in these regions.Use outside of the certified regions or any unauthorized use may be subject to legal penalties in accordance with local laws and regulations.
For more details, please contact your local distributor before purchase.
- How can I initialize the device?
-
You cannot initialize the device from T&D Thermo.
Please connect the device to a PC and use the Windows software "TR7 for Windows" ([Settings] - [Reset to Factory Default Settings]).
- How can I check my firmware version and update it when necessary?
-
Firmware updates are done to fix malfunctions and add new functionality. We highly suggest that you always keep the firmware and the Smartphone apps / Windows software up to date.
How to Check the Current Firmware Version:
The firmware version can be found in the Settings Table as shown below.
TR7A2/A/wb: Device Info screen (WebStorage
 or Bluetooth
 ) - [Settings Table]
TR-7nw: Device Info screen (WebStorage) - [Settings Table]
TR-7wb/wf: Menu ( ) - [WLAN Direct Communication] - [Settings Table]
Firmware Update Program:
Please download the Windows PC program from our website for your particular device. Refer to each download page for details such as the operating environment and version information.
Web site > Software/AppsIMPORTANTBy updating the firmware, all previously recorded data in the logger will be deleted. (Settings information will remain.) It is recommended that you manually download the recorded data beforehand, or run the update after the auto-upload of recorded data if you know the transmission schedule.
To manually download the recorded data, refer to the following.- Download via Bluetooth from this app and store the data on your smartphone.
See: [Usage by Communication Method] - [Device Registration/Configuration and Data Collection via Bluetooth] - [Collect Data and View Graph] - Download from TR7 for Windows and store the data on your PC (TR7A2/A can also use Bluetooth communication). See: TR7 for Windows Help - [Basic Operation Procedures] - [Downloading Recorded Data]
Note- For the latest information regarding updates, please tap [Support Info] from the menu icon () located in the upper left corner of the T&D Thermo home screen to check for available Apps/Software/Firmware updates.
- You can also check the current firmware version of the device from the [
 Devices] menu of the T&D WebStorage Service or from TR7 for Windows.
- Download via Bluetooth from this app and store the data on your smartphone.
- What kind of smartphone or tablet can it be used with?
-
Please use with Android or iOS devices with Bluetooth Low Energy.
Compatible OS (iOS, Android):
For compatible OS versions, please refer to the download page of T&D Thermo.Note: Newer versions of Android OS and iOS may be incompatible with the device. Please be fully aware of this before using our product.
- How far is the Bluetooth communication range?
- Approx. 10 meters (33 ft. if direct and unobstructed)
- Nearby Bluetooth loggers don't appear in the T&D Thermo app's search results list, why not?
-
Please check/try the following:
- Make sure your data logger is a Bluetooth-compatible model.
(See this Help: [Overview] - [Compatible Devices].) - Make sure there is sufficient battery power.
(Change the battery if the battery warning mark () appears on the logger's display.) - Check the settings on the mobile device.
(See below.)
Mobile Device Settings
To communicate with a data logger via Bluetooth, the following settings are required on the smartphone/tablet device:
- Bluetooth settings on the mobile device must be enabled.
- Permission must be granted for the app to find and connect to Bluetooth devices.
Setting Procedure
For iOS:
-
From the Home screen, tap [Settings] > [Bluetooth], and turn Bluetooth On.
-
Tap [Privacy & Security] (or [Security]) > [Bluetooth].
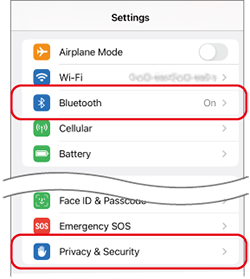
iOS Settings menu -
From the list of displayed apps, turn T&D Thermo On (Allow).
For Android:
-
From the Home screen, tap [Settings] > [Connected devices] > [Connection preferences] > [Bluetooth], and turn [Use Bluetooth] On.
Note: Pairing with the data logger is not necessary. If you have paired the device, be sure to remove the pairing.
-
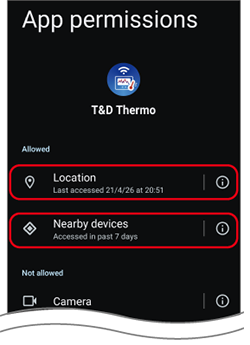
Tap [Apps] > [See all apps] > [T&D Thermo] to open App info.
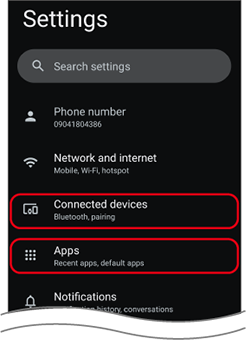
Android Settings menu -
Tap [Permissions], and allow access to both [Location] and [Nearby devices].
- Make sure your data logger is a Bluetooth-compatible model.
- I cannot connect using WLAN Direct Communication, what should I do? (wb/wf)
-
Check and/or try the following:
- Is the AP mark (
 ) lit up on the logger screen? (AP mode is deactivated after a certain amount of time)
 - Make sure there is sufficient battery power in the device.
- Check to see that the Wi-Fi mark (
 ) is displayed on your smartphone or tablet.
 - Try turning your mobile device's Wi-Fi OFF and ON, and then try again to establish WLAN Direct Communication.
- Is the AP mark (
- I cannot properly make Wireless LAN Settings using WPS, what should I do? (A2/A/wb/wf)
-
Check the following:
- Check whether the wireless LAN access point is compatible with WPS.
- Check to make sure [WPA/WPA2 Personal(AES) or No security] has been selected. If [WEP (64bit/128bit), WPA Personal(TKIP) or WPA2 Enterprise] has been selected WPS cannot be used.
- Try adjusting the position of the device (move it closer to the access point)
- If you are using an access point which uses other forms of authentication such as AOSS, make sure that only WPS is activated.
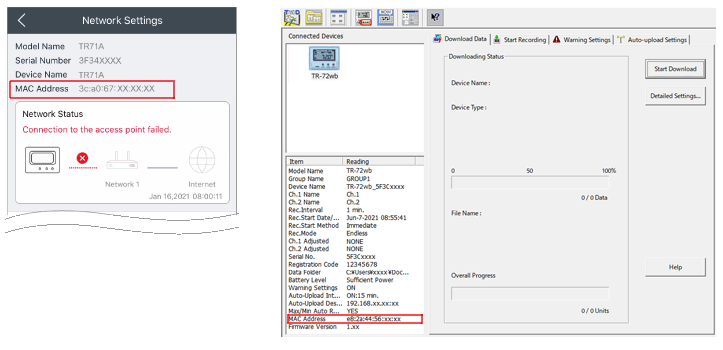
- If the Wireless LAN Access Point's MAC address filtering feature is set to active, it is necessary to first register the MAC address*1 of the device being used.
- Using T&D Thermo, communicate via Bluetooth or WLAN Direct Communication to make Wireless LAN Settings*2.
*1: Your device's MAC address can be found in T&D Thermo Settings Menu - [Network Settings] or [Setting Table] (only via Bluetooth connection). You can also find the MAC address in the TR7 for Windows by connecting the logger to the PC.
*2: Using T&D Thermo, go to Settings Menu - [Network Settings], enable [Wireless LAN] and make necessary settings. If you are using the TR7 for Windows, make proper wireless LAN settings and enable the auto-upload feature by specifying the [Upload Interval] in the [Auto-upload Settings] tab.
- Do you make public your communication protocol?
-
If you are interested, please contact the distributor from which you purchased the product.
- What is the difference between Normal and Vaccine Mode?
-
It is a measurement mode compliant with the directives on vaccine management laid out by the Center for Disease Control and Prevention (CDC).
Compatible Products:
TR71A2, TR75A2, TR71A and TR75AYou can change this setting by opening the logger's Setting Menu via Bluetooth and going to [Rec Settings] - [Measurement Mode].
Operational differences by mode are as follows:
Normal Mode Vaccine Mode Max/Min Values Max/Min temperature reading since the start of recording or reset (via buttons or software/app) Max/Min recorded value since the start of recording or reset (via buttons or software/app) Warning Judgment Time 30 sec to 60 min (9 selections)
A warning will be issued when a measurement exceeds the set threshold value or a sensor error occurs for longer than the set judgment time.0 sec (Same as recording interval)
If a recorded value exceeds the set threshold value or if a sensor error occurs, a warning will be issued.Warning Display
[ALM] IconWarning alarms for exceeding a set upper and lower limit and for sensor errors will both disappear when the warning condition is resolved. Warning alarms for exceeding a set upper and lower limit will not disappear even after a value returns to within the threshold range.
Warning alarms for sensor errors will disappear upon return to normal.
- When will warning emails be sent?
-
Please refer to [TR7 Series Warning Transmission Specifications] in this Help.
- The warning report e-mail is not being received, what should I do?
-
First, please check whether the recorded data is automatically being uploaded to T&D WebStorage Service. (See: FAQs - [Functions] - [Q: I cannot view the recorded data that was auto-uploaded to T&D WebStorage Service, what should I do?])
If the data is being auto-uploaded but no warning mail is being sent, check the following:
- Confirm that the email address registered in T&D WebStorage Service is correct and valid.
- If you are using a junk mail filter, make sure to allow to come from T&D WebStorage Service (@webstorage-service.com or @webstorage.jp).
- Note that warning report mails will not be sent for warnings that occurred in the device prior to device registration or the completion of warning settings.
- At the time of the warning the logger may not have been able to communicate with T&D WebStorage Service. Therefore the warning that wasn't sent will be sent at the time of the next successful communication.
- I cannot log in to the T&D WebStorage Service, what should I do?
-
Please make sure that the combination of User ID and Password are correct and match.
If you can't remember or have lost your password, please get a new one reissued at T&D WebStorage Service.IMPORTANTThe user ID cannot be reissued so please keep it in a safe place. If you lose your user ID, you will not be able to access the data stored in your account.
- I cannot view the recorded data that was auto-uploaded to T&D WebStorage Service, what should I do?
-
Check the result of Connection Test. (See: [Device Settings] - [Network Connection Status] in this Help)
The basic checklist is as follows:
- Please check that there are no physical problems such as a broken LAN cable, or trouble with the access point, HUB, or router.
- Check to make sure that an Internet connection can be established on the network you are using. (See if an Internet connection is possible using a PC or some other device that is connected to the same wireless LAN access point, hub, or router. See also, if the Internet connection is restricted by a firewall.)
- Make sure there is ample battery power. (Change the batteries if you see the battery warning mark on the LCD.)
- Turn off the power with the PWR button on the device and turn it on again to check if it can be connected. (The power cannot be turned off while recording is in progress, so stop recording and try again.)
- Check with your network administrator to see if communication is being filtered by a firewall, UTM, etc. If communication is being filtered, please configure the settings to allow communication with the following addresses:
TR7A2/A:
https://api.webstorage-service.com Port number 443
(When using Japanese Ondotori Web Storage:) https://api.webstorage.jp Port number 443
TR-7nw/wb/wf:
http://api.webstorage-service.com Port number 80
(When using Japanese Ondotori Web Storage:) http://api.webstorage.jp Port number 80
Check the following on the T&D WebStorage Service:
- Make sure that registration has been completed. (Confirm that you can log in to T&D WebStorage Service via a web browser.)
- Check to make sure that T&D WebStorage Service is not temporarily down due to maintenance or other trouble. (Try accessing T&D WebStorage Service from your web browser.)
After settings have been completed and by pressing the REC/STOP button on the device, data will be immediately sent without waiting until the next automatic transmission according to the set interval. Check to see if results are shown on the LCD screen and the [Web] mark lights up. If the [Web] mark is blinking, it means the device is unable to connect to the wireless network.
- How much data can be stored in the T&D WebStorage?
-
For the data uploaded automatically from the logger (via Auto-upload):
The maximum amount of data that can be stored in the T&D WebStorage Service varies depending on the recording interval set for the logger. After the storage period expires, the data will be automatically deleted.For the data sent manually via T&D Thermo (from the File List of downloaded files):
There is also a limit to the amount of data that can be stored. When the limit is exceeded, the oldest data will be deleted automatically.For details about the storage capacity, refer to the T&D WebStorage Service Details.
Please use our Windows Software T&D Graph for downloading and storing a backup of your cloud data.
- Is it possible to share data between multiple users of T&D WebStorage?
-
It is possible when using a web browser to share data by creating a Read-Only account.
- With a Read-Only account it is possible to view data but it is not possible to delete data or make any settings changes.
- Visit T&D WebStorage Service, go to [Account] - [Read-Only Account Setting] and set the Read-Only ID Password.
- Is it possible to increase the number of e-mail addresses or change the recipient address depending on the name of the Remote Unit or the type of warning?
-
With T&D WebStorage Service, it is not possible to increase the number of recipients or filter and send using specific conditions. But if you set the address to a cloud-compatible mail service (Gmail, Outlook, etc.), the filtering function of that mail service can be used and mail can be forwarded to more addresses. Since forwarding is not done via a PC, you can use it as if you were increasing the number of recipients.
Also, if you specify an e-mail address with the filter function of the e-mail service and create a filter using a specific word such as the name of the installation location, Remote Unit name, or type of warning, it is possible to send mail to a specific address depending upon the set conditions.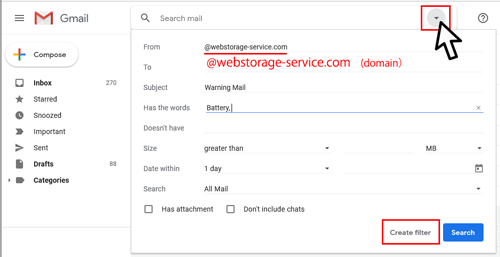 Note
NoteThe types of warning are explained in [TR7 Series Warning Transmission Specifications] - [Examples of Warning E-Mails and Push Notifications] in this Help.
- Can I make adjustments to the measurements?
-
TR7 series loggers have an adjustment function that allows you to display and record the post-adjusted readings.
Please use TR7 for Windows to make (or reset) adjustment settings.
 Note
Note- The adjustment setting values can also be viewed from the [Devices] menu of the T&D WebStorage Service.
- Please refer to the TR7 for Windows Help for the following information.
- For important notes on the adjustment settings, guidelines, and other related features: TR7 for Windows Help - [Useful Features and Functions] - [Adjustment]
- For details on how to connect TR7A2/A to a PC via Bluetooth: TR7 for Windows Help - [Basic Operation Procedures] - [Connecting to a Device]
- The adjustment setting values can also be viewed from the [