ThermoREC
What is ThermoREC?
This application enables the monitoring and graph display of temperature data recorded by the registered loggers.
The data displayed in Graph View is automatically uploaded to T&D WebStorage Service.
Compatible OS: Android OS, iOS
For compatible versions, please refer to the Software page of our website.
T&D Website > Software/Apps > ThermoREC
To upload data, it is necessary to have a T&D WebStorage Service User ID and add the data logger(s) to your account in advance. See [How to Use the T&D WebStorage Service]-[Initial Settings].
- If you add a logger to T&D WebStorage Service after downloading data to your mobile device, you'll need to first delete the data, then repeat the download procedure in order to upload to T&D WebStorage Service.
- See [Graph View] for the download and upload of data.
Application Compatibility
The ThermoREC App is only compatible with the TR4 Series models. Note that the TR4A Series (successor models TR41A/42A/43A) are not supported.The T&D Thermo App is compatible with the TR4, TR4A, and TR7 Series, and performs operations such as device settings, downloading, graphing, and uploading data.
For details such as compatible OS, please refer to the Software page of our website.
T&D Website > Software/Apps > T&D Thermo
T&D Thermo does not have the following features:
Monitoring graph (feature of ThermoREC iOS/Android)
Graphing and uploading of data of multiple devices (ThermoREC Android only)
Registration Code Entry
When using the ThermoREC App for the first time, register devices by entering the registration code to enable communication via Bluetooth®.
Help - TR4 FAQs- [Main Unit/Power/Sensors]-[Where can I find the registration code and serial number?]
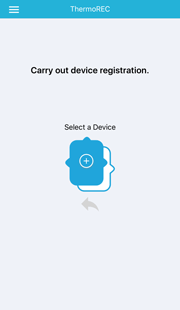
-
Upon startup, the app scans for available loggers in range and displays them in a list with the model and serial number.
-
Select a device to open the registration code entry screen.
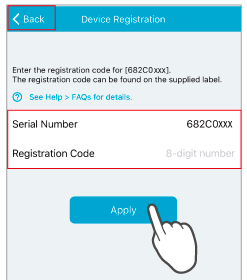
In order to add the devices that do not appear in the list, tap [Add Manually] to open the serial number and registration code entry screen.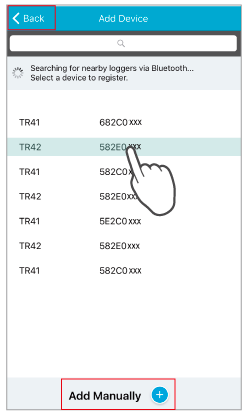
-
Enter the required information (registration code/serial number) you can find on the supplied label, and tap [Apply] button.
-
After registering the necessary devices, tap [ < Back] to go to the Top screen.
If you change your smartphone/tablet, it is necessary to perform device registration again.
Top Screen
Reading the Display
The following explanations concern those sections outlined in red.
Support Menu
App Version Info
App Settings (Temperature Unit / Data Destination)
Help (this document)
Support Info (if there are site links or new info a red circle (badge) will appear.)
T&D Website (Site Link)
About Purchasing (Site Link)
Multiple Unit Selection / Edit
The display and operation vary depending on the OS.
Android:
Multiple Unit Selection
iOS:
Sorting Device List / Deleting Devices
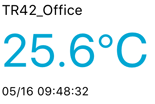
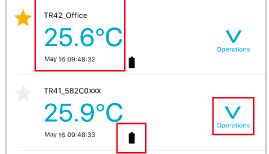
Device Name / Current Readings / Data Acquisition Date and Time
Device Name: Can be changed in the Device Settings.
Current Readings: Tap to start Graph View and Monitoring.
If the data is grayed out, it is a communication error due to out of the Bluetooth range or insufficient battery power.
[Operations] Menu
View in Graph
Make Settings
See Graph Archives
Delete this Device (Android only / See:[Deleting Devices])
Battery Level
 OK
OK
 Low Battery
A low battery may cause communication errors.
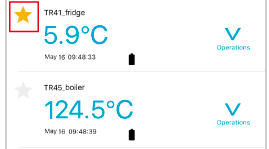
Favorite
Tap to select (or deselect) the star icon as a marker for device search.
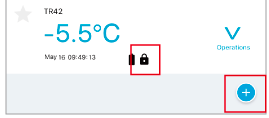
Device Lock
Display ON: Locked
Display OFF: Unlocked
Can be changed in the [Device Settings]
Add Device
Tap to register a new device.
Sorting Device List
Operation varies depending on the OS.
iOS:
-
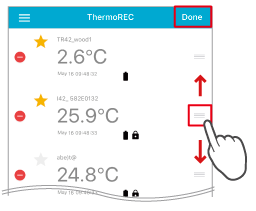
In the Top screen tap [Edit].
-
Press and hold
 and then drag to the desired location.
iOS -
When sorting is finished, tap [Done].
Android:
-
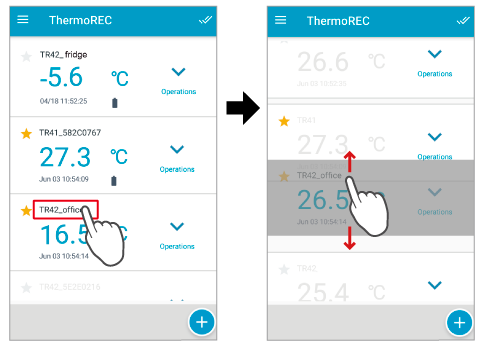
Press and hold the device name until the cell turns gray.
-
Then drag the cell to the desired location.
Deleting Devices
Operation varies depending on the OS.
By deleting the registered device, all data stored in the app will be deleted, including the archived graph data.
iOS:
-
In the Top screen tap [Edit].
Tap
 and then [Delete].
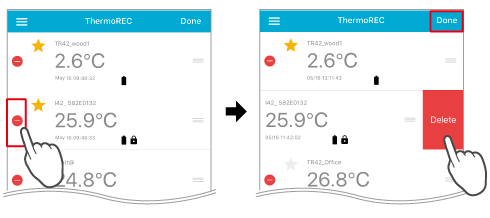
A confirmation message will appear. Select [Yes] to confirm or [No] to cancel.
Tap [Done] to return to the Top screen.
Android:
In the Top screen, open the Operations menu of the target device and select [Delete this Device].
Graph View
By opening the Graph View, the downloading of recorded data and data monitoring will start. The downloaded recorded data is stored on your smartphone/tablet.
- The recorded data will be uploaded to T&D WebStorage Service when returning to the previous (Top) screen.
- If you viewed the graph without making settings for T&D WebStorage Service, you can access the data stored on your smartphone/tablet from the Archived Graph Data.
Reading the Display
The following explanations concern those sections outlined in red.

Back
The recorded data will be automatically uploaded to T&D WebStorage Service by going back to the previous (Top) screen.
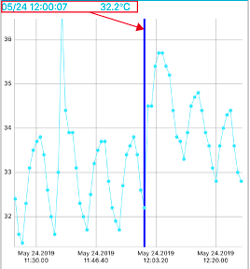
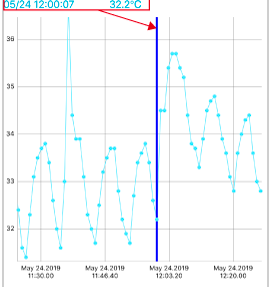
Date, Time and Measurement / Cursor
Press and hold on the graph to display a cursor. The date, time and measurement of the cursor's position will appear above the graph.
You can pinch in/out to change the graph range.


Graph Display Range
16 choices; scroll horizontally

Pause / Resume
 Pause monitoring and downloading of data.
 Resume monitoring and downloading of data.

Monitoring Interval
5 choices

Device Name / Current Readings
Up to 4 units for Android
Multiple Unit Selection (Android)
The Android version can plot data for up to 4 units simultaneously.
-
In the Top screen tap
 .
. -
Select up to 4 units.
-
Tap [View in Graph].
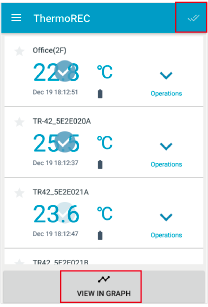
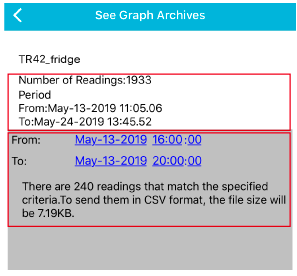
Archived Graph Data
In the Operations menu, select [See Graph Archives].

Number of Readings / Period
Shows the total number of readings stored in the mobile device and the recording period.

Specified Period
Allows you to narrow down the number of readings by specifying the time period.

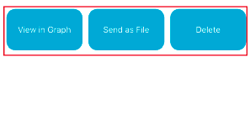
Menu Buttons
View in Graph: Allows you to view data in graph.
Send as File: Allows you to send the data in CSV format via email.
Delete: Allows you to delete data from your smartphone or tablet.
Device Settings
In the Operations menu, select [Make Settings].
Setting Items
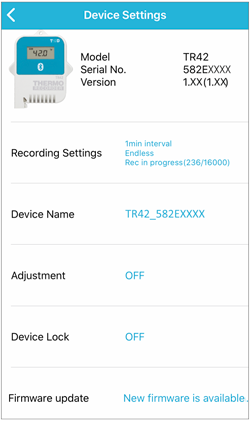
To change the settings, tap on the necessary item.
Upon the start of a new recording session, all recorded data stored in the logger will be deleted. If necessary, save the data by uploading to T&D WebStorage Service before making new recording settings.
The factory default settings:
Immediate Start / 10-min Interval / Endless / Thermocouple Type K
- Recording Settings
-
Recording Start Method: Select Immediate Start or Programmed Start
Recording Interval: Select from 15 choices: 1, 2, 5, 10, 15, 20, 30 sec. or 1, 2, 5, 10, 15, 20, 30, 60 min.
Recording Mode: Select Endless or One Time.
Sensor Settings (TR45 only): Select the type of sensor to be used.
[Start Recording] Button: Tap to start recording with the above settings. Previously recorded data will be deleted.
[Stop Recording] Button: Tap to stop recording.
Recording Intervals & Estimated Time until Logging Capacity is Reached Rec Interval Time Period 1 sec About 4 hours 30 sec About 5 days 1 min About 11 days 10 min About 111 days 60 min About 1 year and 10 months - Device Name
-
Each name can contain up to 16 alphanumeric characters
(¥/:;,*?"<>|&' are not allowed) - Adjustment
-
Allows you to make adjustments to measurements. (For details see: [Adjustment Examples])
1 Point Adjustment: Use this to adjust all measurements with the same offset.
2 Point Adjustment: Use this to adjust measurements in a wide range or when adjustment cannot be carried out using only one point. - Device Lock
-
When Device Lock is set to ON, the registration code is required at the time of communication in order to prevent the connection from unintended devices.
- Firmware Update
-
This is the latest version: Tap to check the Firmware and Bluetooth version of the device.
New firmware is available: Tap to check the current and latest version, then tap [Start] to start the update.
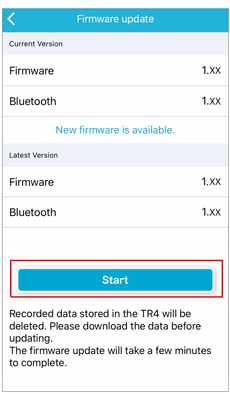
- All recorded data will be deleted by updating the firmware. If necessary, upload data to T&D WebStorage Service before update. (See: Reading the Display).
- Do not close the app, open another screen or go out of Bluetooth range until the update process finishes.
Adjustment Examples
After adjustment settings have been made to a logger, it will display and record only the post-adjusted readings.
1 Point Adjustment
This adjustment method changes only the intercept (b) where the slope (a) is considered to be the value of "one".
For example, the Remote Unit is measuring 10.2°C, but the standard says the actual measurement should be 10°C. Enter 10.2 in the "Current Reading" box and 10 in the "Post-adjusted Reading" box. The conversion equation will be Y=X−0.2 and for all measurements an adjustment to the offset of −0.2 will be made.
2 Point Adjustment
The adjustment equation will be calculated from two points: the slope (a) and the intercept (b).
For example, the Remote Unit is measuring 0.2°C and 9.6°C, but the standard says the actual measurements should be 0°C and 10°C. Enter 0.2 and 9.6 in the "Current Reading" boxes and 0 and 10 in the "Post-adjusted Reading" boxes. In this case the slope (a) is (10−0)/(9.6−0.2)=1.06. The conversion equation is Y=1.06X−0.213 with the intercept being −0.213.
When you are carrying out adjustment settings and formulating equations please take care with the settings and take personal responsibility for the process.
- Making adjustment settings will not guarantee the improvement of measurement accuracy for the whole measurement range.
- If you replace a sensor that was connected when making adjustment settings, it is necessary to re-make any desired settings to be written into the newly connected sensor.
- By making new adjustment settings to an already adjusted device without first clicking the Initialize button, the new adjustment equation will be used to further adjust the previously adjusted result. Please be careful that in this case, the difference between the actual measurement (original value) and the post-adjusted value will be bigger than it should be.
EX: When changing 0 to 0.1 (+0.1) in the first adjustment and 0 to 0.2 (+0.2) in the second adjustment, the difference will be 0.3 (0.1+0.2).
- For 2 point Adjustment, it is important to make sure the points are not too close to each other. The probability of measurement errors will increase in other ranges outside of the two points. It is recommended to make the space between the two points 20% or more of the measurement range for the Remote Unit.
- When carrying out adjustment to the slope, adjustments will become larger in areas outside of the 2 points which were entered.

