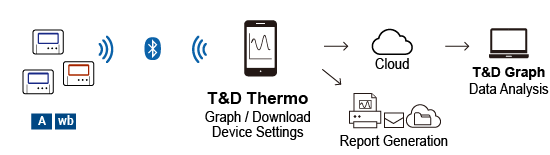
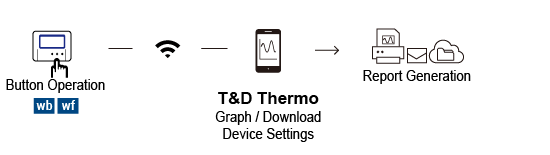
Usage by Communication Method
Device Registration/Configuration and Data Collection via Bluetooth
Compatible Products: TR7A/wb
T&D Thermo facilitates logger configuration and data collection using a Bluetooth connection.
The data retrieved by the mobile device can be viewed in a graph, saved, output as a PDF report, and transferred to the cloud-based T&D WebStorage Service.
Add a Device to the App
- For details about getting the device ready and other info, please refer to the manuals (PDF)
- Make sure that the mobile device's Bluetooth function is switched to ON.
- If you change your smartphone/tablet, it is necessary to perform registration of the devices and cloud account again.
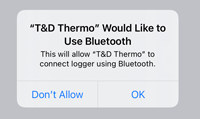
- When you see a permission prompt as shown below, tap [OK] to allow Bluetooth access.
- If you have the serial number and registration code information for the device at hand, you can also register devices that are not nearby or do not have Bluetooth communication capability.
- It is also possible to use Bluetooth communication only without using the cloud storage service (T&D WebStorage Service).
-
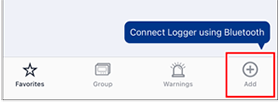
Tap the [+ Add] Button in the lower right corner of the home screen to open the Add Device screen.
Add Device -
The serial number and registration code are required to register the device. By selecting the desired device in the list of Nearby Bluetooth Devices, its serial number will be entered automatically.
Or you can directly enter the serial number. -
Enter the registration code (that can be found on the label supplied with the product) and tap [Apply].
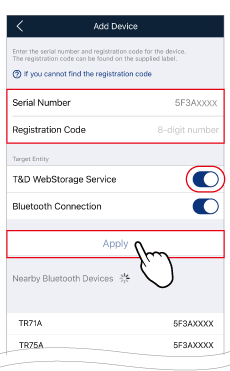
Add Device Window If you have lost the registration code label, see FAQ - [Device/Power/Sensors] - [Q. Where can I find the registration code and serial number?]
-
When adding multiple loggers, repeat the process one unit at a time.
Tap (
 ) to go back to the home screen and confirm that the device has been added.
The devices are listed in the order of registration and can be sorted. (For details see [Editing List])
About [Target Entity] Field
- When [T&D WebStorage Service] is OFF in the [Target Entity] field, by switching it to ON and tapping [Apply], the [Add Account] screen will open. Enter the user ID and password of the WebStorage account to be used, and the device can be registered to the WebStorage as well as the T&D Thermo app, and automatic data upload function can be utilized. If you do not already have an WebStorage account, create one by tapping [Get a user ID] on the [Add Account] screen.
- When [T&D WebStorage Service] is set to OFF, the device will not be registered to T&D WebStorage Service. In this case, you can use Bluetooth or WLAN direct communication to collect data and store it in the device. If you wish to add devices to your T&D WebStorage Service account later, tap [+Add] in the lower right corner of the app home screen and then enter the serial number and registration code for the device, or log in to the T&D WebStorage Service from a web browser such as Safari or Chrome, and add devices from the [
 Devices] menu.
 - If you enter the serial number for a device that does not have Bluetooth function, [Bluetooth Connection] for the Target Entity will be hidden.
Collect Data and View Graph
You can only select one device at a time.
-
Select and tap the device in the list to open the Device Info screen.
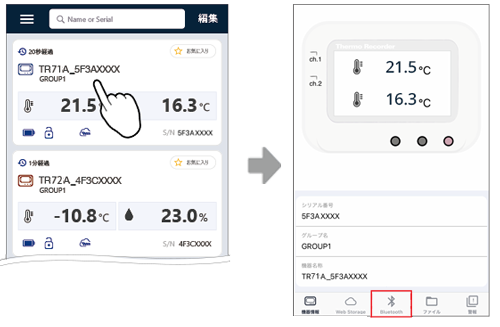
List Display and Device Info Screen -
Tap the [
 Bluetooth] to connect with the device.
 -
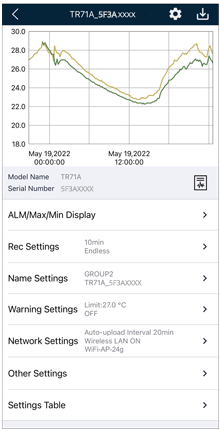
The app starts collecting data from the logger and plots a graph.
-
If necessary, proceed with Report Creation (
 ), Download(
 ), Device Settings.
For the TR7A, it is also possible to manually Reset the ALM Display and Max/Min Values on the device LCD.
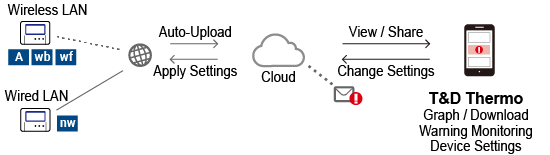
Accessing Cloud Storage (A/wb/nw/wf)
Compatible Products: TR7A/wb/nw/wf
You can access the cloud from this app to check recorded data and change settings.
Set up a T&D WebStorage Service Account
If you already have an account to which the devices are registered, you can configure it to be used with this app.
- The T&D WebStorage Service User ID cannot be reissued so please keep it in a safe place. If you lose your user ID, you will not be able to use the data stored in the T&D WebStorage Service.
- The data storage period varies depending on the recording interval of the logger. For details see T&D WebStorage Service Details and License Agreement.
-
Tap the Menu icon (
 ) - [App Settings] - [Account Management].
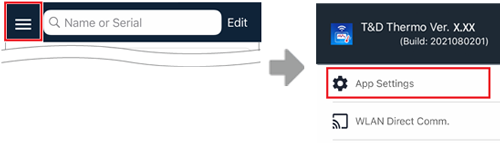
-
Enter the User ID and Password for account you wish to add, and tap [Apply].
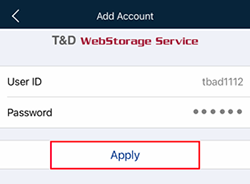
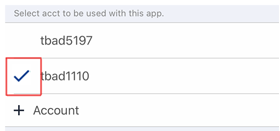
* Multiple accounts can be added and switched.
-
Click the back navigation icon (
) in the upper left corner of the screen to open a list of devices associated with the selected account.If the device has been set up for auto-upload and has started recording, the latest measurement readings and device status will be displayed when the app communicates with the T&D WebStorage Service.
- If data is not displayed in the device list, refer to the following and check the settings, etc. (See: FAQ - [Functions] - [I can’t view the recorded data that was auto-uploaded to T&D WebStorage Service, what should I do?])
- If you change your smartphone/tablet, it is necessary to perform registration of the devices and cloud account again.
- When you see a permission prompt as shown below, tap [OK] to allow Bluetooth access.
Access Data in the Cloud
-
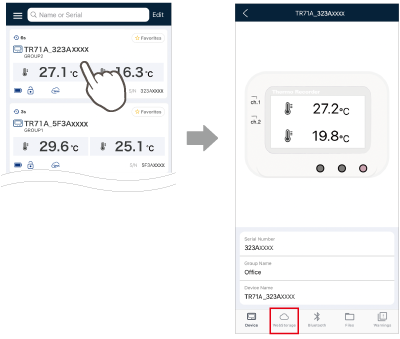
Select and tap the device in the list to open the Device Info screen.
-
Tap [
 WebStorage] to access your account and view the recorded data in graph.
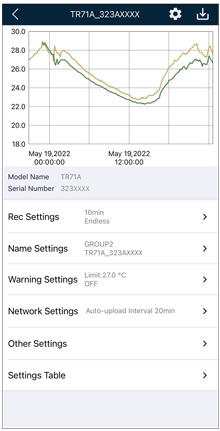
If necessary, proceed with Download(
), Device Settings.
- To view and analyze the recorded data in the cloud storage using a PC, please install T&D Graph, a graphing tool for Windows, to your PC.
Device Configuration and Data Collection via WLAN Direct Communication (wb/wf)
Compatible Products: TR-7wb/wf
T&D Thermo is also capable of direct communication via WLAN for logger configuration and data collection.
The data retrieved by the mobile device can be viewed in a graph, saved, output as a PDF report, and transferred to the cloud-based T&D WebStorage Service.
Each time you use this communication method, it is necessary to press buttons on the logger to activate Mode.
-
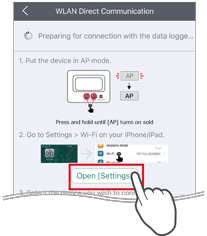
Put the device in AP mode.
To activate, press and hold down the DISPLAY and INTERVAL buttons until the AP mark turns on without blinking.
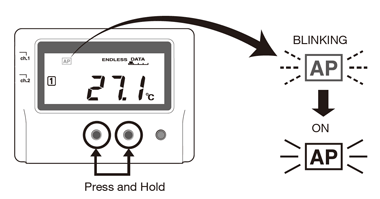
AP Mode will stay on for about two minutes. -
Tap
in the upper left corner of the List Display, and select [WLAN Direct Comm.] from the displayed menu.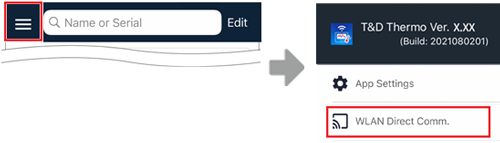
- iOS:
- In the Home screen open [
 Settings]-[Wi-Fi] and select the target logger (Model_Serial number).
(Tapping the [Open [Settings]] button will also take you to the Settings screen.) - Returning to T&D Thermo will start communication with the device.
If there is recorded data in the device, collection of that data will commence.
Screen image for iOS
Android OS:
The loggers in AP mode will appear in the list as shown below. Tap the device (Model_Serial number) to start communication.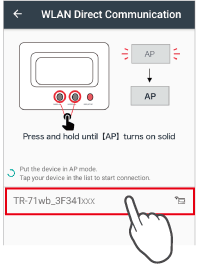
Screen image for Android - In the Home screen open [
-
The app will start collecting data from the logger and plot a graph.
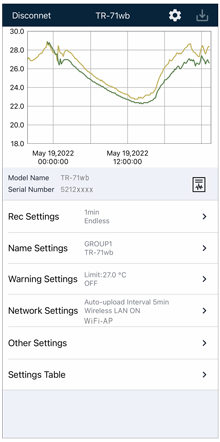
Graph and Settings Menu Screen -
If necessary, proceed with Report Creation (
), Download (), Device Settings. -
Tap [Disconnect] to go back to the home screen.
(The device will appear in the list.)